Introduction
In WebRatio 7 the deploy functionality has been improved and extended. In addition to the local deploy, you can now deploy your applications on the cloud.
This feature replaces the Deployment Plans and the Deployment Configurations available in WebRatio 6.
Compatibility with previous WebRatio projects (before WebRatio 7.0)
The Deployment Configuration and the Deployment Plan are replaced by the Deploy Configuration. Therefore the configuration and the deployment plan nodes existing in a project with WebRatio 6 will disappear and they will be merged into a deploy configuration, having as properties the ones specified in the Configuration node and as tasks the ones that were available in the Deployment Plan node.
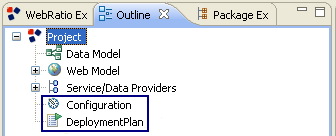
Configuration node and Deployment Plan node
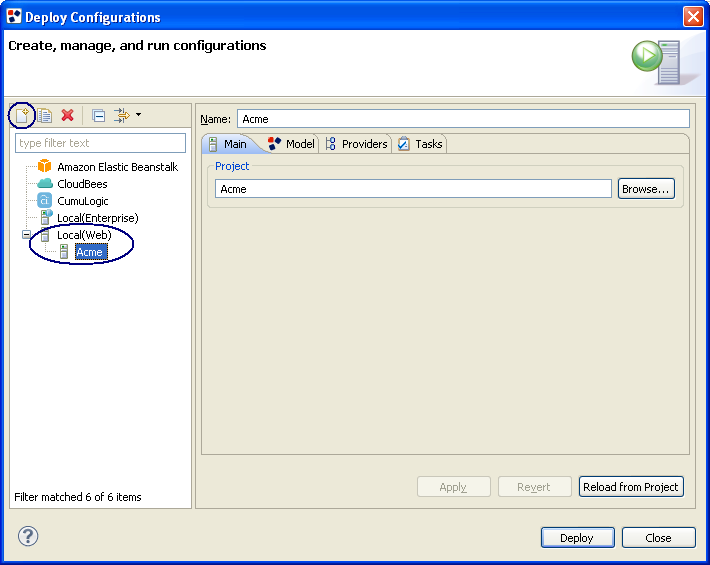
Deploy Configurations dialog
The deploy functionality is related to the process of installing your Web Application on a local/remote machine, or even in the cloud. The deploy is configured in WebRatio through the "Deploy Configurations" dialog which allows you to specify all the deploy settings (e.g. the application to deploy, the tasks to be executed during the deployment process,...). To open the "Deploy Configurations" dialog press on the "Deploy" icon in the toolbar, or alternatively right-click on the project node and choose "Deploy As" → "Deploy Configurations...".

Deploy Configurations icon
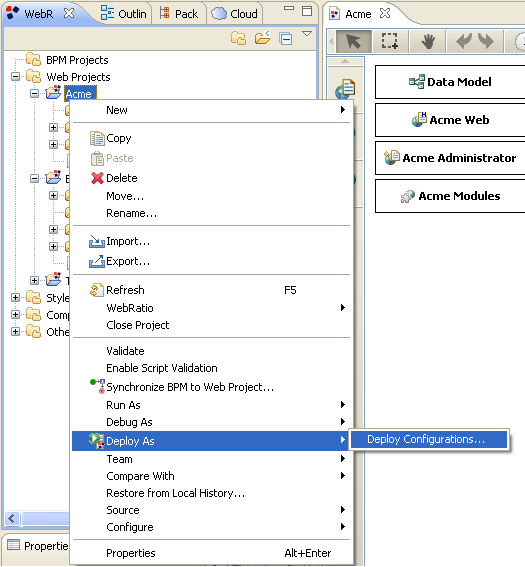
Deploy Configurations menu command
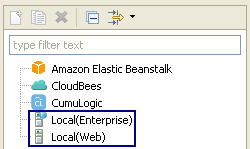
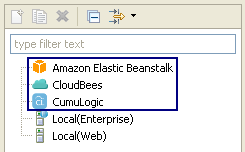
The available deploy configuration types are:
- Cloud (Amazon Elastic Beanstalk and Openshift are the supported cloud service providers).
- Local(Enterprise).
- Local(Web).
A Deploy Configuration is represented by a ".launch" file available in the Deploy folder of your Web Application. The double click on a ".launch" configuration file opens the "Deploy Configuration" dialog (preloaded with the previous settings) and allows its editing.
Local(Web) and Local(Enterprise)
Local deploy
The Local deploy (Web or Enterprise) allows you to deploy the application on a local/remote machine. The Local(Web) deploy refers to a traditional Web Application, while the Local(Enterprise) is about an Enterprise application.
To create a new configuration press on "New launch configuration" icon. The launch configuration is preloaded with the data about the opened project, taken from WebRatio Model properties; it can be customized with both the addition and the change of properties.
Local deploy
For each configuration the following options are available:
- Main: allows the choice of the project to deploy. A Web Application is usually deployed on Tomcat. In case of an Enterprise application you can specify the Application Server (e.g JBoss, IBM WebSphere).
- Model: the WebRatio Model properties.
- Providers: allows the configuration of the service/data providers (databases, SMTP Servers, Web Services, XSD Providers,...).
- Tasks: allows the choice of the tasks to be executed during the deployment process (the deployment plan). The default ones are the clearing of the deployment folder and the generation of the application.
The Local deploy fully generates the Web or the Enterprise Application and makes it available in the deploy folder of your machine.
The Local deployment configuration can be used as Current Deploy Configuration for the generation of the project. In this way the generation actions will generate the project on the base of the information specified in the Local configuration dialog, instead of the default information taken from WebRatio Model properties.
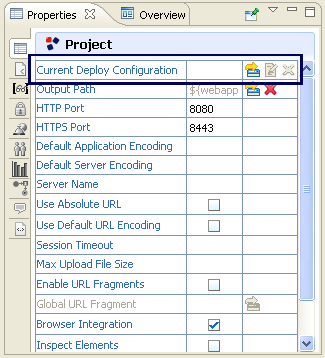
Current Deploy Configuration property
Cloud
Cloud deploy
The Cloud Deploy allows the deploy of an application in the cloud, by using the subscribed cloud services providers (AWS, CloudBees or CumuLogic). You need to create a new configuration for the chosen cloud service provider, in order to deploy your application in the cloud.
To create a new configuration select a Cloud Service Provider and press on "New launch configuration" icon.
Cloud deploy
For each configuration the following options are available:
- Main: allows the choice of the project to deploy, the cloud service provider account (e.g. CloudBees) and the Cloud Application. Pressing on "Service" link you can create a new cloud service and configure it (name, API key and secret key).
- Model: the WebRatio model properties.
- Providers: allows the configuration of the service/data providers (databases, SMTP Servers, Web Services, XSD Providers,...).
- Tasks: allows the choice of the tasks to be executed during the deployment process (the deployment plan). The default ones are the clearing of the deployment folder, the generation of the Web Application and the creation of the ".war" file to be uploaded to the Cloud Service Provider.
Cloud Service Providers
Amazon Web Services (AWS)
Amazon Web Services is a collection of remote computing services that together make up a cloud computing platform. The service is not free and you have to provide a valid credit card number during the registration phase, to be charged of service usage.
You can register at this page: http://aws.amazon.com → Sign Up

Amazon Web Services registration form
WebRatio AWS Cloud Deploy is based on the following Amazon Web Services:
- AWS Elastic Beanstalk: this Web Service allows the deployment and the management of applications in the AWS cloud. AWS Elastic Beanstalk handles the deployment details of capacity provisioning, load balancing, auto-scaling and application health monitoring. The service is based on other AWS services, such as Amazon EC2 (computational capacity service), Amazon S3 (storage service), Amazon Simple Notification Service, Elastic Load Balancing and Auto-Scaling.
- Amazon Relational Database Service (RDS): this Web Service offers relational databases in the cloud (MySQL or Oracle) together with scalability and replication capabilities.
The interaction with AWS from WebRatio depends on the AWS security credentials (Access Key ID and Secret Access Key), associated with your AWS account. Security credentials are used to authenticate requests to a service and identify yourself as the sender of a request. The security credentials can be read from your security credentials page at: http://aws.amazon.com/security-credentials
WebRatio Cloud Deploy Plugin
WebRatio Cloud Deploy plugin allows you to deploy an application in the cloud: the application will be available on the machines of a cloud service provider. This solution delegates the hardware management to a third-party provider and free you from all the possible problems related to hardware resources (failures, availability, scalability,...).
WebRatio supports the following cloud service providers:
- Amazon Web Services (AWS)
- CloudBees
- CumuLogic
The following paragraphs explain how to deploy an application in each Cloud Service Provider.
Step 1: Service subscription and keys generation
The preliminary step is the subscription for the cloud services and the generation of the keys (see Cloud Service Providers section).
Step 2: Service addition and configuration
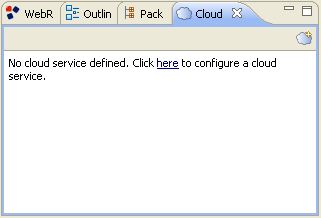
The Cloud Services functionality is accessible by opening the "Cloud Services" view (Window -> Show View -> Other... -> WebRatio Cloud Services). Alternatively, open the dropdown menu of the Deploy icon and choose "Open Cloud Services View".
Cloud Services view
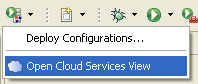
Open Cloud Services view
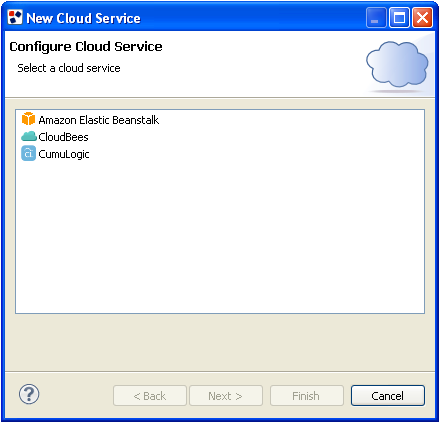
Click on the right-side icon (Add Cloud Service), or simply follow the link "here" in the text, in order to configure a new cloud service.
Cloud Service dialog
Cloud Service dialog
Select a Cloud Service and then configure it:
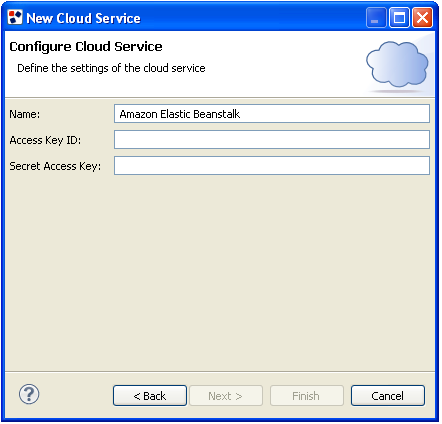
- Amazon Elastic BeanStalk:
- Name: the name of the cloud service.
- Access Key ID: the access key associated with your AWS account.
- Secret Access Key: the secret access key associated with your AWS account.
- CloudBees:
- Name: the name of the cloud service.
- API Key: the API key associated with your CloudBees account.
- Secret Key: the secret key associated with your CloudBees account.
- CumuLogic:
- Name: the name of the cloud service.
- API Key: the generated API key associated with your CumuLogic account.
- Secret Key: the generated secret key associated with your CumuLogic account.
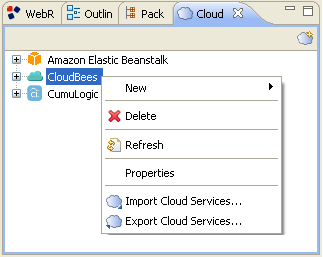
The Cloud Services view shows the created cloud services:
Cloud Services view
For each cloud service the following options are available:
- New → Cloud Service: opens the wizard that adds a new cloud service.
- Delete: deletes the cloud service.
- Refresh: refreshes the cloud service.
- Properties: opens a dialog that summarizes the cloud service settings (Name, API Key, Secret Key) and allows their editing.
- Import Cloud Services...: opens a dialog that imports a cloud services configuration file from the local file system. The dialog is also reachable by pressing File → Import... → WebRatio → Cloud Services.
- Export Cloud Services...: opens a dialog that exports an xml file with the configuration properties of your cloud service(s). The dialog is also reachable by pressing File → Export... → WebRatio → Cloud Services.
The Export Cloud Services and Import Cloud Services options allow respectively to save a cloud services configuration and open it in a new workspace, without the need to create and configure every time your cloud services.
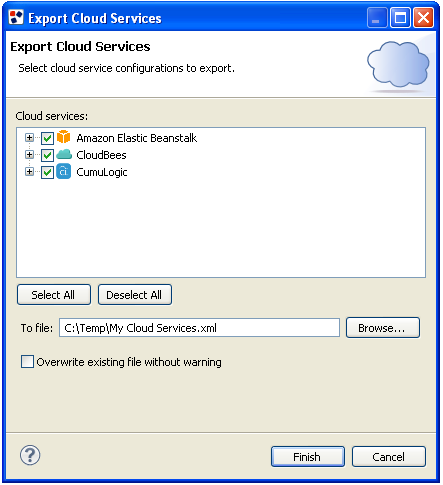
Export Cloud Services
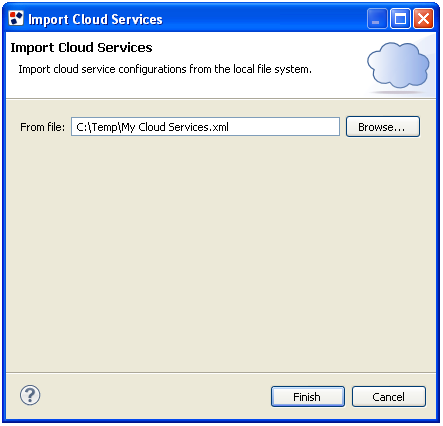
Import Cloud Services
Step 3: Web application creation
AWS
Amazon RDS
Amazon RDS - Launch a database instance (step 1)
Amazon RDS - Launch a database instance (step 2)

Amazon RDS - Launch a database instance (step 3)
Amazon RDS - Launch a database instance (step 4)
Amazon RDS - Launch a database instance (step 5)
The database details page shows the connection parameters:
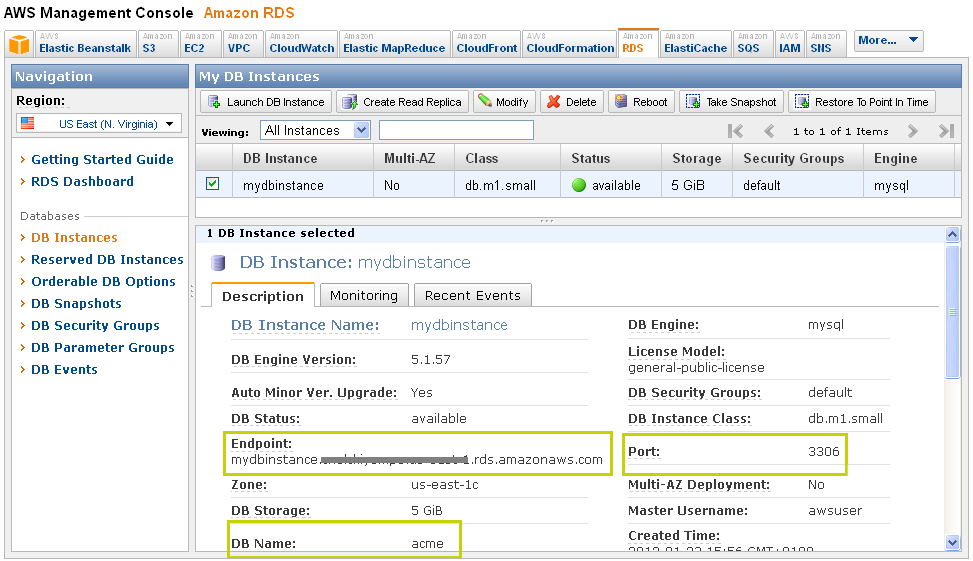
Amazon RDS - DB instance summary
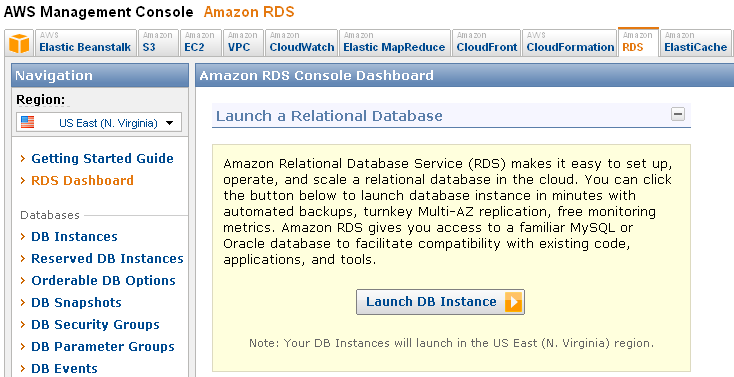
- Create the database in your AWS console. In order to accomplish this task:
- Login to your AWS console (http://aws.amazon.com/console/).
- After the login, choose the RDS (Relational Database) service and click "Launch DB Instance". A new wizard dialog appears and guides you in the creation of a new database.
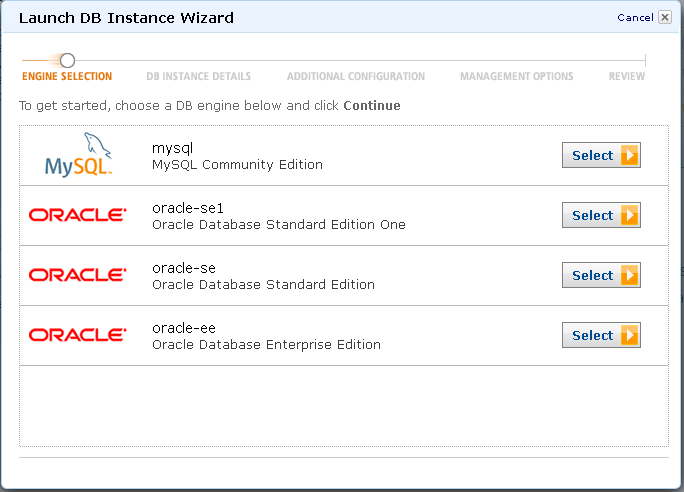
- Step 1 - Engine selection: Choose MySQL.
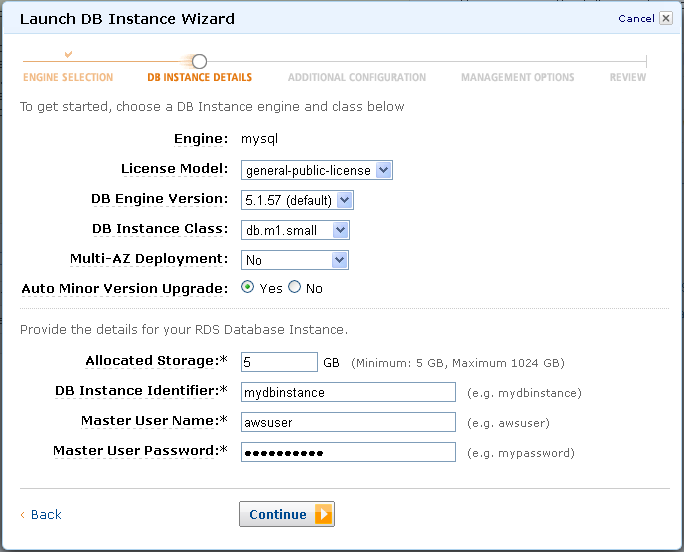
- Step 2 - DB Instance Details: specify the engine version, the instance database class, the storage size, the database instance identifier, the username and the password.
- Step 3 - Additional configuration: specify the database name (e.g. acme).
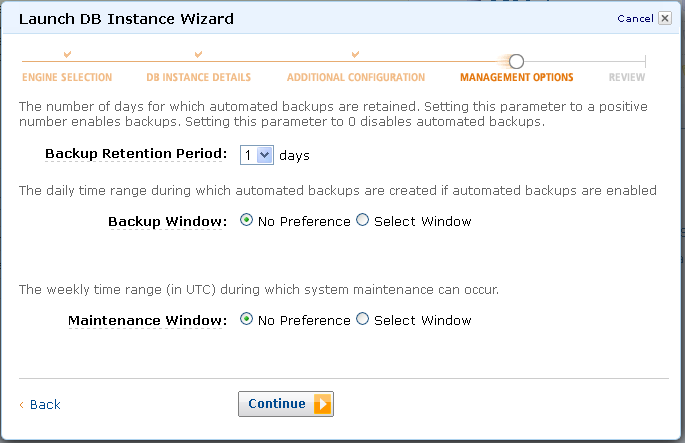
- Step 4 - Management options: accept the default options.
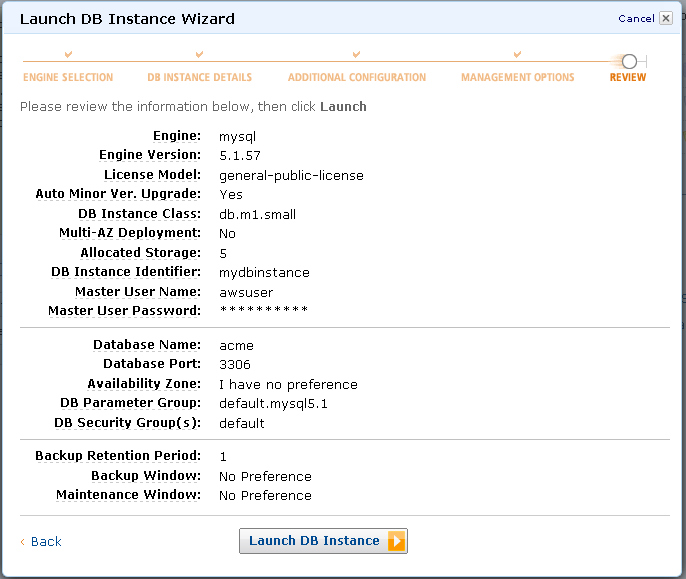
- Step 5 - Review: read the summary configuration and click "Launch DB Instance" to create a new database.
- Create a new WebRatio application (e.g. Acme) with the database. Configure the following database parameters:
- Type = MySQL
- URL = jdbc:mysql://<host>:<port>/<database>, where <host> is the RDS database endpoint (mydbinstance.<address>.rds.amazonaws.com), <port> is 3306 and <database> is the name of the database (e.g. acme)
- Username: the RDS database username
- Password: the RDS database password
Cloud Services view after the Web Application creation
The Cloud Services view shows a list of nodes, one for each configured Cloud Service. After the creation of the applications and the databases, you can expand the nodes and see the list of applications and the list of databases available in each cloud. For example:
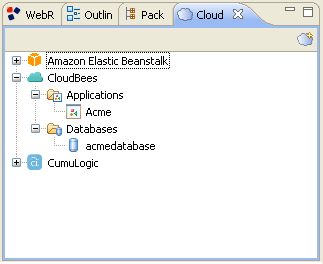
Cloud Services view - show database and application
Step 4: Cloud deploy
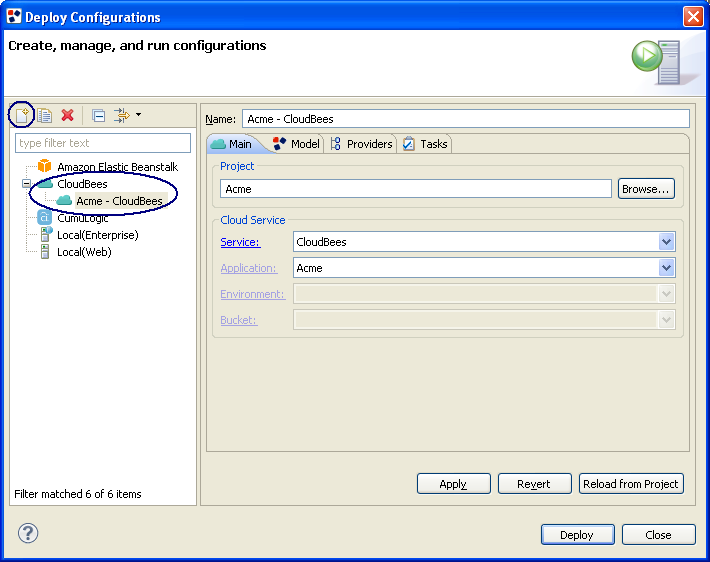
Open the Deploy Configurations dialog and create a new launch configuration for the chosen cloud service provider (e.g. CloudBees).

Deploy Configurations command
Cloud deploy
A simple configuration is:
- Main: specify the project name (e.g. Acme - CloudBees), the cloud service provider account (e.g. CloudBees) and the cloud application (e.g. Acme).
- Providers tab: choose the Cloud database and insert your password. Alternatively, set the database type (MySQL), the URL, the username and the password. In the last case:
- CloudBees: the jdbc parameters can be read in the page containing the database details (CloudBees Console: Services → Database → <Database name>)
- AWS: the jdbc parameters are available in the page containing the database details (AWS Console: RDS → 1 DB Instances → <Instance name>)
- CumuLogic: the database parameters are not exposed.
Click "Apply" to save your configuration.
To deploy the application, press on "Deploy" button in the Deployment Configuration dialog, or right click on the project node → Deploy As → choose one of the saved deployment configurations.
Step 5: Application access
At the end of the deploy process, the application will be available in the cloud. Open the browser and type the url of the application to interact with it.
The application url can be read from the service provider console:
- CloudBees: Services → Applications → Application name page (Location).
- AWS: Elastic Beanstalk → <Application name> → Environment Details (URL).
- CumuLogic: Managed Applications → Dashboard → Application Details.
Example of deployed application:

Example of a Web application deployed on CloudBees