Introduction
The deploy process of a Web application is the final step of the application’s development. In a structured company, the Web application must pass different tests before going to production. Usually companies have three different environments in which the Web application must be deployed and tested:
- Test Environment. Developers test the Web application to find bugs and fix them.
- Quality Assurance Environment. Some real users test the Web application.
- Production Environment. The Web application is deployed in the final environment where it will be used.
Each environment has a specific server and a specific configuration that the Web application must accommodate to work properly. Every time the Web application must be deployed in a different environment, all the configuration options must be changed because the environment in which you have to deploy is different from that of your local machine.
WebRatio Platform helps you package your Web application by letting you create a set of Deploy Configurations that can be used at any time. It allows you to create the deploy package with a single click.
You can refer to the "Best practice for the deploy process" section in this article, to see which properties to consider depending on the type of environment.
How to Create a Deploy Configuration
Use the Deploy Configuration to save time during the deploy phase. The idea is to centralize all the configuration options you need to change when moving from your local machine to an external server so that, once you create the Deploy Configuration for the first time, you can reuse it and save time.
You can create several Deploy Configurations for the same Web Project. Usually you will create a Deploy Configuration for each environment in which you need to install the Web application.
You can create a new Deploy Configuration on through the following steps.
- Press the Deploy button in the toolbar and choose the Deploy Configurations… option.
- In the "Deploy Configurations" dialog, right-click on the "Local(Web)" deploy configuration and select the New option.
The configuration is preloaded with the configuration set on the current project, using the information stored in the Web Project. You can customize all the properties as you prefer.
Once the Deploy Configuration is created, it is possible to specify every configuration property using the sections in the tabs. The Deploy Configuration dialog is composed of several tabs, and each is dedicated to a particular set of configuration properties.
The tabs are the following:
- Main
- Model
- Providers
- Tasks
Each tab is composed of several sections allowing you to select the precise aspects you may need to configure for your project deployment. Refer to the following sections to learn more about all the available properties in the "Deploy Configuration" dialog.
The dialog contains several configuration properties. You do not need to change all of them when creating a new Deploy Configuration. The following sections point out the properties you will properly need to change to meet the environment's characteristics.
The "Main" tab
In the "Main" tab, you can select which Web Project you want to deploy. It is strongly suggested that you enable the Validate project dependencies prior to executing property. This property assures you that the Web Project is correctly generated through the use of all the other referred projects (e.g., BPM, Style, Components) according to the settings defined in the "Dependencies" section of your Web Project.
The "Model" tab
In the "Model" tab, you can overwrite all the Web Project configurations set during application development. This tab contains all the configurations you can make on the project level. This tab has several sections since you can specify many options in the Web Project. Let's have a look at the main properties that you need to set when creating a Deploy Configuration for your Web Project.
"General" section
Usually, the properties that you may need to change to adapt the application package to the deploy environment are the following:
- HTTP Port. This is the port number on which the Application Server (e.g., Tomcat, JBoss and so on) listens for new requests.
- HTTPS Port. This is the port number on which the Application Server listens for secure requests.
- Browser Integration. It is strongly suggested that you disable this property.
"Authentication & Access" section
It is strongly suggested that you disable the Enable Admin Area property. This option lets you generate a private section of the Web application, which is accessible by users with special credentials.
This private section allows you to manage the protected modules of the Web application. This can be useful during the application development, but during the deployment, it is better to create an SQL file containing the code for adding the protected module into the corresponding table, thereby avoiding the need to have this private section.
"Security" section
In this tab, you can configure properties to obtain a more secure Web application.
Since Web application security is an important aspect, these properties are usually set and tested during application development. Configuring these properties in different ways during the application development and deployment phase is not a standard procedure.
The "Providers" tab
Here you can configure the information about all the providers that the Web application uses. The following are the provider categories:
- Databases
- SMTP Servers
- Web Services
- XSD
- Other
Usually, the configurations of these providers are different for each deploy environment, so it is important to know the information necessary for configuring everything properly according to the desired target environment.
Databases
The main information to know is whether the connection to the database is handled by the Web application itself or if it is demanded by the Application Server.
The main properties that need to be updated to connect the Web application to the database in the target environment are URL (“host” and “port”), Username, Password, and Default Schema (if it exists).

SMTP Servers
You need to configure the SMTP Server when you use the mail operation in the Web Project to send an email. In this tab, you can set all the properties regarding the provider. The properties to change are usually: URL, Use SSL, Username, Password, Default From.
Web Service Providers
In this panel, you can set all the properties regarding the Web Services Providers defined in the Web Project. You need to change the URI or File property when the WSDL or WADL is different.
XSD Providers
In this panel, you can set all the properties regarding the XSD Providers and the corresponding XSD Resources defined in the Web Project. You need to change the URI or File property when the WSDL or WADL is different.
The "Tasks" tab
This tab allows you to change the package generated by WebRatio Platform to customize and obtain the final Web application package.
The view is organized in two sections:
- On the left, you can add tasks to the Deploy Configuration.
- On the right, you can configure a specific task when required.
By default, the Deploy Configuration includes two predefined tasks:
- Clear Deployment Folder.
- Generate Web Application.

These are the minimum tasks required to obtain the Web application package.
WebRatio Platform lets you customize the Deploy Configuration by selecting the task you desire from the available list.
A new task can be added to this list in the following way:
- Press the Add button.
- Select one of the available tasks in the opening dialog.
- Press the OK button to confirm your choice.
The selected task will be shown in the list. You can delete a task from the list, by selecting it and then pressing the Remove button.
It is possible to change the order of the tasks in the list by using the Up and Down buttons.
Suggested Tasks List
The following list of tasks represents the best choices for most Web applications:
- Clear Deployment Folder
- Generate Web Application
- Copy Additional Folders
- Delete Hibernate Java Sources
- JAR Descriptor Folder
- WAR
Refer to the dedicated sections for more information about each task.
Launching a Deploy Configuration
Once you have the desired configuration, you should do the following:
- Press the Deploy button to execute the current Deploy Configuration.
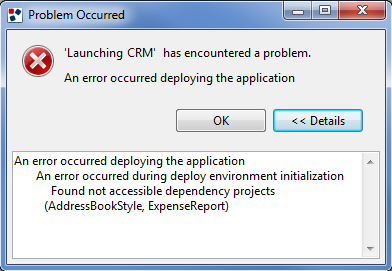
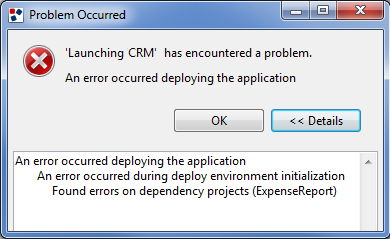
- When you execute the Deploy Configuration, the execution stops and an error dialog is shown in the case of problems in the project dependencies. See the complete error message by pressing the Details button.
Basically, you can have two types of errors:
- Found not accessible dependency projects. Next to this message, you will see the full list of the projects that are not accessible.
In this case, the listed projects in the “Dependencies” section of the Web Project could be unavailable in your workspace or they could be closed. The error message contains the list of all the referred to projects in which the problem is occurs.
- Found errors on dependency projects. Next to this message, you will see the full list of the projects having some problems.
Check the Problems View to find the errors and solve them. In the case of problems in a Components Project or Java Project, the error is related to a wrong line of code in a Java class. In the case of problems in a BPMN Project, the error is related to incorrect modeling of the business process.
Best practices for the deploy
It is good practice to perform tests locally or on a test server before deploying a Web application in a production environment. You must reproduce the production environment characteristics to anticipate problems due to different settings.
For example, you need:
- Use the same version of the Application Server as the one that will be deployed in the final Web application (e.g., Tomcat 7).
- Use the same version of Java as the one that the Application Server used (e.g., JDK 1.7.0_51).
- The database engine should be the same (e.g., use a JNDI configuration or the correct connector for the database).
Appendix - Available Tasks
Ant
The "Ant" task runs Ant on the provided Build File containing the list of instruction to be executed.
The Build File can be provided by pressing the … button next to the Build File property in the "Properties" section.

Clear Deployment Folder
Wipes out the deployment folder addressed by the Output Path property.
The Output Path property is specified in the "Project" node in the "General" tab of the Properties View and, the Deploy Configuration in the "Model" section can override.

If the Output Path is unspecified, the ${deploy_loc}/${project_name} is cleared instead.
It is possible to set or change the value of the deploy location by setting the "deploy_loc" variable in the Preferences section:
- Select Window > Preferences from the main menu.
- Expand the WebRatio item and select the Variables item, in the opening dialog. The list of all the defined variables defined in WebRatio Platform will be displayed in the main area.
- Select the "deploy_loc" variable and press the Edit Variable… button.
- Update the value for the selected variable, in the opening dialog.
- Press the OK button.
Copy Additional Folder
This task allows you to copy a list of chosen folders in the root of the application according to the specified order.
This task can be used every time you want to overwrite a configuration file of the Web application. For example, it can be useful in setting the log configuration or adding additional files.
For more about how to change the Log configuration, please refer to the "Analyze Error Logs" online lesson.
It is also possible to change a set of runtime configurations that are defined in the "RTXConfig.properties" file. This file defines the information regarding the runtime of the deployed Web application.
You can add a folder to the Deploy Configuration by following these steps:
- Select Copy Additional Folders from the Task list and move to the "Properties" section.
- Press the Add button.
- Choose the desired folder, in the opening dialog.
- Press the OK button.
The selected folder will be displayed in the "Properties" section. It is important to remember that folders must be contained in the Web Project to be selectable.
It is also possible to change the order of the added folders by using the Up and Down buttons.

Copy Local WebApp
This task allows you to create a copy of the deployed Web application in the ${deploy_loc}/${project_name} folder.

Delete Hibernate Java Sources
Deletes the Hibernate *.java source files from the generated application.
This task allows you to remove useless files, such as all the Java files related to the Hibernate classes.
Using this task is recommended since the Web application will use only the compiled ones. In addition, removing the source files can also save disk space on the deploy server because the number of files increases as the Domain Model complexity increases.

Execute SQL
This task allows the user to execute a script file on a selected database.

This task has the following available properties:
- SQL script file (mandatory). In this property, set the script file that you want to execute.
- Database. You can ensure it works properly by setting the database in which the script file will be executed.
- Statement Separator. This property allows you to execute multiple statements, by setting the string that separates them in the SQL file.
- Enable SQL Transaction. This property permits the user to enclose all SQL statements in a single transaction (please note that transactions do not usually support the DDL statements such as DROP, CREATE TABLE, and so on).
Generate Web Application
This task fully generates the Web Project into the output folder.
If the output path is unspecified, the ${deploy_loc}/${project_name} is used instead. As explained in the "Clear Deployment Folder" section, you can change the "deploy_loc" variable in the Preferences settings.
It is strongly suggested that you enable the Stop plan execution on generation errors property to ensure that you obtain a package for a working Web application. If this property is enabled and an error is found during the generation, then the Deploy Configuration will stop its execution and an error dialog will be shown to the user. The error message is shown below:
"Errors occurred generating the project …".
You can solve the issue by generating the project without the Deploy Configuration and solving all the generation errors you get before launching the deployment another time.

JAR Descriptor Folder
Replaces the descriptor folder with a single JAR file and stores it in the generated application library folder.
The descriptor folder is a directory inside the Web application folder in which all XML files related to the View Components and Operations are stored. Those files contain user’s configuration of the components inside the WebRatio Platform, and the Web application uses them to compute the content to show it to the user or to accomplish an operation. Since you have one file for each component used in the Web Project, the descriptor folder can contain many files and occupy a lot of space in terms of disk size. Using the JAR task, you can obtain a single file with a lower size. Moreover, in this way, the files contained in the JAR cannot be easily modified after the Web application deploys.

Synchronize Database
This task automatically synchronizes the selected runtime databases with their local definitions.
It can also synchronize custom tables and view definitions if the local and runtime databases are both MySQL databases.
You can make it work properly, by setting the Database property by pressing the … button and choosing a database from the list of the available ones defined in the Web Project.

WAR
Packages the application into a Web application archive (WAR) file and stores it in the output folder. If the output path is unspecified, the ${deploy_loc} is used instead. A WAR file can be auto-extracted by all application servers, so it is the best solution if you have to move the Web application package from your local hard drive to the deploy server.

This task has two available properties:
- Filename. This property contains the name used for the WAR file that will be created. By default, the Web Project name is also contained in the "project_name" variable.
- Delete Deployment Folder. If checked, this property allows you to remove the referred to deployment folder after the creation of the WAR file.
Usually, it is recommended that you not change these default settings unless you specifically need to do so.