Introduction
In a Web Application, feedback messages are used to notify the user about the result of a business logic execution.
Feedback messages vary depending on message types, which can be: success, information, warning, or error.
The WebRatio Model
In WebRatio, you can model feedback messages with the Message View Component. You can configure this component in two ways.
- Static Message: this is the easiest way to show a notification message, specifying on the Message View Component the complete message to be displayed.
- Dynamic Message: with the use of several “Placeholder” elements, it’s possible to build a message containing dynamic information.
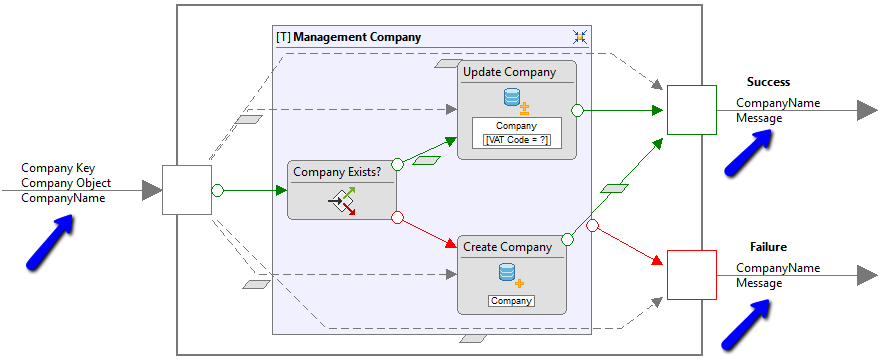
The proposed example is to enhance the model so that a feedback message is shown to the user every time he saves a new company, or updates or deletes an existing company.
The final IFML model in both cases is the following:
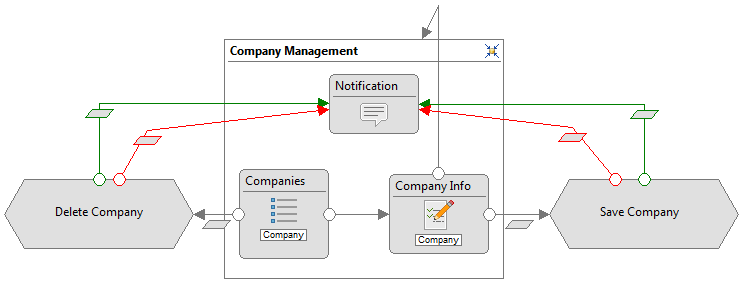
Basically, what you need to do is to add a Message View Component to the “Company Management” page. Then all OK and KO Flows outgoing from the actions must have the Message component as the target. Let’s see now how to change the action definitions model in order to get a static or a dynamic message.
Static Feedback Message
The following figure shows how the static feedback message appears in the Web application:

The message to be displayed is configured inside the two action definitions "Save Company" and "Delete Company”.
This is the final model of the “Save Company” Action Definition:
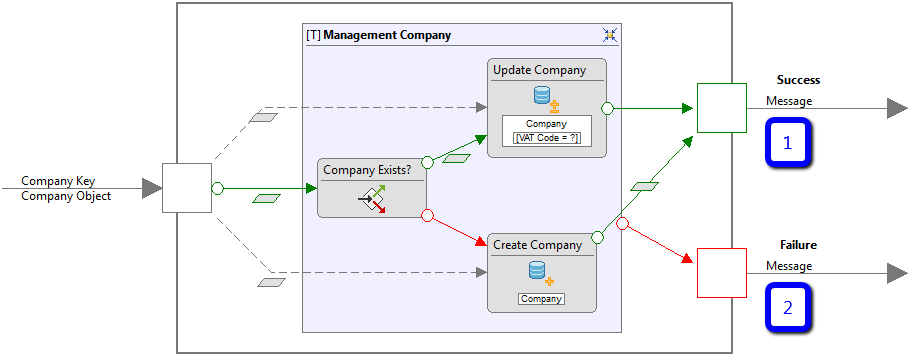
Starting from the basic model you have to:
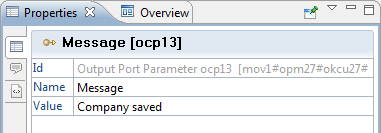
- Add an Output Parameter named “Message” to the OK Port.
- In the Properties View of the parameter, set the value to “Company saved”.
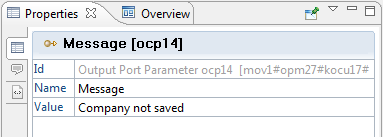
- Add an Output Parameter named “Message” to the KO Port.
- In the Properties View of the parameter, set the value to “Company not saved”.
This is the model of the “Delete Company” Action Definition:
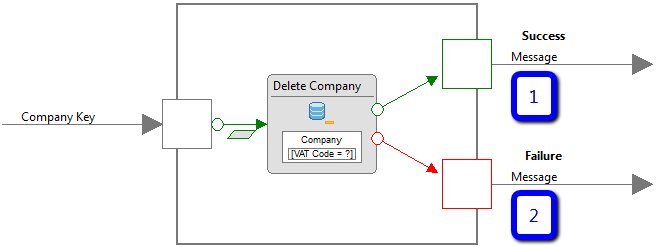
Starting from the basic model you have to:
- Add an Output Parameter named “Message” to the OK Port.
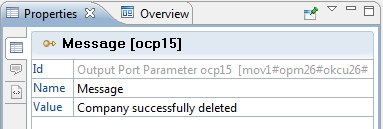
- In the Properties View of the parameter, set the value to “Company successfully deleted”.
- Add an Output Parameter named “Message” to the OK Port.
- In the Properties View of the parameter, set the value to “Company not deleted”.

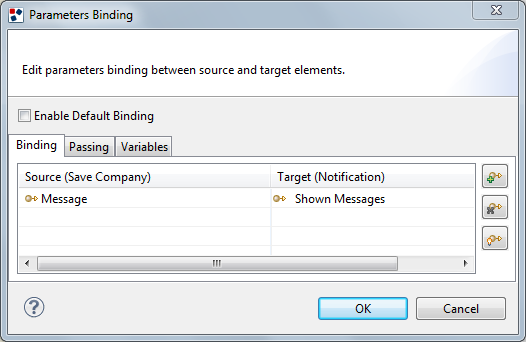
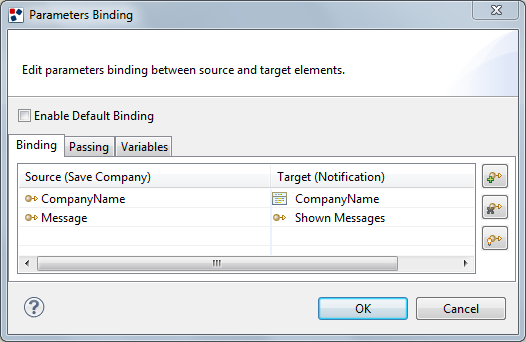
In the IFML model, the OK and KO Flows outgoing by the actions “Save Company” and “Delete Company”, bind the “Message” parameter to the “Show Message" parameter of the Message View Component. Refer to the following image.
Dynamic Feedback Message
The message returned by the Message View Component can be improved so that it contains information about the changed object. For example, let’s suppose that in the message we want to include the name of the Company on which the operation was performed. The following image is an example of what we would get:

To obtain this result we need to change the IFML model, adding a placeholder to the Message View Component as follows:
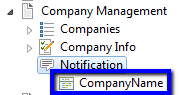
- Right-click on the Message Component and select “Add” and then the “Placeholder” option.
- Move to the Properties View and name it “CompanyName”.
The placeholders can be used to compose the dynamic message. What you need to do is to write the message with the placeholders. Just remember to enclose the name of each placeholder in $$ characters; in this case, $$CompanyName$$. This means that the placeholder will be replaced with its computed value at runtime.
Each placeholder also becomes an Input Parameter of the Message View Component, which can be bound with an Output Parameter of a source component, corresponding to the value to associate with the placeholder.
Let’s see how to change the model of the action definitions in order to use a dynamic message.
In the “Save Company” action definition:
1. Add an additional parameter to the OK port named “CompanyName”.
2. Select the Message parameter of the OK Port and move to the Properties View.
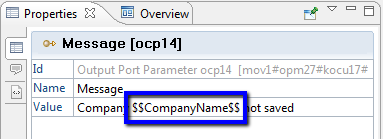
3. Write “Company $$CompanyName$$ saved” in the “Value” property.

4. Add an additional parameter to the KO port named “CompanyName”.
5. Select the Message parameter of the KO Port and move to the Properties View.
6. Write “Company $$CompanyName$$ not saved” in the “Value” property.
7. Add an additional parameter to the Input Port named “CompanyName”.
8. Draw a Data Flow connecting the Input Port with the OK Port.
9. Double-click on the Data Flow and bind the CompanyName Input Port Parameter with the CompanyName.
10. Draw a Data Flow connecting the Input Port with the KO Port.
11. Double click on the Data Flow and bind the CompanyName Input Port Parameter with the CompanyName.
Finally, you need to go back into the IFML model and make a change. The OK and KO flows outgoing by the action “Save Company” must bind the information as shown in the following image:
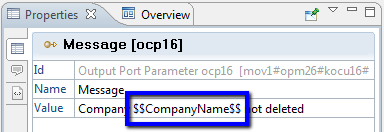
In the “Delete Company” action definition:
1. Add an additional parameter to the OK port named “CompanyName”.
2. Select the Message parameter of the OK Port and move to the Properties View.
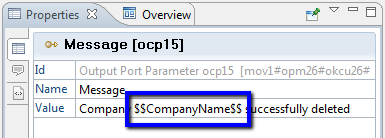
3. Write “Company $$CompanyName$$ successfully delete” in the “Value” property.
4. Add an additional parameter to the KO port named “CompanyName”.
5. Select the Message parameter of the KO Port and move to the Properties View.
6. Write “Company $$CompanyName$$ not deleted” in the “Value” property.
12. Add an additional parameter to the Input Port named “CompanyName”.
13. Draw a Data Flow connecting the Input Port with the OK Port.
14. Double-click on the Data Flow and bind the CompanyName Input Port Parameter with the CompanyName.
15. Draw a Data Flow connecting the Input Port with the KO Port.
16. Double-click on the Data Flow and bind the CompanyName Input Port Parameter with the CompanyName.
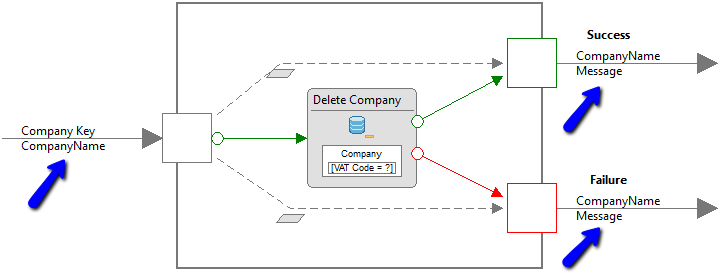
Finally, you need to go back into the IFML model and make a change. The OK and KO flows outgoing by the action “Delete Company” must bind the information as shown in the following image:
Static Message on the Message Component
Do you want to use a static message without passing the message on the Binding?
You can save the structure of the message directly in the Message View Component. To do this, select the element in the Outline View. In the Properties View there are two properties “Message File” and “Message Text”.
- “Message File”: you can attach a file that contains the message text, useful in case of multiple components sharing the same text.
- “Message Text”: write the message to be displayed.
Do you want to see the message with different colors?
You can use the “Notification Message” template for the Message Component which displays the message using different colors, depending on the notification type: error, info, success, warning. You can download it from the WebRatio Store.