Introduction
This tutorial will explain step by step how to create a simple Business Process Model. First the process to be modeled is introduced and explained, then you'll see how to realize it with WebRatio.
The Computer Repair Process
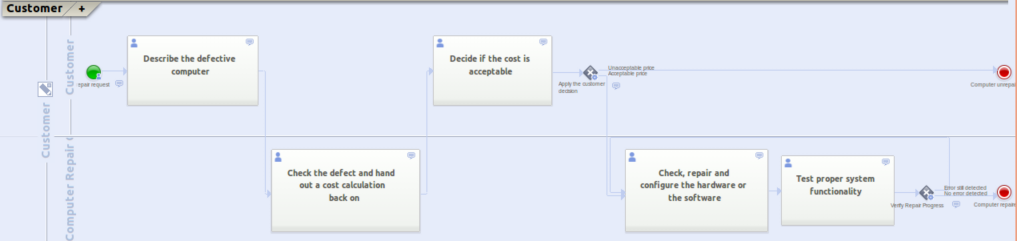
The process of Computer Repair starts when any customer of the computer repair company having a defective computer submits a repair request, once the requirement is registered, the request is received by an operator of the company who checks the defect and hands out a cost calculation back that the customer must next decide whether he accepts it or not. If the offer is rejected the customer gets back his defective computer and the process ends. If the offer is approved the computer repair company can check, repair and test the computer while new errors are detected. The process ends when the computer is finally repaired.
Step 1: Define the process
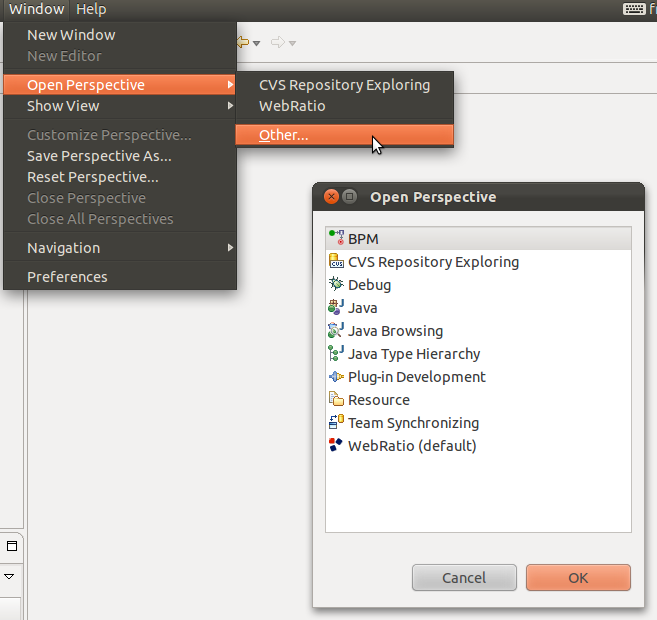
According to the BPMN notation, the first step is to define the process and the actors the cooperate in it. After this step it's necessary to define the tasks accomplished by each actor in the process. If you're not in the BPM perspective, select Window > Open Perspective > BPM from the main menu.
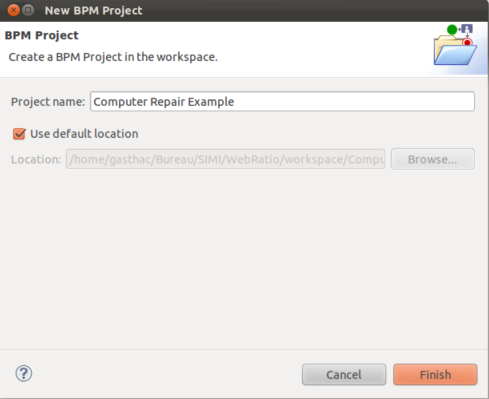
1. Let's create a new Project. This project will contain all the process models we would like to cooperate. In the Main Menu:
- Click on File > New > BPM Project.
- Enter "Computer Repair Example" as project name and click Finish.
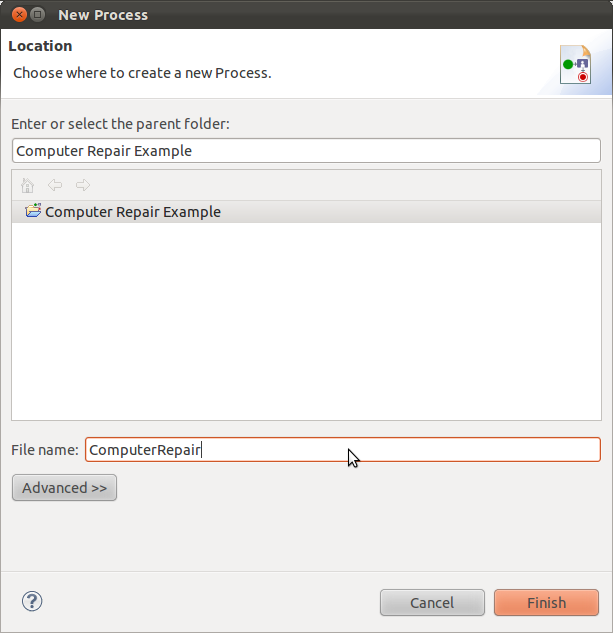
2. Now it's possible to create a new Process Model within the Project. In the BPM Explorer View:
- Right click on the project and select New > Process.
- Enter "Computer Repair" (avoiding spaces) as process name.
- Press Finish.
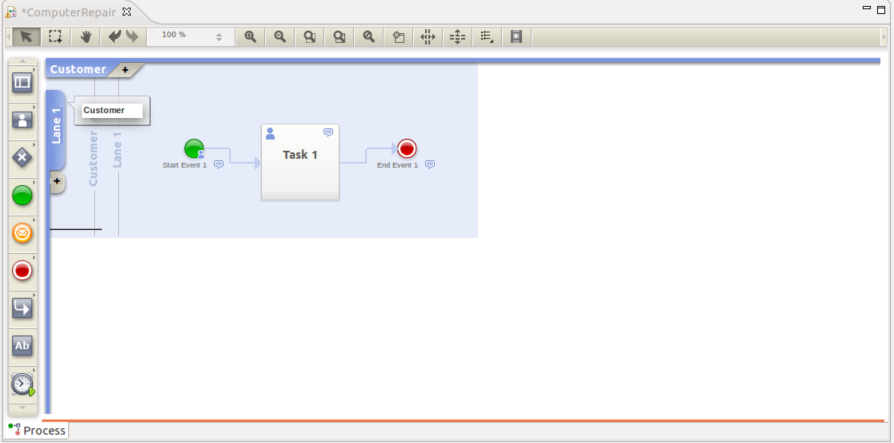
3. In the Process Model created you will define the representation of the process of the Computer Repair using the BPMN.By default every new Process Model is created with a Pool already defined. We have to change it's name according to our process:
- Double-click on the Pool tab "Pool 1" at the top of the edit area.
- Enter "Computer Repair" as Pool name.

4. The Pool is already created with a Lane within. It's necessary to change the name to the first Lane and add the second Lane of the process. To change the Lane name:
- Double-click on the Lane tab "Lane 1" at the left of the edit area.
- Enter "Customer" as Lane name.
according to our process we have to create an other "Computer Repair Company" Lane. To add the other Lanes:
- Right click within the Pool and select Add Lane.
- Enter the name of the Lane.
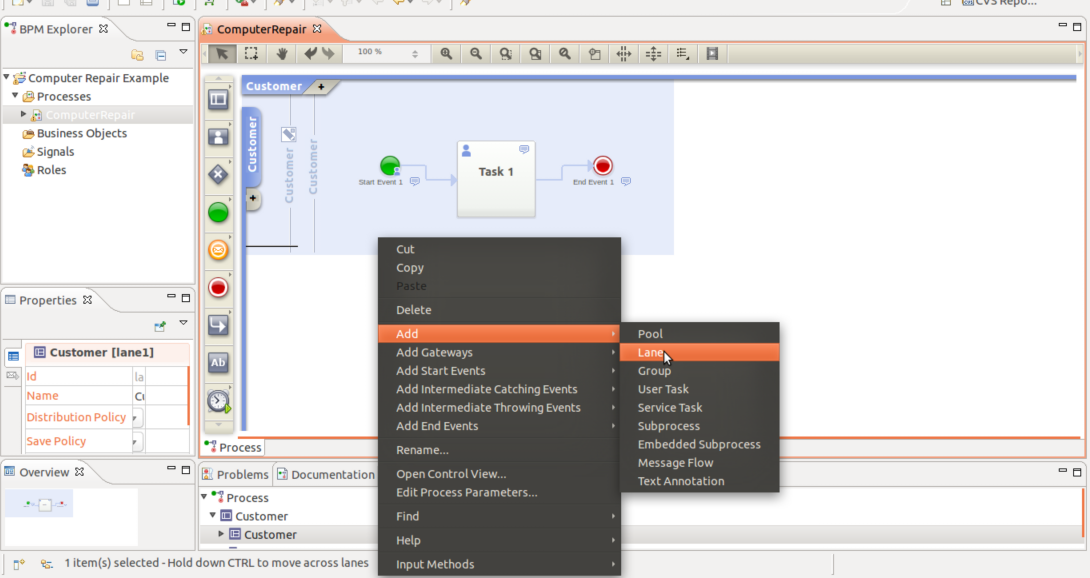
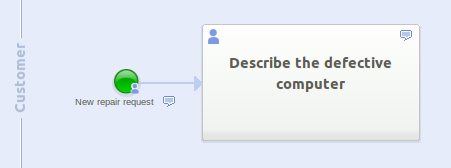
5. Now it's possible to define the single steps of the process in the Lanes, assigning each task to the right actor. Within the first Lane a simple process has been already created. Since the process is started by the Customer we can leave the Start Event in the Customer Lane and change the name of the first Task:
- Double-click on the Task element.
- Enter "Describe the defective computer" as Task name.
Since the Start Event represents the first item activated by the Customer to start the Process, it's necessary to change it's name:
- Double-click on the Start Event element.
- Enter "New repair request" as Task name.
Finally, since the process doesn't ends here, it's necessary to delete the End Event automatically created.
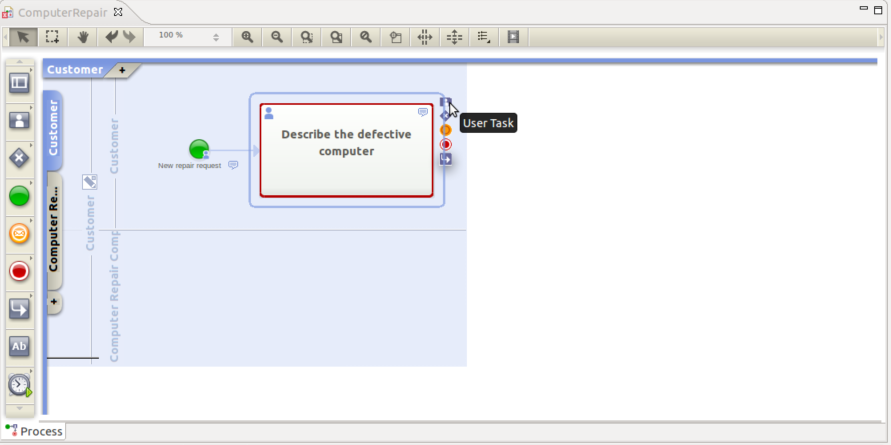
6. The following step consists in checking the defect and handing out a cost calculation back on , which is executed by an operator of the repair company. Let's add the corresponding Task:
- Click on the "Describe the defective computer" Task.
- In the Pie Menu on the Task, click on the User Task icon.
- Drag the new User Task in the Computer Repair Company Lane.
- Enter "Check the defect and hand out a cost calculation back on" as Task name.
7. The customer must then decide whether he considers the price acceptable or not.
- Click on the "Check the defect and hand out a cost calculation back on" Task.
- In the Pie Menu on the Task, click on the User Task icon.
- Drag the new User Task in the Customer Lane.
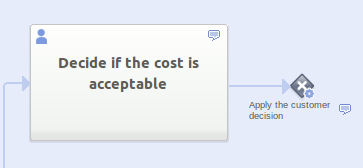
- Enter "Decide if the cost is acceptable" as Task name.

8. Basing on the response of the customer, we will define a different path to be followed whether the price is accepted or not, therefore we will use a Gateway element. To add a Gateway connected to the "Decide if the cost is acceptable" Task:
- Click on the "Decide if the cost is acceptable" Task.
- In the Pie Menu on the Task, click on the Exclusive Gateway icon.
- Drag the new Gateway in the Customer Lane.
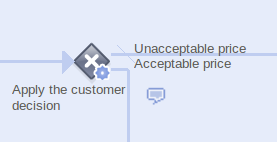
- Enter "Apply the customer decision" as Gateway name.
- In the Properties panel, in the Execution Property, select "Service" (since this element must be executed by the application).
9. Once the Gateway has been placed, it's necessary to place the Flow Connectors representing the paths selected basing on the condition to be evaluated by the Gateway. Since this Gateway will evaluate the result of the execution of the "Decide if the cost is acceptable" Task, it's necessary to add two Flow Connectors: one in case the price is accepted and one in case the company offer is rejected. The former will activate a new User Task for the repair of his computer, the latter will lead directly to the end of the process since the customer gets back his defective computer.
Let's add the Flow Connector for the case in which the price is accepted, we will simultaneously create the next Task for the Computer Repair Company:
- Click on the "Apply the customer decision" Gateway element.
- In the Pie Menu on the Gateway, click on the User Task icon.
- Drag the new User Task in the Computer Repair Company Lane.
- Enter "Check, repair and configure the hardware or the software" as Task name.
- Double-click on the newly created Flow Connector.
- Enter "Acceptable price" as Flow Connector name.

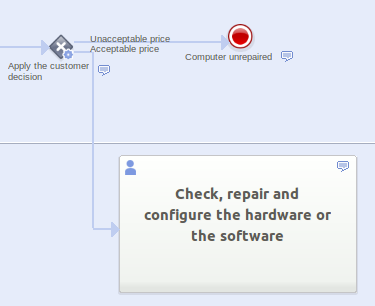
Let's add the Flow Connector for the case in which the customer refuses the offer:
- Click on the "Apply the customer decision" Gateway element.
- In the Pie Menu on the Gateway, click on the End Event icon.
- Drag the new End Event in the Customer Lane.
- Enter "Computer unrepaired" as End Event name.
- Double-click on the newly created Flow Connector.
- Enter "Unacceptable price" as Flow Connector name.
- In the Flow Connector Properties Panel check the Default Property (stating that this is the Connector followed by default).
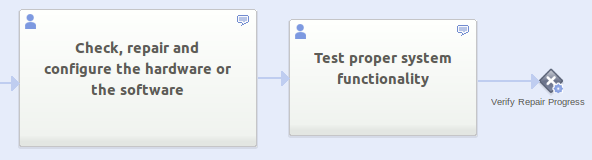
10. After each repair attemps, the computer repair company operator must test the proper functionnality of the system. The result of this test will define a path if any error is still detected and a path if no error is detected:
- Click on the "Check, repair and configure the hardware or the software" Task.
- In the Pie Menu on the Task, click on the User Task icon.
- Drag the new User Task in the Computer Repair Company Lane.
- Enter "Test proper system functionality" as Task name.
- Click on the newly created Task.
- In the Pie Menu on the Task, click on the Exclusive Gateway icon.
- Enter "Verify Repair Progress" as Gateway name.
- In the Properties panel, in the Execution Property, select "Service" (since this element must be executed by the application).
11. Once the Gateway has been placed, it's necessary to add the destination of the Flow Connectors. If any error is still detected the repair must carry on, else the computer is repaired and the process ends.
Let's define the case in which any error is still detected:
- Click on the "Verify Computer Progress" Gateway.
- In the Pie Menu on the Gateway, click on the Flow Connector icon.
- Drag the Flow Connector to the "Check, repair and configure the hardware or the software" Task.
- Enter "Error still detected" as Flow Connector name.
- In the Flow Connector Properties Panel check the Default Property (stating that this is the Connector followed by default).
Let's define the case in which no error is detected:
- Click on the "Verify Computer Progress" Gateway.
- In the Pie Menu on the Gateway, click on the End Event icon.
- Drag the new End Event in the Computer Repair Company Lane.
- Enter "Computer repaired" as End Event name.
- Double-click on the newly created Flow Connector.
- Enter "No error detected" as Flow Connector name.
Step 2: Process Data
Once the steps of the process have been entirely defined we can focus on the definition of the parameters of the process.
Here we will define the internal structure of every parameter, if it's a simple parameter or a complex one (in this case we will create a Business Object).
In this phase we will also define which process parameters are managed by every single Element in the process (Task, Event, Gateway).
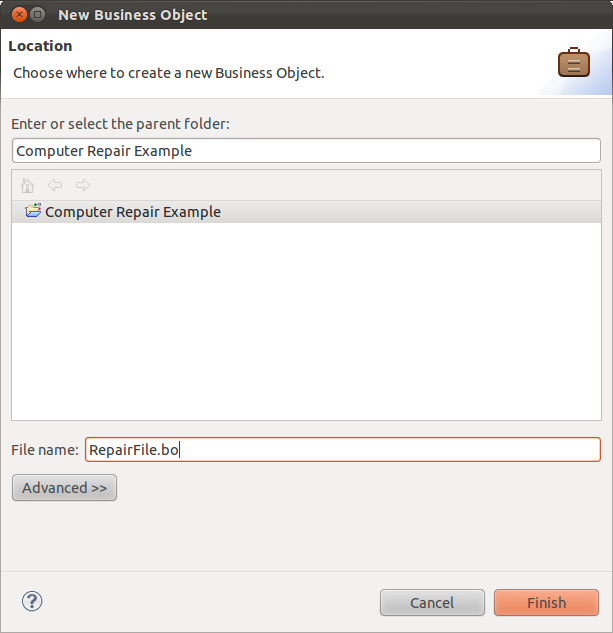
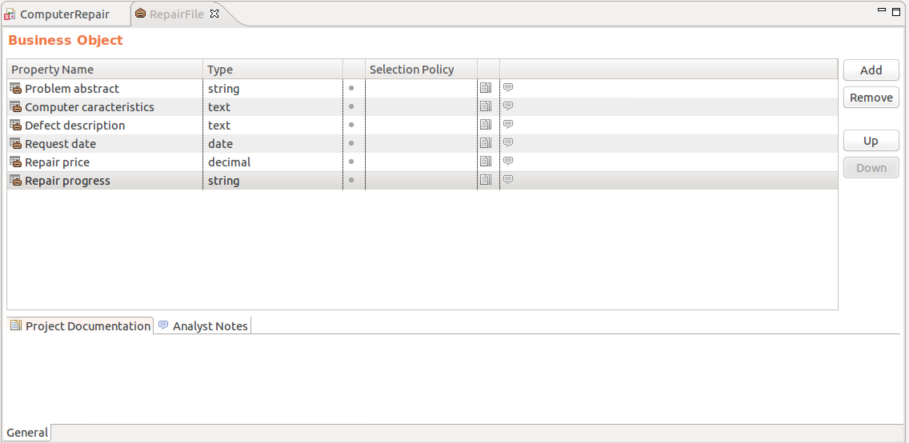
The first process parameter to define is the repair file parameter. The repair file is composed by multiple properties such as the computer type and caracteristics, the description of the defect, the request date, the repair price.... Since the repair file is a complex parameter we must define a Business Object:
- In the BPM Explorer view, right-click on the Business Objects project element.
- Select New -> Business Object.
- Enter "RepairFile.bo" as Business Object name.
In the "RepairFile" Business Object window, we will insert all the properties that define a computer file:
- Problem abstract: contains a short description of the repair needed.
- Computer caracteristics: contains the defective computer caracteristics.
- Defect description: contains the description of the computer defect.
- Request date: contains the date of the request.
- Repair price: contains the price of the repair.
- Repair progress: contains the date of the request (''In progress'' or ''Finished'').
Let's add all the properties to the Repair File Business Object. In the Repair File Business Object window, for every property:
- Press on the "Add" button.
- In the "Property Name" field enter the name of the property.
- In the "type" field select the type of the property.
as an example:
- Click on the "Add" button
- In the "Property Name" field enter "Request Date".
- In the "type" field select"date".
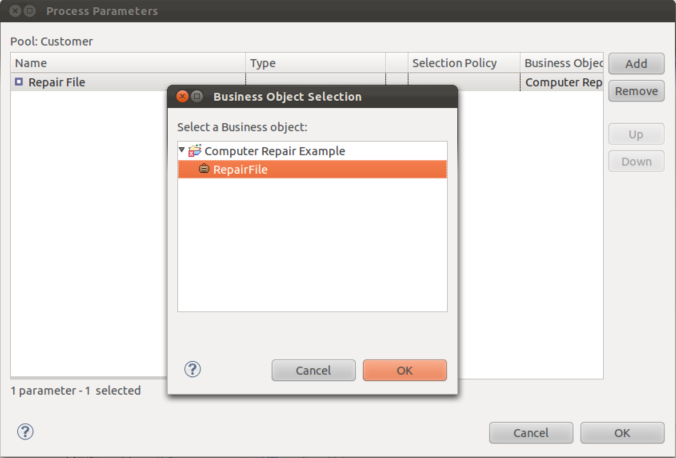
Once the Repair File Business Object has been defined, it's possible to use it as process parameter:
- Click on the Edit Process Parameters icon next to the Pool name.
- In the Edit Process Parameters window press on the "Add" button.
- Enter "Repair File" as parameter name.
- Click on the Business Object icon.
- Select the Repair File Business Object.
Now it's possible to state that during the "Describe the defective computer" Task, the Customer must edit the Repair File parameter:
- Click on the "Describe the defective computer" Task.
- In the properties panel select the Problem abstract, Computer caracteristics, Defect description and Request date properties of the Repair File parameter.
- Check the properties Visible, Editable, Required.

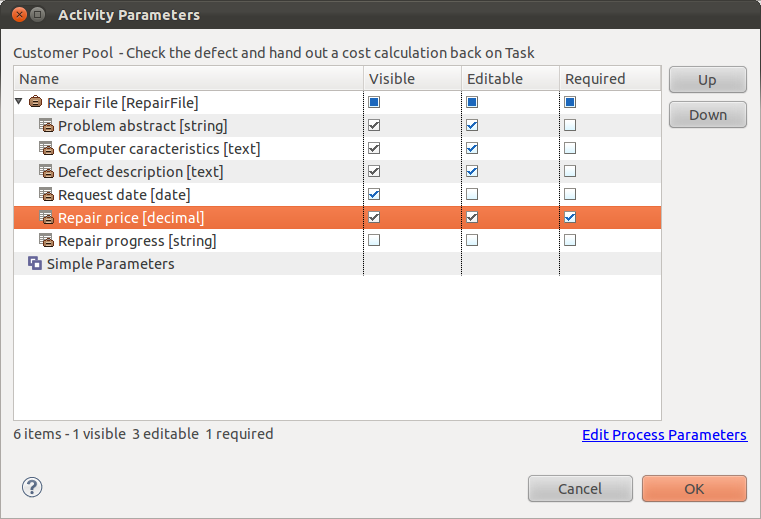
To ''check the defect and hand out a cost calculation back'', the Computer Repair Company Operator need the previous description that he may complete and he must complete the Repair Price property of the Repair File parameter
- Click on the "Check the defect and hand out a cost calculation back" Task.
- In the properties panel select the appropriate properties of the Computer File parameter.
- Check the properties Visible or Editable or Required.
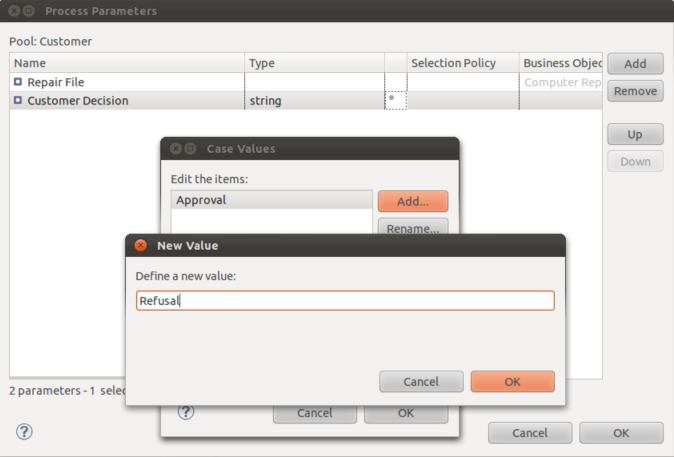
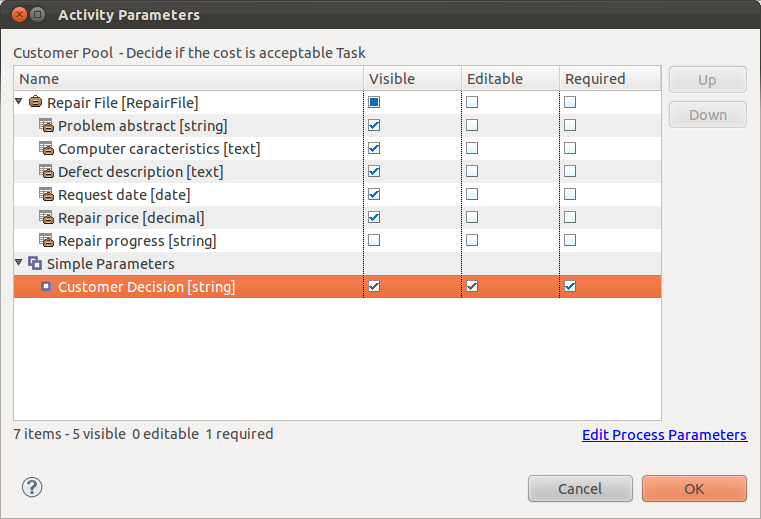
In the "Decide if the cost is acceptable" task, the Customer will decide whether to accept or not the price of the repair. In the Task, the Computer File will be Visible. It's necessary to add a new parameter, to represent the decision of the Customer:
- Right-click on the pool.
- Select Edit Process Parameter.
- In the Edit Process Parameter windows press the "Add" button.
- Insert "Customer decision" as parameter name.
- Insert string as parameter type.
This parameter is particular since we want the Supervisor to choose only among these two values: "Approval" or "Refusal".
In order to define statically the available parameter values:
- Click on the gray dot next to the type field.
- In the Case Values Editing window press the "Add" button.
- Insert "Approval" as value.
- Again, press the "Add" button.
- Insert "Refusal" as value.
To decide if the cost is acceptable, the customer only needs the previous parameters as Visible and the newly created Customer Decision parameter as Required
- In the same way, complete the "Decide if the cost is acceptable" Task parameters.
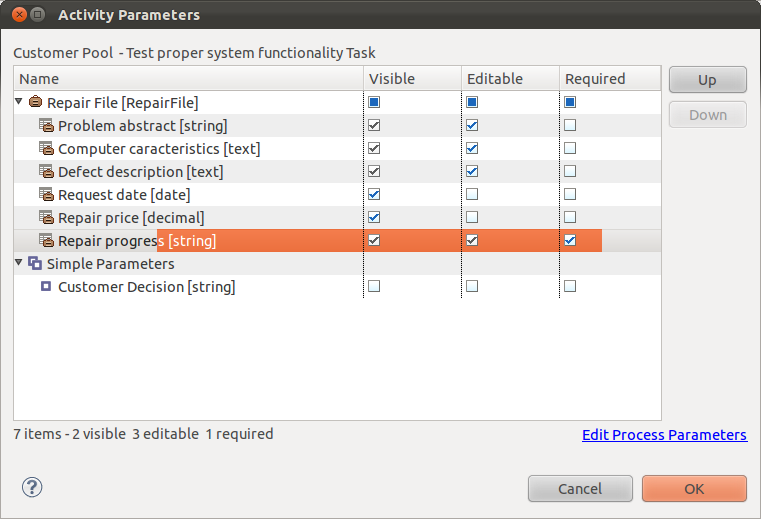
During the two last User Tasks corresponding to the repair, the company's operator needs the whole parameters as Visible, the Defect description parameter as Editable and the Repair progress parameter as Required.
Step 3: Business Rule
Once all the process parameters has been defined, it's possible to define the Business Rules. In this step we will define the behaviour of the process' Gateways defining the conditions for the proceeding of the process.
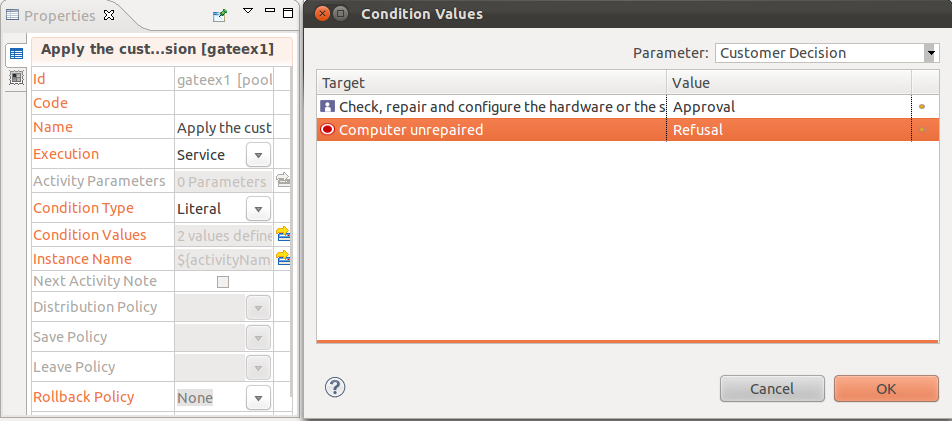
The "Apply the customer decision" Gateway will automatically evaluate the result of the "Decide if the cost is acceptable" User Task execution. If the repair request is confirmed it will lead to the Repair Tasks, else it will return to the "Computer unrepaired" End Event.
Let's configure this Gateway:
- Click on the "Apply the customer decision" Gateway.
- iIn the Properties Panel, in the Condition Type Property, choose Literal (since we want the Gateway to evaluate the value contained in the Customer Decision Process Parameter).
- In the Properties Panel, in the Condition Value Property, press the "Browse" button.
- Select the Customer Decision Process Parameter in the Parameter field.
- Select the Approval case value for the Flow Connector that leads to the "Check, repair and configure the hardware or the software" Task.
- Select the Refusal case value for the Flow Connector that leads to the "Computer unrepaired" End Event.
In the same way, it's necessary to configure the second Gateway that evaluates the result of the "Test proper system functionality":
- Click on the "Verify Repair Progress" Gateway.
- In the Properties Panel, in the Condition Type Property, choose Literal (since we want the Gateway to evaluate the value contained in the Repair Progress Process Parameter).
- In the Properties Panel, in the Condition Value Property, press the "Browse" button.
- Select the Repair Progress Process Parameter in the Parameter field.
- Select the In progress case value for the Flow Connector that leads to the "Check, repair and configure the hardware or the software" Task.
- Select the Finished case value for the Flow Connector that leads to the "Computer repaired" End Event.
Step 4: Business Process Users
By defining the Process Lanes we are defining all the actor categories of a process. With the Roles we are defining the Group of users that will use the Process. A Role might correspond to several Lanes in the same Process or in different Processes (e.g.: a user belonging to the Computer Repair Company Operator Role might act as Computer Repair Company Operator in a Computer Repair Process instance, but he might start a Computer Repair Process himself, or he might act as Customer in a Computer Repair Process Instance). The Roles are defined within a BPM Project (since the Roles are shared in all the Process Models contained in the BPM Project).
In this project we are creating three Roles: Customer and Computer Repair Company Operator:
- Customer: is related to the Customer Lane in the Computer Repair Process Model.
- Computer Repair Company Operator: is related to the Computer Repair Company and Customer Lanes (since a Computer Repair Company Operator user might ask for a repair himself).
To add the user Roles to the Project, in the BPM Explorer window double click on the "Roles" node, or right-click on this node, than on Open With -->Roles Editor.
Once the Roles configuration panel has been shown it's possible to create the Roles:
- Press on the "Add" button.
- Insert the Role name.

Now we can associate the newly created Roles to the Computer Repair Process Model Lanes:
- In the Process Model click on the Customer Lane.
- In the Properties panel, click on the Roles Property Select Roles button.
- Choose the Customer and the Computer Repair Company Operator Roles.
It's possible to repeat this steps to associate the Computer Repair Company Operator Role to the Computer Repair Company Lane.
Step 5: Publish the Process
Now we have completely defined the process. It's possible to validate the process model by activating the Publish Process functionality.

This functionality will automatically create a Java Web Application that supports the process modeled and permits to verify the model correctness browsing it.