Introduction
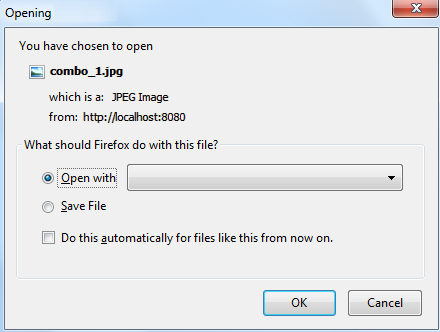
If you want to show a dialog for the download of the blob data (file) you can consider the Content Disposition feature that is used to force the "SaveAs" dialog for the browsers.
Using the Content Disposition features lets you open dialog like the one shown below when the user opens a dowload link from your
Configuration
To model the download of contents using the Content Disposition your Web application you need at least two pages, one with the item's description that is also the source of the download link and another one that allows to open the "SaveAs" dialog (hereinafter referred as Dialog Page).
From a Layout point of view, the Dialog Page is not a common Web page, as it requires a particular template applied; the same goes for the content of the Dialog Page.
Dialog Page Template
The Dialog Page Template is reported below and only defines a Custom Location called DocumentFile in which will be placed the real content to be downloaded.
#?delimiters [%, %], [%=, %]
[%setHTMLOutput()%]
<wr:Page type="HTML4_Transitional"/>
<wr:Resources types="jspdeclaration"/>
<%@ page contentType="text/html; charset=UTF-8"%>
<webratio:Page page="<wr:Id context="page"/>"/>
<wr:CustomLocation name="DocumentFile"/>
Remember to apply the template to the Dialog Page and set the Cell Layout property to <Undefined> and the Frame Layout property to None in the Properties View.
Dialog Content Template
The Content of the Dialog Page must be placed in the DocumentFile custom location of the Dialog Page.
The Dialog Content Template is made of the following lines of code, and must be applied to the Component used to represent the Content of the Dialog Page (tipically a Details Component).
#?delimiters [%, %], [%=, %]
[%
setHTMLOutput()
def file = unit.selectSingleNode("layout:Attribute")
%]
<c:set var="file" value="${<wr:UnitId/>.data.[%=getFieldName(file)%]}"/>
<c:set var="fileName" value="${<wr:UnitId/>.data.[%=getFieldName(file)%].name}"/>
<c:set var="fileExt" value="${<wr:UnitId/>.data.[%=getFieldName(file)%].extension}"/>
<%  response.setHeader("Content-Disposition", "attachment; filename=\"" + (pageContext.getAttribute("fileName").toString()) + "\"");
    String fileType = (String)pageContext.getAttribute("fileExt");
    if (fileType.trim().equalsIgnoreCase("txt")) {
        response.setContentType( "text/plain" );
    } else if (fileType.trim().equalsIgnoreCase("doc")) {
        response.setContentType( "application/msword" );
    } else if (fileType.trim().equalsIgnoreCase("xls")) {
        response.setContentType( "application/vnd.ms-excel" );
    } else if (fileType.trim().equalsIgnoreCase("pdf")) {
        response.setContentType( "application/pdf" );
    } else {
        response.setContentType( "application/octet-stream" );
    }
    java.io.OutputStream outStream = response.getOutputStream();
    com.webratio.rtx.RTXManager manager = (com.webratio.rtx.RTXManager) application.getAttribute("com.webratio.struts.RTX");
    String uploadPath = manager.getWorkDirectory();
    java.io.File f=new java.io.File(uploadPath + pageContext.getAttribute("file").toString());
    byte[] buf = new byte[8192];
    java.io.FileInputStream inStream = new java.io.FileInputStream(f);
    int sizeRead = 0;
    while ((sizeRead = inStream.read(buf, 0, buf.length)) > 0) {
        outStream.write(buf, 0, sizeRead);
       }
       inStream.close();
       outStream.close();
%>
The role of this template is to:
- Retrieve the blob data from the Details Component
- Set the Content Type header filed related to the MIME type
- Set the Content Disposition
- Return the bytes stream of the file to the response
Example
This section shows a working example of this feature. You will find the Web Project modeled in this section attached to this article.
Introduction
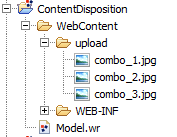
The content of the dialog for this example is a set of JPG images.
These files are located in the WebContent/upload folder of the project.
Since, as you will see, the products are stored in an application-volatile entity, there will be a Job used to fill the entity with data. This is not mandatory; for example the Product entity could be mapped on a database.
Domain Model
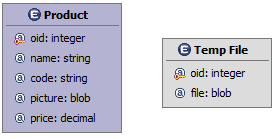
The Domain Model consists of two Entities: Product and File Temp.
The Product application volatile entity describes a product and has the picture blob attribute that will be the content downloaded by the user. The persistency can be any; for a matter of example here is set to be application volatile.
The File Temp session volatile entity is used to temporary store and manage a generic file. The content of the Dialog will arrive from here. It is a session volatile entity since data is written only when the user requests a file; hence there is no reason to make it persistent.
IFML, Actions and Modules Model
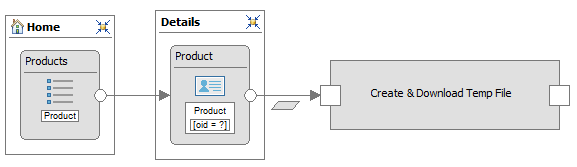
This is the IFML Model of the Site View for this example. You have a Master & Details for the Product entity and a normal navigation flow that starts from the Product Details and leads to a Hybrid Module called "Create & Download Temp File". This module is the piece of model that shows the Dialog Page when the user clicks on the "Download Picture" button from the Product Details.
The combined usage of the Hybrid Module and the Volatile Entity Temp File is tactical since in this way you can reproduce this feature anytime that you need in your model, abstracting from the kind of content you want to download.
Let's see the inner structure of the Hybrid Module.
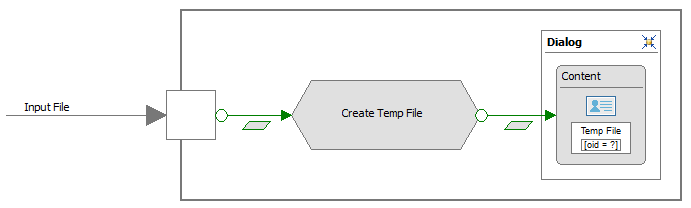
The Hybrid Module receives as Input Parameter the Input File which is in our example the Product's picture. This blob data is passed to an Action Definition called "Create Temp File" that creates the volatile Temp File and gives it back to the Dialog Page.
The Dialog Page must have the Dialog Page Template applied with all the required layout settings and the Content Details Component must be placed into the DocumentFile custom location.
The Content Details Component must show only the blob attribute of the Temp File entity.
Let's see now the inner structure of the "Create Temp File" Action Definition.
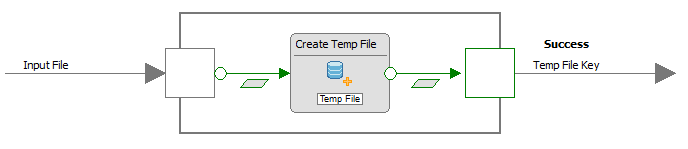
The Input File Input Parameter is passed to the Create Operation that writes the content of the Temp File and then the Action Definition returns the primary key of the Temp File, in order to be shown into the Content Details Component.
Final result
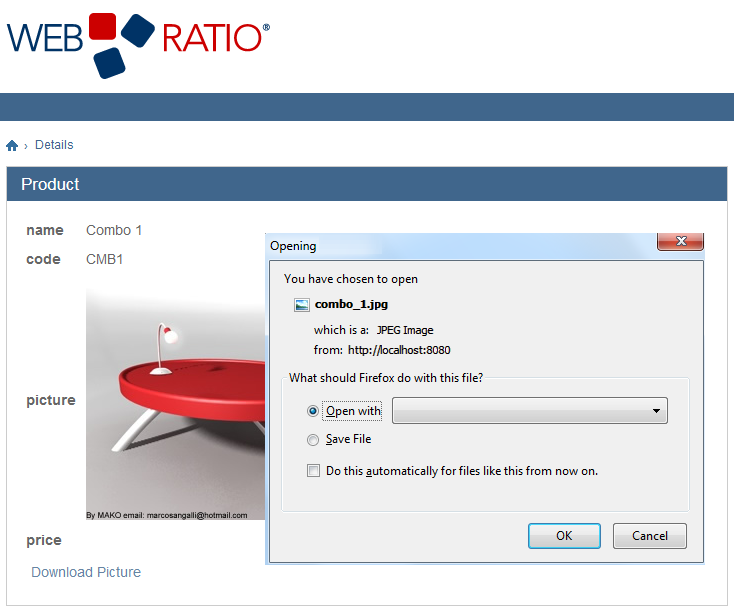
Use the Generate and Run command to launch the Web application.
From the Details page of the product the user can click on the Download Picture button to open the Download Dialog for the image, as shown in picture below.