WebRatio Store is a place where you can search for items (projects, styles, templates, units) and use them in your applications, or even publish a new item and share it with all WebRatio Store users.
WebRatio Store is accessible through the "WebRatio Store" icon located in the main toolbar, or the Help menu (Help --> WebRatio Store).

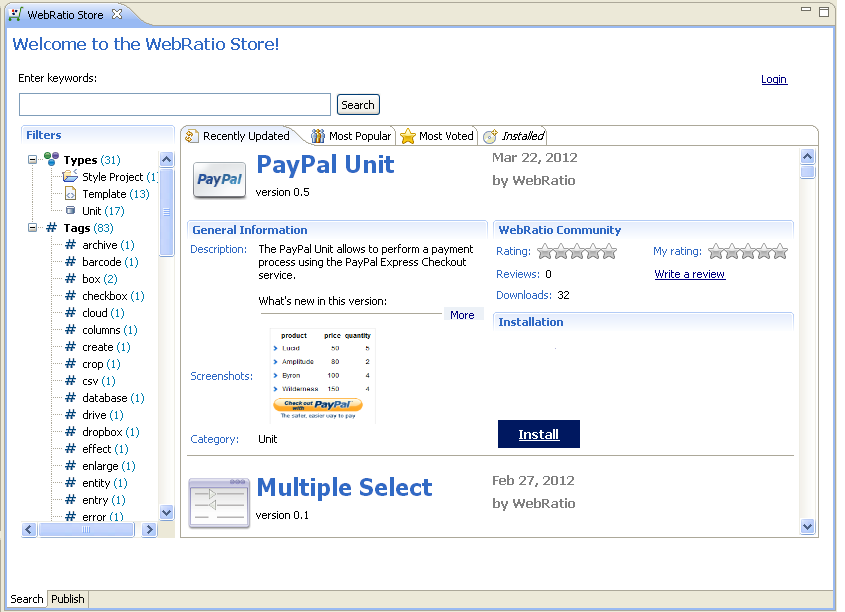
WebRatio Store appears with a graphical interface, showing all the available components. The search box allows to quickly find a component, which satisfies specific keywords, while the filters are useful for refining the result set or for searching for components on the base of tags and types.
The store components can be visualized according to the updating date (default), or by popularity or by number of downloads.
The store components are be grouped into the following categories:
- Web and BPM projects
- Style projects
- Templates
- Units
- Validation Rules
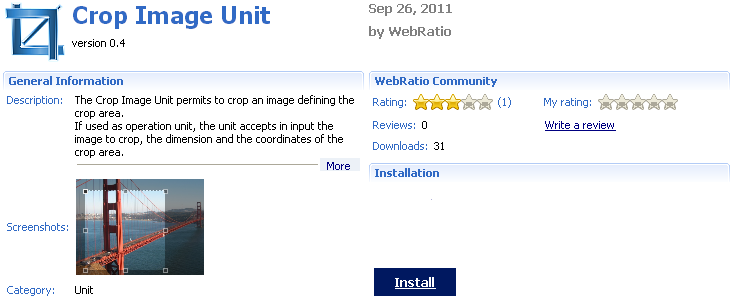
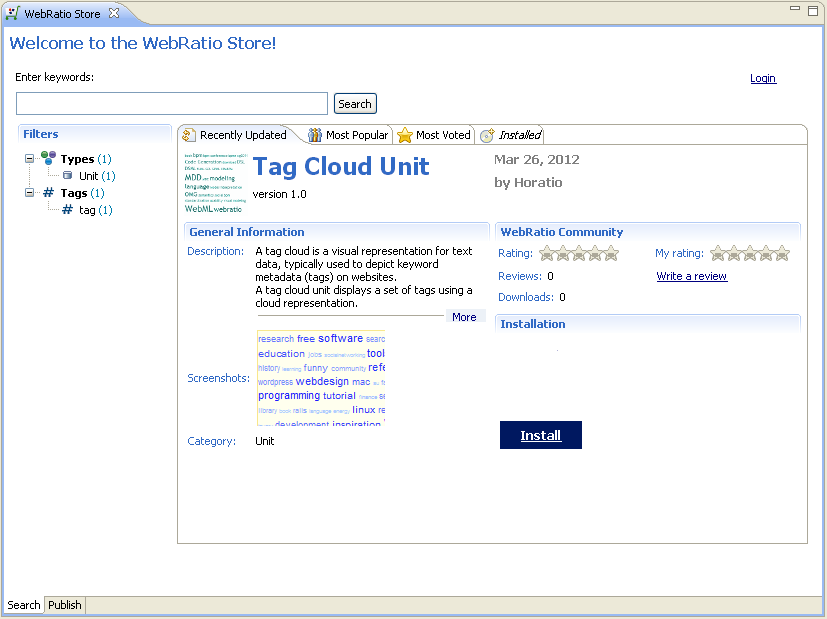
Each component is represented with a descriptive text, some screenshots, specific enriched data (e.g. version, author, publishing date,...) and useful information coming from the WebRatio Store community (e.g. reviews, ratings, number of downloads). You can vote for a component and leave a comment. The installation part contains the buttons for installing the component in your workspace, uninstalling the component from one or more than one project, or updating the component to a new released version. Each store component is supplied with a sample project, which lets you to immediately test its behavior.
Publish
WebRatio Store allows you publishing new components and making them available to all WebRatio Store users. You can publish Web projects, BPM projects, Style projects, Units, Templates and Validation Rules.
The WebRatio Store publish view appears by clicking on the "Publish" tab.
The first time you decide to publish a component in the WebRatio Store, you will be asked to accept the WebRatio Store Terms of Use. By accepting the conditions, you become a publisher user and you are able to publish new components.
The publication of a new component is a process divided into 3 steps:

- STEP 1- Adding the component, through the usage of a wizard. The component is inserted into the WebRatio Store and it is visible only to you.
- STEP 2 - Submitting the component for approval: the publication of a component requires the approval by the WebRatio Store Team.
- STEP 3 - See the approval result: if the component is successfully approved, it will be visible to all WebRatio Store users. Otherwise a rejection reason will be sent to the publisher; the rejected component can be corrected and submitted again for the approval.
STEP 1: Adding the component
You can add a new component in the store, by clicking on the icon which represents the desired type.
The possible types are:
- Web Project
- BPM Project
- Style Project
- Template
- Unit
- Validation Rule
A store component consists of an item and one or more versions:
- the item describes the properties of a component, which are the type (e.g. Unit), the name (e.g. Create Or Modify Unit), the description, the tags and meaningful images.
- the version belongs to an item and it is characterized by the version number (e.g. 1.0), the compatibility with the WebRatio versions, the release notes and the source files, containing the implementation code of the component.
First you have to add an item. If you click on one components' icon (e.g. Unit), a wizard dialog will appear, in order to allow the specification of the information about the new item:
- the name
- the icon (".png" image, 64x64 pixel)
- the thumbnail (".png" image, 128x96 pixel)
- the screenshots (".zip" archive, containing ".png" images)
- the comma-separated list of tags
- a brief description of the unit

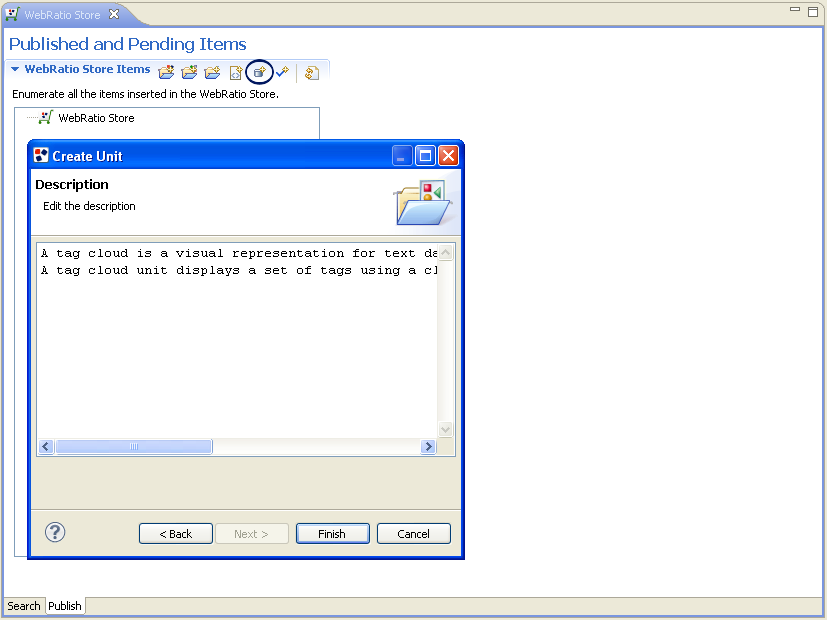
At the end of the procedure, the new unit is created. A dialog informs you that you should "Add" and "Submit" a version, in order to complete the publishing process.
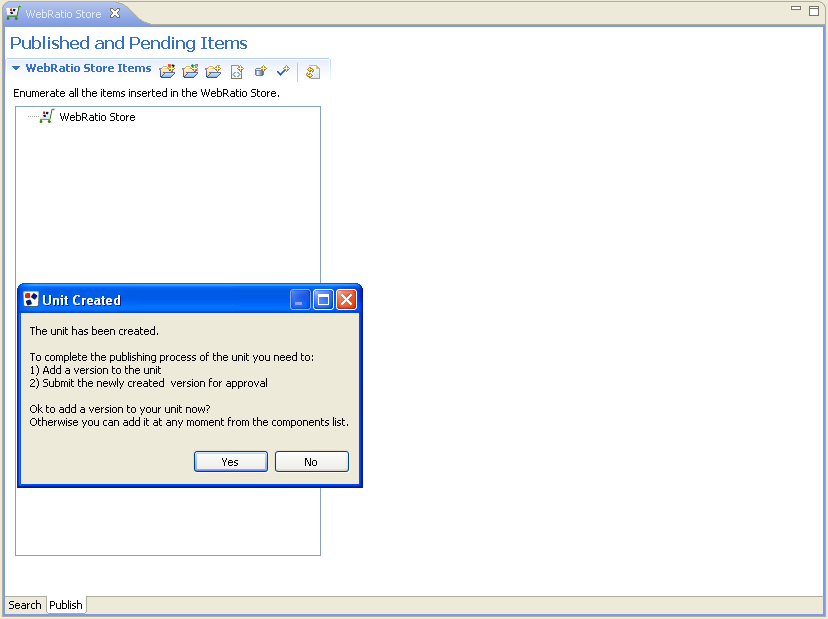
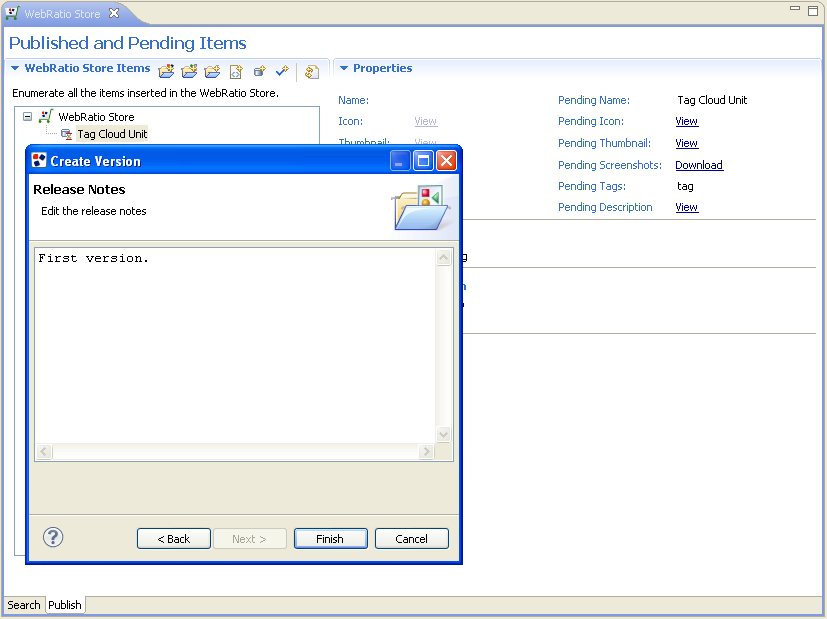
You can decide to add a version to your unit now, or alternatively to add it at a second moment. In the first case, confirm the message dialog. A new wizard appears and allows the specification of the information about the new version:
- the name: a string representing the version as <major>.<minor>.<patch>
- the source files, containing the source code of the component. In case of a Unit, the needed ones are:
- Unit
- Templates(optional)
- Sample project
The source files can be selected from the workspace (WebRatio projects), or the file system (.zip archives).
- the WebRatio tool versions in which the new version is available
- the release notes

The source archive files depend on the type of item. Here the possible options:
| Type |
Source Files |
| Web Project |
Web Project, Style project(optional) |
| BPM Project |
BPM Project, Sample Project(optional), Style Project(optional) |
| Style Project |
Style Project, Sample Project(optional) |
| Template |
Template, Sample Project |
| Unit |
Unit, Templates(optional), Sample Project |
| Validation Rule |
Validation rule, Sample Project |
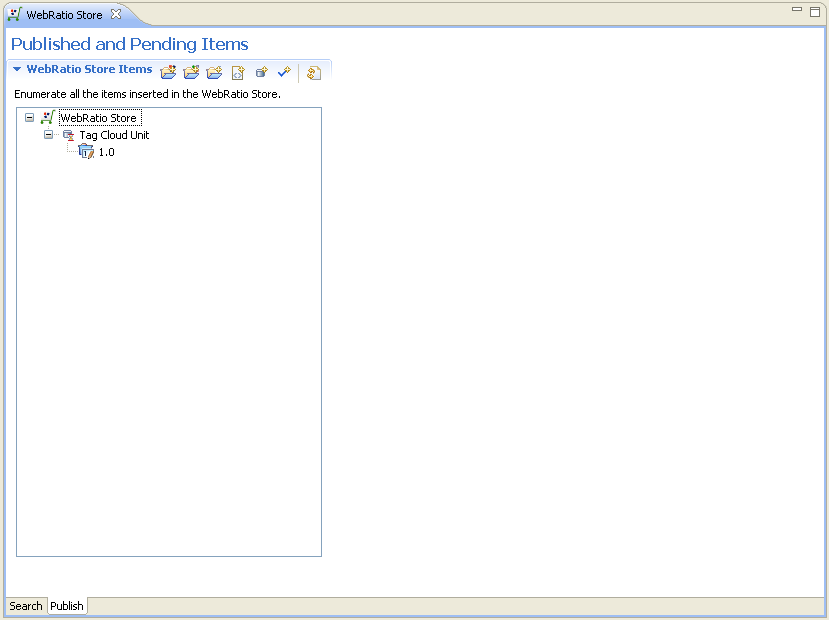
At the end of the procedure, the new version is created. The list of your WebRatio Store items is enriched with the newly item and version.
Properties
You can select the item (or the version) and see its properties.
Item:

The properties of the newly created item are marked as "pending". This means that you can modify them, by clicking on the "Edit..." link.
The "Edit..." link opens the item wizard and allows the editing of the properties.
The "Add Version..." link opens the wizard about the creation of a new version.
Version:
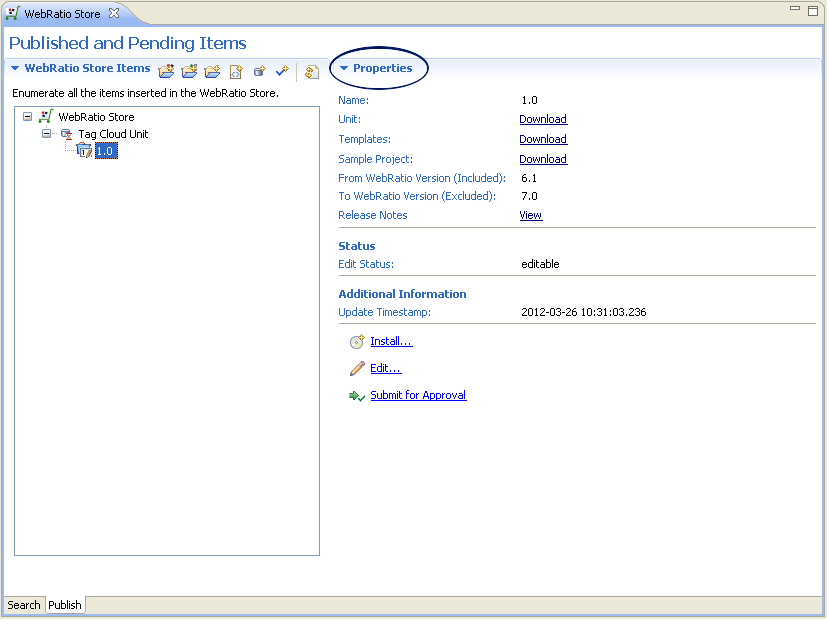
The status of the newly created version is equal to "editable". This means that you can modify it, by clicking on the "Edit..." link.
The "Edit..." link opens the version wizard and allows the editing of the properties.
The "Install..." link installs the version in the workspace. In this way you can test the version, before the submission.
The "Submit for Approval" link submits the version for the approval.
STEP 2 - Submitting a component for approval
The newly created component should be submitted for the approval, in order to publish it on the WebRatio Store. Precisely, the version is submitted for the approval. The item is correlated with the version and doesn't need to be explicitly submitted. With reference to an approved item, I can suppose add more versions and decide which is the one to submit.
The submission of a version for approval consists in making it available to the WebRatio Store Team. The store manager tests its functionality, its correctness and finally he decides to approve or reject the new component.
To submit a version for the approval, right click on the version --> Submit for Approval, or alternatively select the version and click on the "Submit for Approval" link, available in the Properties panel.

The submission of the version for the approval, makes it "non editable" until the end of the approval process. However you can decide to interrupt the approval process and "reopen" the version for editing.
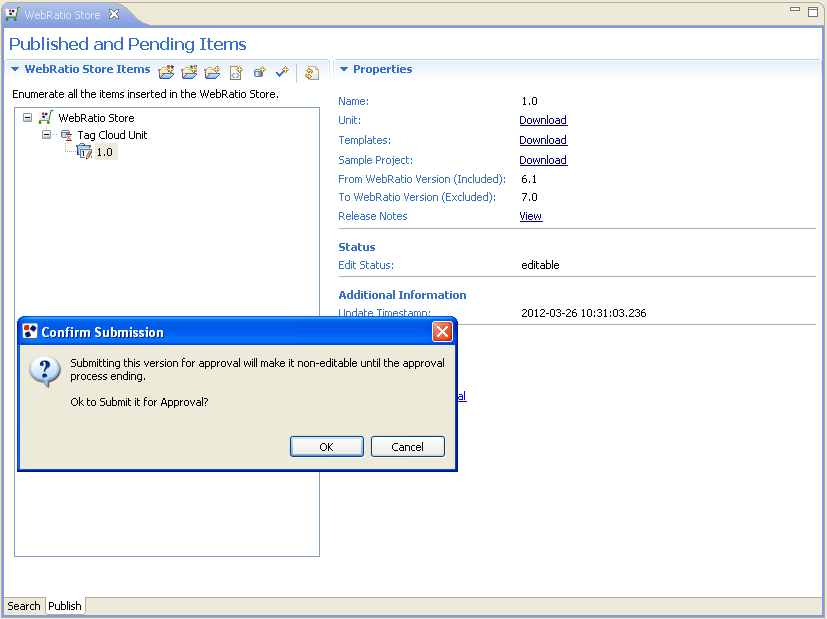
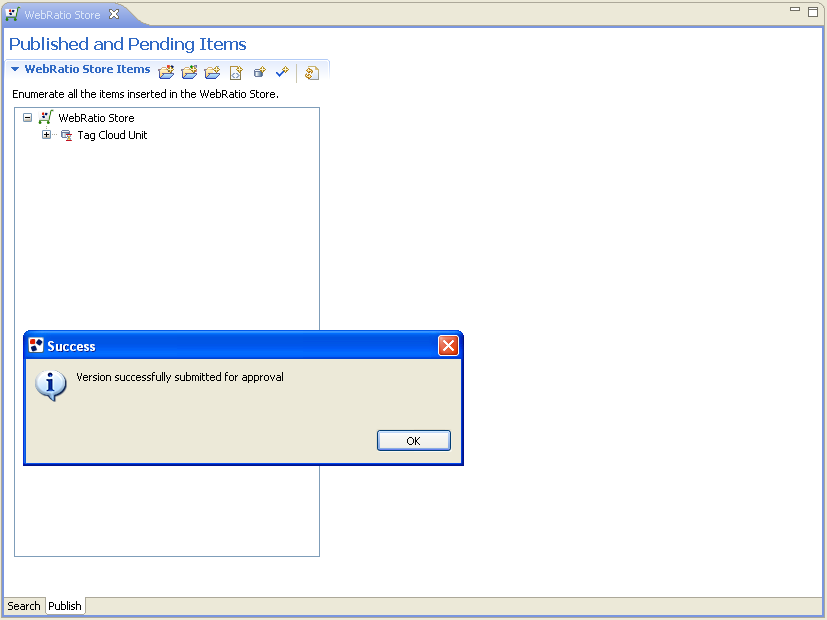
The status of the version becomes equal to "submitted".

If the version isn't approved / rejected yet, you can "reopen" it for editing, by clicking on the "Reopen for Edit" link. Note that this option will stop the approval process, so you will have to submit again the version for the approval.


STEP 3 - Approval Result
The WebRatio Store Team analyzes and tests the submitted components. It can decide to approve an item and a version.
The approval process can have a positive or a negative outcome:
- positive: the component (item + version) is approved and it becomes visible to all users, who can see it in the "Search" store tab.
The status of the item / version is equal to "approved".
Item:

The approved item can be deleted (no more visible on the WebRatio Store), by right clicking on the item node --> Delete.
The approved item can be updated (click on the "Edit..." link), in order to modify its properties. In this case the state will be equal to "pending" and the updates need to be approved by the WebRatio Store Team, to become definitive.
Version:


The approved version can be deleted (no more visible on the WebRatio store), by right clicking on the version node --> Delete
The approved version cannot be modified. In case of updates you have to create a new version, submit it and wait for the approval.
- negative: the component is not approved, so it isn't visible.
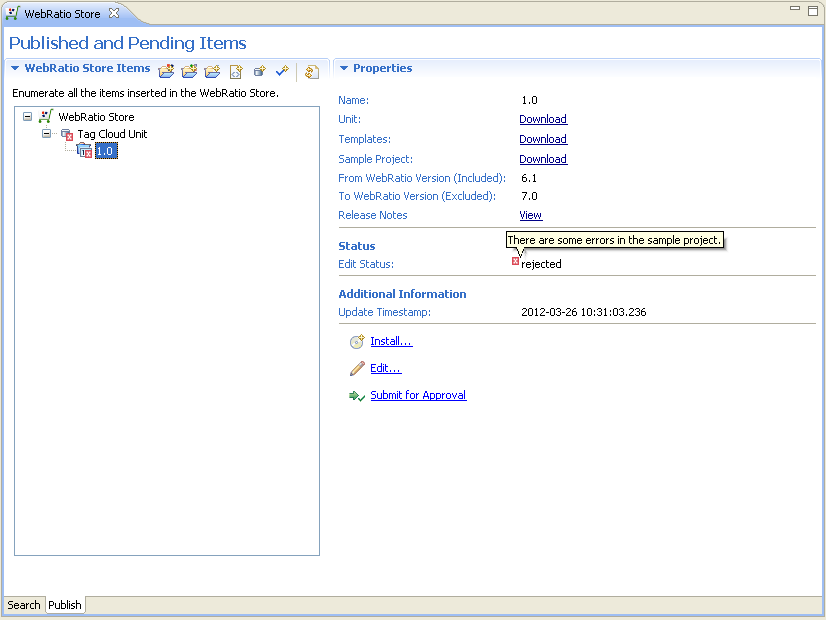
The status of the item / version is equal to "rejected" and if you pass the mouse over the "X" status icon (in the Properties panel) you can read the rejection reason.
The rejected version can be corrected and submitted again for the approval. Also the rejected item can be corrected; in this case the updated properties are automatically visible to the WebRatio Store manager user.
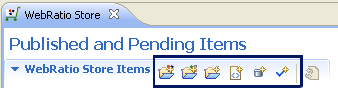
Operations
The operations enabled for each item / versions are accessible through the icons located in the Properties panel or right clicking on the item / version. They change according to the item / version status.
Item:

Version:

IMPORTANT! Publishing Conventions
The published WebRatio Store components should comply with specific naming conventions and constraints, in order to organize them in a uniform way and guarantee their correct behavior. The first important constraint is to include ONLY the needed files and avoid the inclusion of the the entire project or the project specific files and folders (plugin.xml, .project, META-INF and so on).
Web Project

- the name of the web project should be uppercase (e.g. BookStore)
- the style project associated with the web project should be named: <WebProjectName>Style (e.g. BookStoreStyle)
Structure of the uploaded files:
| File name |
Structure |
| <WebProjectName>
(e.g. BookStore)
|
WebRatio Web Project |
| <WebProjectName>Style
(e.g. BookStoreStyle)
|
WebRatio Style Project |
BPM Project

- the name of the BPM project should be uppercase (e.g. MyProject)
- the style project associated with the BPM project should be named: <BPMProjectName>Style (e.g. MyProjectStyle)
- the sample project should be named: <BPMProjectName>Sample (e.g. MyProjectSample)
Structure of the uploaded files:
| File name |
Structure |
| <BPMProjectName>
(e.g. MyProject)
|
WebRatio BPM project |
| <WebProjectName>
(e.g. BookStore)
|
WebRatio Web Project |
| <WebProjectName>Style
(e.g. BookStoreStyle)
|
WebRatio Style Project |
Style Project

- the name of the style project should be uppercase (e.g. FertileEnvironmental)
- the sample project should be named: <StyleProjectName>Sample
Structure of the uploaded files:
| File name |
Structure |
| <StyleProjectName>
(e.g. FertileEnvironmental)
|
WebRatio Style Project |
| <StyleProjectName>Sample
(e.g. FertileEnvironmentalSample)
|
WebRatio Web Project |
Template

Unit Template
<TemplateName> is the name of the template uppercase (e.g. NotificationMessage)
<UnitName> is the name of the unit uppercase (e.g. MultMessageUnit)
- the unit template files are positioned inside a Style Project. They are grouped in:
     - CSS/<TemplateName><UnitName>/*.css
         - CSS/<TemplateName><UnitName>/<TemplateName><UnitName>.css (not mandatory)
         - #<TemplateName><UnitName><Class1> {
           ...
           }
     - Images/<TemplateName><UnitName>/*.png
     - Scripts/<TemplateName><UnitName>/*.js
     - Units/<UnitName>/<TemplateName>.unit.template
- the sample project should have the following name: <TemplateName>TemplateSample
Structure of the uploaded files:
| File name |
Structure |
| <TemplateName>
(e.g. NotificationMessage)
|
CSS folder (optional)
Images folder (optional)
Scripts folder (optional)
Units folder
|
| <TemplateName>Sample
(e.g. NotificationMessageSample)
|
WebRatio Web Project |
Other templates
<Type> is the type of the template uppercase (e.g. Page)
<type> is the type of the template lowercase (e.g. page)
- the template files are positioned inside the "StoreTemplates" project. They are grouped in:
     - CSS/<TemplateName><Type>/*.css
         - CSS/<TemplateName><Type>/<TemplateName><Type>.css (not mandatory)
         - #<TemplateName><Type><Class1> {
           ...
         }
     - Images/<TemplateName><Type>/.*png
     - Scripts/<TemplateName><Type>/*.js
     - <TemplateName>.<type>.template
- the sample project should have the following name: <TemplateName>Sample
Structure of the uploaded files:
| File name |
Structure |
| <TemplateName>
(e.g. AutoExpandingFieldTemplate)
|
CSS folder (optional)
Images folder (optional)
Scripts folder (optional)
<TemplateName>.<type>.template
|
| <TemplateName>Sample
(e.g. AutoExpandingFieldTemplateSample)
|
WebRatio Web Project |
Unit

<unitname> is the name of the unit lowercase (e.g. tagcloudunit)
<UnitName> is the name of the unit uppercase (e.g. TagCloudUnit)
- the unit files are positioned inside a Components Project
- the source Java classes implementing the unit should be contained inside a package with the following name: com.webratio.units.store.<unitname>
- the unit files are positioned inside the folder Units/<UnitName>. They are grouped in:
- Images (16x16 and 32x32 pixel)
- Layout (optional)
- Logic
- Warnings (optional)
- Unit.xml
- the template associated with a content unit is located inside a Style Project. They are grouped in:
- CSS/<UnitName>/*.css
- CSS/<UnitName>/<UnitName>.css (not mandatory)
- Images/<UnitName>/*.png or .gif
- Scripts/<UnitName>/*.js
- Units/<UnitName>/Default.unit.template
- the sample project should have the following name: <UnitName>Sample
Structure of the uploaded files:
| File name |
Structure |
| <UnitName>
(e.g. TagCloudUnit)
|
Units folder
src folder
lib folder (optional)
|
| <UnitName>Templates
(e.g. TagCloudUnitTemplates)
|
CSS folder (optional)
Images folder (optional)
Scripts folder (optional)
Units folder
|
| <UnitName>Sample
(e.g. TagCloudUnitSample)
|
WebRatio Web Project |
Validation Rule

<validationrulename> is the name of the validation rule lowercase (e.g. myvalidationrule)
<ValidationRuleName> is the name of the validation rule uppercase (e.g. MyValidationRule)
- the validation rule files are positioned inside a Components Project
- the package containing the source files of the validation rule should have the following name: com.webratio.units.store.<validationrulename>
- the validation rules files are positioned inside the subfolder "ValidationRules" of a Components Project. They are grouped in:
- <ValidationRuleName>/Images
- <ValidationRuleName>/Layout
- <ValidationRuleName>/Logic
- <ValidationRuleName>/ValidationRule.xml
- the sample project should have the following name: <ValidationRuleName>Sample
Structure of the uploaded files:
| File name |
Structure |
| <ValidationRuleName>
(e.g. MyValidationRule)
|
src folder
ValidationRules/<ValidationRuleName>/Image
ValidationRules/<ValidationRuleName>/Layout
ValidationRules/<ValidationRuleName>/Logic
ValidationRules/<ValidationRuleName>/ValidationRule.xml
|
| <ValidationRuleName>Sample
(e.g. MyValidationRuleSample)
|
WebRatio Web Project |
Item
(Web Project, BPM Project, Style Project, Unit, Template, Validation Rule)
- 64x64 pixel
- .png (e.g. <ItemName>Icon.png)
- 128x96 pixel
- .png (e.g. <ItemName>Thumbnail.png)
- .zip (e.g. <ItemName>Screenshots.zip)
- there are no constrains about the size of the images (a suggested one is 800x600 pixel)
- .png images