Introduction
IFML, the modeling language of WebRatio, is built on very few, highly composable concepts, which can be used to assemble complex Web applications for publishing or updating content. The key aspect of IFML is the capability of defining a Web Model consisting of pages, content units, and operation units, linked to form a specification of the required content publishing or management functions.
However, the core units provided in IFML may not be sufficient for covering the entire spectrum of application requirements, and you may want to use your own software components in the development of your Web applications. To this purpose, WebRatio includes the notion of custom units (also called plugin units). A custom unit is a content unit or an operation unit defined by the developer, and not included in the WebRatio standard installation.
A custom unit is both similar and different with respect to the standard units.
- Like standard units, you can place a custom unit in a hypertext diagram, link it to other units, with input or output links, define the unit's properties using the Property View; if the unit is a content unit, you can also place it in the grid using the Grid View, and choose a Unit template to display its content.
- Unlike a standard unit, a custom unit has a behavior that is completely defined by the unit designer. You can implement units that do virtually anything, from sending emails to publishing XML documents, to interacting with Web services.
Getting Started
The overall architecture of WebRatio distinguishes two major components:
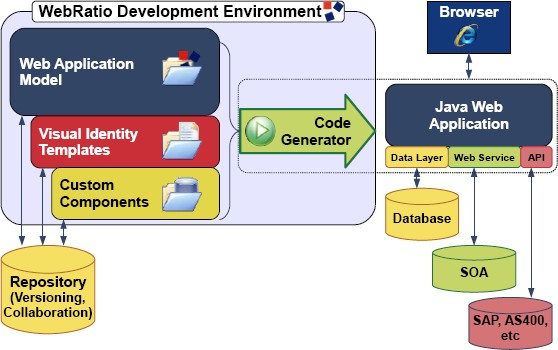
- WebRatio Development Environment, which supports the designtime activities of application development, including the specification of the application site views and the generation of the application code.
- WebRatio Runtime, which enables the execution of Java Web applications generated by WebRatio, by offering a featurerich execution framework for page templates and business components.
The development of a custom unit will take you through all the components of WebRatio, because the definition and the execution of a unit requires addressing both designtime and runtime issues. Adding a custom unit to WebRatio will require:
- Adding a Unit definition to the unit library (mandatory). You will need to edit the Unit.xml file using the tool provided editor, which instruct WebRatio to build the proper commands for placing the custom unit in the Web Model, linking it to other units, and defining the coupling of input and output parameters.
- Adding a set of rule for validating the usage of the custom unit in the Web Model, and for producing error and warning reports. This means to create and edit the WebModel.template file, writing a fragment of Groovy code (optional).
- Adding a set Groovy template files (Input.template, Output.template, Logic.template) for producing the runtime XML descriptors associated with the custom unit (optional).
- Adding one or more Unit templates, which indicates how the unit has to be rendered in a page (mandatory if the custom unit is a content unit).
- Implementing a runtime class, which actually performs the business service for which the unit is designed.
In return of these activities, WebRatio let you use your components in the Web Model of every Web Project and these components will cooperate perfectly with the standard units.
In the end, building a custom units boils down to write a few pieces of code and specifications, and so let's see how to create the place to store your work. Since also the predefined IFML units are implemented in the same way as your custom units, you can start familiarizing with the components of a custom unit by looking at those of the standard units.
- Select File > New > Units Project from the main menu, enter "MyCustomUnits" for the project name, then click on the Finish button. This project is the container of your custom units. You can use different Units Project if you want.
- Select File > New > Unit from the main menu,enter "MyFirstUnit" for the unit name, then click on the Next button. In the opening folder select "Content" for the type of the unit? the tool also proposes a default name for the Unit Service Java class. Feel free to change it. Then click on the Finish button.
After these two operations you should have a folder tree like the one shown in the image below. Each folder contains files associated with a different aspect of the unit specification.
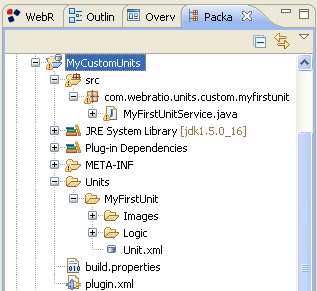
- Unit.xml: Contains the Unit Definition which is used by WebRatio to allow the editing of the unit in the Web Model, and to display its properties in the Property View.
 Images: Contains the images used to represent the unit in the Web Model.
- Logic: Contains three files? two of them (Output.template and Input.template) specify the unit's input and output? one file (called Logic.template) produces the runtime XML descriptor for the unit's service.
- Warning: Contains a file called WebModel.template used to show errors and warnings in the usage of the unit.
The Unit.xml file
The Unit.xml file contains the entire custom unit definition and configuration. WebRatio provides a multipage unit editor that manages the entire lifecycle of a userdefined unit and save it into this file. The pages of this editor are: General, SubElements, Logic, Layout and Documentation.
The General Page serves dual purpose:
- It contains a section to set the General Information of the custom unit like the Name, the Type and the Views where it can be inserted.
- It specifies if the unit can be source and target of one or more links.
These are the properties that you can configure:
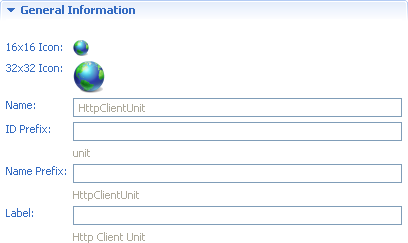
- 16x16 Icon. The rendition of the unit in the Outline tree. To change the 16x16 icon, a PNG file named 16.png must be inserted in the subfolder Images of the unit configuration folder.
- 32x32 Icon. The rendition of the unit in the Web Model Editor. To change the 32x32 icon, a PNG file named 32.png must be inserted in the subfolder Images of the unit configuration folder.
- Name. The XML tag name given to the unit, which corresponds to the unit folder name.
- Id Prefix. The prefix you want the unit is identified by.
- Name Prefix. The default name prefix of the unit when it is added into the model.
- Label. The label used to visualize the unit in the Units view.

- Type. The type of the unit: Content Unit, Operation Unit or Both.

- Site View. The view(s) where you can insert the unit. By default, the Site View option is on.
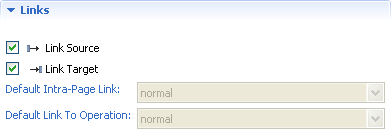
- Link Source. If checked, the unit supports outgoing links.
- Link Target. If checked, the unit supports incoming links.
- Default IntraPage Link. It specifies the default link type of intrapage links exiting from the unit. A link between two content units is considered intrapage when the source and target units belong to the same page or to different pages that are displayed simultaneously: this occurs when the two pages are nested inside the same top level page and none of the two is part of an alternative element. The attribute is meaningful only for content units. The possible values are: Normal, Automatic and Transport.
- Default Link To Operation. It specifies the default link type of links exiting from the unit that point to an operation unit. The attribute is meaningful only for content units. The possible values are: Normal,Automatic and Transport.

- OK Link Source. If checked, the unit supports outgoing OK links.
- OK Link Target. If checked, the unit supports incoming OK links.
- Multiple OK Links. If checked, the unit supports multiple outgoing OK links.
- OK Link Codes Script. If the unit supports multiple OK Links, it's possible to define a script to return the values to use in the code property of the OK Link. The script returns a list of code values.
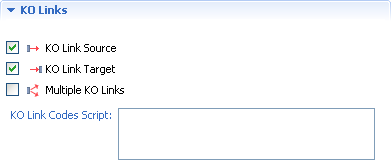
- KO Link Source.The unit supports outgoing KO links.
- KO Link Target.The unit supports incoming KO links.
- Multiple KO Links. The unit supports multiple outgoing KO links.
- KO Link Codes Script. If the unit supports multiple KO Links, it's possible to define a script to return the values to use in the code property of the KO Link.
The SubElements Page serves to add, delete or edit the unit and sub unit properties or sub units. For each unit property, you can edit its options. The subelements have some common properties:
- Label: defines the label used to visualize the property in the Properties View. If the field label is void it is used the subelement name as label.
 Figure Order: defines the order of elements to be drawn in the figure representing the unit in the IFML model. If left blank, the property is not shown in the unit figure.
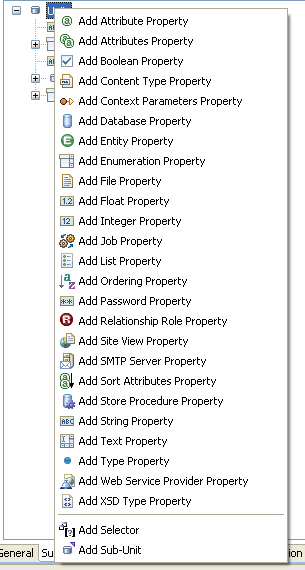
Moreover each sub element has its own properties. You can find the list of sub elements and properties in the WebRatio User Guide. Here is the list of sub elements types.
- Attributes Property. The property permits to select a set of entity attributes.
- Attribute Property. The property permits to select an entity attribute.
- Boolean Property. The property holds a true or false value.
- Content Type Property. The property holds a content type property, which qualifies an existing type property.
- Context Parameters Property. The property permits to select one or more context parameters.
- Database Property. The property permits to select a database.
- Entity Property. The property permits to select the entity from which the content of the unit is drawn.
- Enumeration Property. The property permits to select one of the proposed values.
- File Property. The property permits to select a file that has to be associated to the unit.
- Float Property. The property permits to write a float value to associate to the property.
- Integer Property. The property permits to write an integer value to associate to the property.
- List Property. The property permits to create and manage a list of element children.
- Ordering Property. The property permits to order the chidren of the element.
- Password Property. The property permits to write a password.
- Relationship Role Property. The property permits to select a data model Relationship Role.
- Site View Property. The property permits to select a site view.
- SMTP Server Property. The property permits to select or create a SMTP Server.
- Sort Attributes Property. The property permits to select the instances sorting attributes and the sorting algorithm (ascending or descending).
- String Property. The property permits to write a string value to associate to the property.
- Text Property. The property permits to write an arbitrary text or script.
- Type Property. The property permits to select the type of the element.
- XSD Type Property. The property permits to select the XSD type.
You can also add Sub Units to your custom component. A unit can have several sub units that can be defined as the units properties. For each sub unit you can define the same properties described above.
- Sub Unit.The sub unit option permits to define a new sub unit and its properties. The properties of the element are:
- Element Name: is mandatory? it defines the tag name of the XML element designed to contain the sub unit properties and subelements.
- Id Prefix: defines the prefix of the identifier of the sub unit.
- Name Prefix: defines the prefix of the name of the element visualized when the sub unit is added to the model.
- Label: defines the label of the element visualized in the Units View or Editor.
- Max Card.: defines if the parent unit accepts more than one sub unit. The possible values are 1 and many.
- Enable Ajax Events': enables the rise of AJAX events on the sub unit.
- Enable Ajax AutoComplete: enables the AJAX auto completion on the sub unit.
- Figure Order: defines the order of element to be drawn in the figure representing the parent unit in the IFML model. If left blank, the property is not shown in the unit figure.
- Selector.The selector option is a shortcut for a special subunit and permits to define a data selector and its properties. The properties of the element are:
- Element Name: is mandatory? it defines the tag name of the XML element designed to contain the selector properties.
- Entity Id Expr: is mandatory? it defines the XPath expression to reach the entity identifier defined in the entity property. The identifier allows to reach the data model Entity.
- Name Prefix: defines the prefix of the name of the element visualized when the sub unit is added to the model.
- Default Policy: defines if the selector default policy is enabled.
- Automatic: defines if the selector, with a key condition, ha to be created at the parent unit creation.
- Label: defines the label used to visualize the selector element in the Units View. If the label field is void it is used the sub unit name as label.
- Figure Order: defines the order of the element to be drawn in the figure representing the parent unit in the IFML model. If left blank, the property is not shown in the unit figure.
- Sub Unit Reference. The sub unit reference option permits to define a sub unit referencing an other sub unit. You can see as example the Hieararchical Index Unit, where a Level subunit references itself through a subunit reference.
- Element Name: is mandatory? it defines the tag name of the referenced sub unit XML element.
- Figure Order: defines the order of the element to be drawn in the figure representing the parent unit in the IFML model. If left blank, the property is not shown in the unit figure.
The Logic Page permits the definition of logic scripts. The scripts are meaningful only for content units because the scripts affect the computation order of the units in a page. As you can see in the image on the right there are different types of scripts:
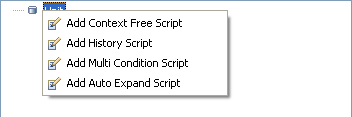
- Context Free Script. The script defines if the unit computation depends on other units that brings parameters to it. If the unit is context free, it has priority over the other page units during the page computation. The script must return true or false.
- Multi Condition Script. The script defines if the unit computation depends on other units that brings parameters to it through different links. During the page propagation process the evaluation of Multi Condition units is postponed with respect to the evaluation of other units. The script must return true or false.
- History Script. The script defines if the unit works with session parameters, i.e., the unit is session aware. The script must return true or false. For instance the Get Unit script is the following.
- Auto Expand Script. At generation time, the unit is auto expanded with the addition or cancellation of elements. As example see the Scroller Index Unit script that shows how to add the five scroller links and to add them the needed link parameters. The script must not return a value.
The Layout Page serves to define the layout behaviour of the unit. The layout behaviour can be defined only for the content units that can be layed out in the generated Web application. For instance the Selector Unit is both an operation and a content unit, but it can't be placed in in the layout grid. This means that the other options are disabled.
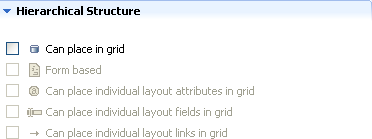
- Form based. The unit supports formbased data entry. For instance the Entry Unit is a formbased unit used for gathering input employed to perform searches over the objects of an entity or to supply parameters to operations
- Can place individual layout attributes in grid. Activating this option, the layout attributes of the unit can be placed in the grid without placing the entire layout unit. For example the Data Unit attributes can be placed individually.
- Can place individual layout fields in grid. Activating this option, the layout fields of the unit can be placed in the grid without placing the entire layout unit. For example the Entry Unit fields can be placed individually.
- Can place individual layout links in grid. Activating this option, the layout links of the unit can be placed in the grid without placing the entire layout unit. For example the Data Unit links can be placed individually.
Right clicking on the structure root it appears a popup menu. Each option of the menu permits to add a specific script. The Groovy script includes a predefined variable named unit which is the layout unit DOM4J element.
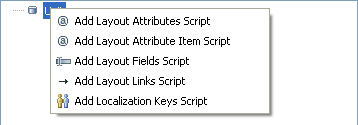
- Layout Attributes Script. The script defines which attributes are to be layed out. More specifically the script returns a list of attribute identifiers.
- Layout Attributes Item Script. The script defines the name under which the unit bean can be accessed at runtime. Usually, this script is not required because the most of units access their bean properties throughout a JSTL iteration declaring a context variable named current. If this does not happen, this script have the ability to produce the name under which the bean can be accessed.
- Layout Fields Script. The script defines which fields are to be layed out. More specifically the script returns a list of fields identifiers.
- Layout Links Script. The script defines which links are to be layed out. More specifically the script returns a list of links identifiers.
- Localization Keys Script. The script defines some predefined keys for the localization of the unit elements, valid for all the instances of a specific unit type. More specifically it returns a list of maps. Each map is formed of three entries: the id of the element, the key of the localization entry (usually, the name of the element) and the localized message to be displayed.
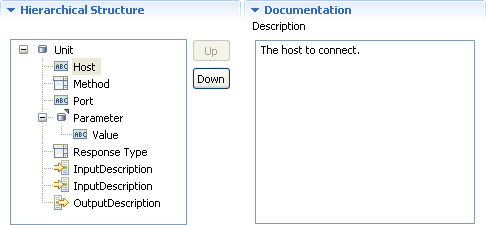
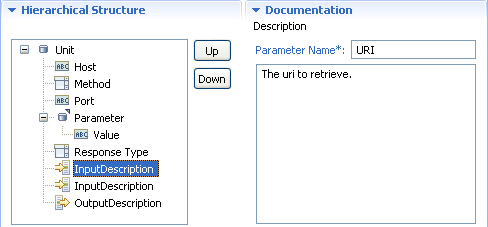
The Documentation Page allows to give a brief description to each subelement and to each input and output parameter. The subelements documentation consists of a brief description. The input and output parameters documentation consist, instead, of:
- Parameter Name: the name of the input/output parameter.
- Description: describes the input/output parameter and defines the parameter purpose.
The Input.template
The Input.template file, located in the Logic subfolder of the unit root folder, specifies the unit input parameters. Each input parameter has a name, a type and a label. The type attribute is very important because, if correctly used, allows you to enable the Automatic Coupling feature when passing information on a link incoming the custom unit. The logic used in the Automatic Coupling is that the type attribute of the input parameter of the unit source of the link and the output parameter of the unit target of the link have the same value (or at least one value equal from the pipe separated type list). As an example:
#?delimiters <%,%>,<%=,%>

<%

setXMLOutput()

def unitId = unit.valueOf( "@id" )

def params = unit.selectNodes( "Parameter" )

%>

<InputParameters>

    <InputParameter name= "<%= unitId%>.uri" type= "" label= "URI" />

    <% for (param in params) { %>

        <InputParameter name= "<%= unitId%>.<%= param[" name "]%>" type= "" label= "<%= param[" name "]%>" />

    <% } %>

</InputParameters>
The Output.template
The Output.template file, located in the Logic subfolder of the unit root folder, specifies the unit output parameters. Each output parameter has a name, a type and a label. The type attribute is very important because, if correctly used, allows you to enable the Automatic Coupling feature when passing information on a link incoming the custom unit. The logic used in the Automatic Coupling is the same explained in the previous section. Here is an example of Output.template.
#?delimiters <%,%>,<%=,%>
<% setXMLOutput()
def unitId = unit.valueOf( "@id" ) %>

<OutputParameters>
    <OutputParameter name= "resultObject" type= "" label= "Result" />
</OutputParameters>
The Logic.template structure
The Logic.template file, located in the Logic subfolder of the unit root folder, specifies the unit behaviour and properties. It contains a <Descriptor> element, whose attributes describe several behaviour and appearance properties. The child elements of <Descriptor> specify the properties that will be available in the unit's property frame. The <Descriptor> element is the root element of the unit descriptor file, and specifies the runtime service Java class through the "service" attribute. You can simply specify only the Unit Service or write a specific structure of your choice for the Descriptor. Here are two examples of the Logic.template file showing both the choices.
#?delimiters <%,%>,<%=,%>

<Descriptor service="com.webratio.units.utility.rtx.PasswordUnitService">

    <% printRaw(serializeXML(unit, false)) %>

</Descriptor>
- Declares the Java class "PasswordUnitService" as the Component Runtime Service (line 2).
- Prints all the XML related to the component.
#?delimiters <%,%>,<%=,%>

<%

setXMLOutput()

def unitId = unit["id"]
def params = unit.selectNodes("Parameter")

%>

<Descriptor service="com.webratio.units.community.net.HttpClientComponentService">

   <Host><%= unit["host"]%></Host>

   <Port><%= unit["port"]%></Port>

   <Method><%= unit["method"]%></Method>

   <ResponseType><%= unit["responseType"]%></ResponseType>

   <Parameters>

      <% for (param in params) { %>

        <Parameter><%= param["name"]%></Parameter>

      <% } %>

   </Parameters>

</Descriptor>
- Extracts the unit ID (line 4).
- Extracts the unit Parameters properties (line 5).
- Declares the Java class "HttpClientUnitService" as the Unit Runtime Service (line 8). Retrieves the "host" attribute of the unit and writes it into the Host node (line 9).
- Retrieves the "port" attribute of the unit and writes it into the Host node.(line 10). Retrieves the "method" attribute of the unit and writes it into the Method node.(line 10).
- Retrieves the "responseType" attribute of the unit and writes it into the ResponseTypenode.(line 11). Writes a Parameter Node for each Parameter property (lines 1317).
The WebModel.template
The WebModel.template file, located in the Warning subfolder of the unit root folder, specifies the situation in which an error has to be shown to the WebRatio user because the custom component is not used correctly. The definition of this file is not mandatory but it can be very useful if you are going to develope a complex custom unit. Here is an example.
#?delimiters <%,%>,<%=,%>

<%

    if (unit["host"] == "") {

        addWarning(unit, true, "Host is unspecified.")

    }

    if (unit["port"] == "") {

        addWarning(unit, true, "Port is unspecified.")

    }


    if (unit["method"] == "") {

        addWarning(unit, true, "Method is unspecified.")

    }

    if (unit["responseType"] == "") {

        addWarning(unit, true, "Response type  is unspecified.")

    }

%>
- Create a warning when the "host" property is not defined (lines 35).
- Create a warning when the "port" property is not defined (lines 79).
- Create a warning when the "method" property is not defined(lines 1113).
- Create a warning when the "method" property is not defined (lines 1517).
The Java class runtime unit service
The Java class(es) defining the runtime behaviour of the unit has a predefined structure that the Unit Wizard prepare when you create the new unit.
The constructor of a WebRatio 5 unit service is the following:
public CustomUnitService(String id, RTXManager mgr, Element descr) throws RTXException {

    super(id, mgr, descr);

}
Note that the third argument of the constructor is a DOM4J element, associated with the root element of the unit's logic descriptor (i.e. the <Descriptor> element). The code super(..) is required when the service class extends the predefined class com.webratio.rtx.core.AbstractService. The logic descriptor is accessed through the standard DOM4J APIs or with some utility methods provided by the com.webratio.rtx.core.DescriptorHelper class. Here are some example to retrieve the <Host> element of the logic descriptor.
Element host = descr.selectSingleNode("Host");

Element Host = DescriptorHelper.getChild(descr, "Host", false, this);

Element Host = DescriptorHelper.getChild(descr, "Host", true, this);

List parameters = descr.selectNodes("Parameter");

List parameters = DescriptorHelper.getChildren(descr, "Parameter", false, this);
- Usage of the "selectSingleNode" method of the DOM4J APIs (line 1).
- Usage of the "getChild" DescriptorHelper utility method. (line 2).
- Usage of the "getChild" DescriptorHelper utility method. The third parameter must be set to true if the element is required and an exception must be thrown. (line 3)
- Usage of the "selectNodes" method of the DOM4J APIs (line 4).
- Usage of the "getChildren" DescriptorHelper utility method. (line 5).
The DescriptorHelper provides methods to obtain the text values or the list of values of sibling children.
String host= DescriptorHelper.getChildValue(descr, "Host", true, this);

List parameters = DescriptorHelper.getChildValues(descr, "Parameter", true, this);

<span style="line-height: 18px; font-family: 'Avenir LT', 'Lucida Sans Unicode', 'Lucida Grande', sans-serif; font-size: 15px;">The "execute" method is identical to the one exposed by the interface com.webratio.rtx.RTXOperationUnitService. The only difference is on the structure of the JavaBean returned by the two methods, which is free for a view component, whereas for an operation must include a mandatory resultCode string property. In this method you may need to instantiate a Bean. There are two predefined class for the component Bean.</span>
- BasicContentUnitBean. A base result bean for content units. Services associated with content units are encouraged to subclass this bean to provide their output parameters as bean's properties. It has two properties:
- dataSize. The size of contained data.
- data. The contained data (Object).
- ExtendedContentUnitBean. A map based result bean for content units. This bean must be used when the content unit you are developing does not have a predefined structure and can return a list of elements.
- BasicOperationUnitBean. A base result bean for operation units. Services associated with operation units are encouraged to subclass this bean to provide their output parameters as bean's properties. It has three properties:
- resultCode. The result code of the operation (success or error).
- errorMessage. The error message produced by the operation.
- exception. The the exception produced by the operation.
- ExtendedOperationUnitBean. A map based result bean for operations units. This bean must be used when the operation unit you are developing does not have a predefined structure and can return a list of elements.
Bean properties can be accessed through the com.webratio.rtx.core.BeanHelper class. The helper provides methods to retrieve and set the values of specific properties.
The BeanHelper.asString(obj) method gets the string value of an object. If the input object is a string, it is returned. If the input object is an array of strings, the first element (if any) is returned. If the input object is an array of objects, the toString() method is invoked over the first element (if any). Finally, the toString() method is invoked over the input object. A null value is returned if the input object is null.
String name = BeanHelper.asString(input)
The BeanHelper.asStringArray(obj) method gets a string array from an object.If the input object is a string array, a clone of it is returned. If the input object is a string, a singleton string array is built from it and returned. If the input object is an array of objects, the toString() method is invoked over each element to build a string array. Finally, the toString() method is invoked over the input object and the result is used to build an array of strings.
String[] names = BeanHelper.asStringArray(input)
Here is the code of the Java class for the HTTPClientComponent.
package com.webratio.units.community.net;


import java.io.IOException;

import java.util.HashMap;

import java.util.Iterator;

import java.util.List;

import java.util.Map;

import java.util.Map.Entry;


import org.apache.commons.httpclient.HttpClient;

import org.apache.commons.httpclient.HttpException;

import org.apache.commons.httpclient.HttpMethod;

import org.apache.commons.httpclient.NameValuePair;

import org.apache.commons.httpclient.cookie.CookiePolicy;

import org.apache.commons.httpclient.methods.GetMethod;

import org.apache.commons.httpclient.methods.PostMethod;

import org.apache.commons.lang.ObjectUtils;

import org.dom4j.DocumentException;

import org.dom4j.Element;

import org.dom4j.io.SAXReader;


import com.webratio.rtx.RTXConstants;

import com.webratio.rtx.RTXException;

import com.webratio.rtx.RTXManager;

import com.webratio.rtx.RTXOperationUnitService;

import com.webratio.rtx.beans.ExtendedOperationUnitBean;

import com.webratio.rtx.core.AbstractService;

import com.webratio.rtx.core.BeanHelper;

import com.webratio.rtx.core.DescriptorHelper;


public class HttpClientUnitService extends AbstractService implements RTXOperationUnitService {


    /** The host to connect */

    private String host;


    /** The port of the host */

    private String port;


    /** The method to use (GET/POST) */

    private String method;


    /** The type of response expected */

    private String responseType;


    /** The list of parameters */

    private List parameters;


    public HttpClientUnitService(String id, RTXManager mgr, Element descr) throws RTXException {

        super(id, mgr, descr);

        host = DescriptorHelper.getChildValue(descr, "Host", true, this);

        port = DescriptorHelper.getChildValue(descr, "Port", true, this);

        method = DescriptorHelper.getChildValue(descr, "Method", true, this);

        responseType = DescriptorHelper.getChildValue(descr, "ResponseType", true, this);

        Element parametersElement = DescriptorHelper.getChild(descr, "Parameters", true, this);

        parameters = DescriptorHelper.getChildValues(parametersElement, "Parameter", false, this);

    }


    public Object execute(Map operationContext, Map sessionContext) throws RTXException {

        ExtendedOperationUnitBean bean = new ExtendedOperationUnitBean();

        try {

            HttpClient client = createHttpClient(host, port);

            String uri = BeanHelper.asString(operationContext.get(getId() + ".uri"));

            if (!uri.startsWith("/")) {

                uri = "/" + uri;

            }

            Map params = new HashMap();

            for (Iterator iter = parameters.iterator(); iter.hasNext();) {

                String param = (String) iter.next();

                params.put(param, BeanHelper.asString(operationContext.get(getId() + "." + param)));

            }

            Object resultObject = executeMethod(method, client, uri, params, responseType);

            bean.put("resultObject", resultObject);

            bean.setResultCode(RTXConstants.SUCCESS_CODE);

        } catch (Exception e) {

            logError("Error in excuting http method", e);

            bean.setResultCode(RTXConstants.ERROR_CODE);

        }

        return bean;

    }


    private HttpClient createHttpClient(String ip, String port) {

        HttpClient client = new HttpClient();

        client.getHostConfiguration().setHost(ip, Integer.parseInt(port), "http");

        client.getParams().setCookiePolicy(CookiePolicy.DEFAULT);

        return client;

    }


    private Object executeMethod(String methodType, HttpClient client, String uri,

          Map params, String returnType)

            throws HttpException, IOException, DocumentException, RTXException {

        HttpMethod method = null;

        try {

            if (methodType.equals("get")) {

                method = new GetMethod(uri);

                NameValuePair[] pairs = new NameValuePair[params.size()];

                int index = 0;

                for (Iterator iter = params.entrySet().iterator(); iter.hasNext();) {

                    Entry entry = (Entry) iter.next();

                    pairs[index] = new NameValuePair(entry.getKey().toString(),

                                              entry.getValue().toString());

                    index++;

                }

                method.setQueryString(pairs);

            } else if (methodType.equals("post")) {

                method = new PostMethod(uri);

                for (Iterator iter = params.entrySet().iterator(); iter.hasNext();) {

                    Entry entry = (Entry) iter.next();

                    if (entry.getValue() instanceof List) {

                        for (Iterator iterator = ((List) entry.getValue()).iterator(); iterator.hasNext();) {

                            ((PostMethod) method).addParameter(entry.getKey().toString(),

                                                                (String) iterator.next());

                        }

                    } else {

                        ((PostMethod) method).addParameter(entry.getKey().toString(),

                                                                ObjectUtils.toString(entry.getValue()));

                    }

                }

            } else {

                throw new RTXException("The method '" + methodType +

                                        "' is not supported.");

            }

            client.executeMethod(method);

            if (returnType.equals("dom")) {

                return new SAXReader().read(method.getResponseBodyAsStream());

            } else if (returnType.equals("bytes")) {

                return method.getResponseBody();

            }

            return method.getResponseBodyAsString();

        } finally {

            if (method != null) {

                method.releaseConnection();

            }

        }

    }


    public void dispose() {

        host = null;

        port = null;

        method = null;

        responseType = null;

        parameters = null;

    }

}