Introduction
Jobs are a new feature available starting from the WebRatio 5.1 version.
A job is a sequence of operations that has to be executed asynchronously by the application. It's possible to schedule a job at a specific time or interval, which means that jobs can be automatically triggered (scheduled when the application starts). It's also possible to schedule a job at runtime: the user navigation can schedule a new job instance. The jobs implementation is based on the Quartz framework. As you can read from it's official website, Quartz is
"a full-featured, open source job scheduling system that can be integrated with, or used along side virtually any J2EE or J2SE application - from the smallest stand-alone application to the largest e-commerce system. Quartz can be used to create simple or complex schedules for executing tens, hundreds, or even tens-of-thousands of jobs; jobs whose tasks are defined as standard Java components or EJBs. The Quartz Scheduler includes many enterprise-class features, such as JTA transactions and clustering."
Working with Jobs
In order to manage the configuration of the job's engine inside the Web Project, in the Properties View there is a new tab called "Service/Jobs" which is available only selecting the Project tab in the Web Project. The available properties are:
-
Thread Pool Size. It's The number of threads that are available for concurrent execution of jobs. If unspecified, a default value (5) is used.
-
Job Store Type. It indicates where scheduling information (jobs and triggers) is stored. The possible values are:
-
Memory: scheduling information is stored within memory; this kind of job store is fast and lightweight, but all scheduling information is lost when the process terminates.
-
Database: scheduling information is stored within a relational database, which has to be a database used in the Web Project
-
Job Database. This option is available only if for the previous one the "Database" option is chosen. It's one of the databases defined in the project, where scheduling information is stored. Near this option there is the Job Store Mapping button that starts the execution of the SQL code needed to install the Quartz table for jobs in the database.
-
Job Schema.The database schema where the scheduling information is stored.
-
Job Table Prefix.The prefix given to tables storing scheduling information; you can have multiple sets of scheduling tables within the same database if they use different table prefixes.
-
Clustered Job Store.This property must be set to true if the Web application is deployed in a clustered environment.
|
|
Jobs can be modeled inside a Service View. In order to get ready to model a new job from scratch in a Web Project you need to know how two new units works:
In a Job it's not possible to use Session informations and there is no unit representing the exit point of the job. Moreover, the only way to understand why a job it's not working properly is to see the logs. If you want to have a clear vision of job errors you have to explicitely model the error management in the job model. You can also use modules inside a job.
Once the job model is ready, it's possible to add Triggers to the job. A trigger represents the istant in which the job must start its execution. It's possible to add more than one trigger to the same job. Those triggers will be instanciated when the Web application starts.
WebRatio 6.1 Improvements
|
From WebRatio 6.1, a Job defined in a Service View can be configured with a Trigger having one of the following new schedule policies:
-
On Session Create
-
On Session Destroy
-
On User Login
-
On User Logout
"On Session Create" and "On Session Destroy" policies can trigger a Job when the session begins and when the session is destroyed.
"On User Login" and "On User Logout" policies can trigger a Job when the users perform the Login in the WebApplication or perform the Logout.
Moreover, a new property Synchronized can be applied to the On Session Create and On User Login schedule policies: deselecting its predefined value (true) allows the asynchronous execution of long-running jobs, thus not impacting the user-experience in case of a newly created session or in case of a user that has just logged-in.
|
|
A Job Example
Suppose you want to realize a Web Application to send newsletter to registered users. We can surely model the operation chain for sending the newsletter as a job. Let's see what we need in order to make this example. First of all, add to the Data Model the entities and relationship to manage the newsletter contents and sending information. You can use the following figure as a starting point. Note that the derived relationship between User and Newsletter is the concatenation of the two N-N relationships connecting the Newsletter to the Group and the Group to the User.
|
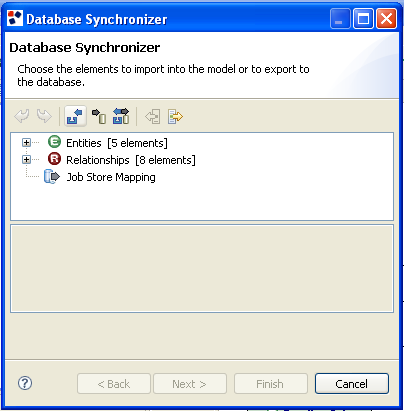
Once completed the Data Model you have to Syncronize the Database. In the opening dialog you see all the modeled entities and relationships. But there is also a new node representing the Job Tables. If you choose the Export All button you will create the SQL code to export all the Data Model but also to create all the Quartz table. Click on the Next button and complete the syncronization process.
The Job Tables, once exported, are ignored by the Database Synchronizer. This means that by default you can not import a Job Table into the Data Model as Entity. If you want to change this behaviour, you have to change an option in the Preferences. Select Window -> Preferences from the main menu. In the opening dialog choose WebRatio -> Modeling. Here there is the new option Ignore Quartz tables. By default this option is set to true. If you want to import as entities some Job tables you have to set this option to false.
|

|
Now we have to create the Web Model and the Job. The job has the goal to send a specific newsletter to all the user connected to it. Once the sending process is at its end it must change that status of the newsletter to "Sent". For each user, the job must consider if the mail is sent correctly or not. In the last case, the job has to trace in the Sending Info entity the failure reason.
Let's see now how to model this job. First of all you have to add a Service View to your Web Project. To do this select the Project tab, right click in the work area and choose the Add Service View command.
-
Select the
 Job tool from the left side palette and click anywhere in the workarea Job tool from the left side palette and click anywhere in the workarea
-
Right click on the Init Job Unit and choose the Add Job Input Parameter command. In the Properties View type "NewsletterOID" for the input parameter name.
-
Model the operation chain just as in the figure on the right. Note that everytime that you need the newsletter identifier in the operation chain use the Job Input parameter we have added to the Init Job unit.
N.B. Note that the last operation of the chain (Set as Sent) does not have any outgoing link. This is because the job does not have an exit point explicitely modeled.
|
|
We do not have to add trigger to this job since we are going to schedule the job when we create the newsletter in the Web Model. So let's see now how to create a newsletter, select the recipients and schedule the job.
First of all you have to add a Site View to your Web Project. To do this select the Project tab, right click in the work area and choose the Add Site View command.
-
Add a page to the Site View. Name the page "Newsletter"
-
Add an entry unit to the page. Name the unit "Newsletter Info"
-
Right click on the entry unit and choose the "Field Wizard" command. In the opening dialog choose the "Newsletter" entity and click on the Next button. Choose all the entity attributes except the OID and choose the NewsletterToUser relationship and click on the Finish button.
-
Add a selector unit on the Group entity and connect it to the entry unit through a transport link. This unit is used to preload the multiselection field. So make sure to have added manually some users and groups in the database. On the transport link couple the name with the label slot and the OID with the output slot.
-
Add the Create unit and the Connect unit needed to create the newsletter and to associate groups to it
-
Add a Schedule Job Unit outside the page. Type "Send Newsletter" as the unit name and choose the "Newsletter Sending " job for the Job property. Choose "Specific Date" for the Schedule Policy property.
-
Add a Time unit that convert the Sending Date (which is a date) in a timestamp in order to pass information to the Schedule Unit.
-
Complete the model as the following figure.
N.B. Before trying to generate the project remember to specify an SMTP server for the mail unit and a mail template if you planned to send HTML emails.