Introduction
WebRatio Mobile Platform gives you the possibility to make continuous builds of your Mobile Projects using predefined buildfiles bundled in WebRatio installation (the buildfiles are described here). This possibility can be integrated in continuous integration environments like Jenkins.
This tutorial guides you through the setup and configuration of a Mobile Project build using Jenkins.
Prerequisites
Download Jenkins
Jenkins can be used as a native package for your operating system or can be used in a web server container. This tutorial covers the second option.
Jenkins Web Archive can be downloaded from the official website.
There are several versions of Jenkins available for download; choose the latest and greatest one; usually available here.
Install Jenkins in a Tomcat application server
Simply copy jenkins.war inside the webapps folder of the Tomcat application server and then start Tomcat. In this way you just installed Jenkins in a Tomcat application server.
Tomcat should deploy jenkins.war and then let you access it from the web browser at http://localhost:<tomcat-http-port>/jenkins
For more details on how to install (including how to use a dedicated Tomcat), update and maintain jenkins inside Tomcat, please refer to the official documentation available here.
Setup Ant environment variables
Jenkins will build the Mobile Project running an Ant script. This requires you to set up Ant properly in order to let Jenkins build a Mobile Project outside the WebRatio Mobile Platform.
For more details on how to set up the Ant environment variables please refer to this tutorial available here.
How to continuously build a Mobile Project
Prepare Mobile Project
The Mobile Project used for this tutorial is the HelloWorld project which can be modeled by attending this video tutorial.
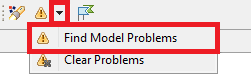
If you wish to use your own Mobile Project, please check that the model is correct by running the Find Model Problems procedure available from the WebRatio’s toolbar.
Keep note of the project’s name as you will need it later.
Prepare the Build Configuration
In order to build a Mobile Project you need to define a Build Configuration.
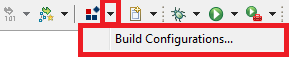
Build Configurations can be created within the WebRatio Mobile Platform using the command available from the WebRatio’s toolbar.
With WebRatio Mobile Platform, you can create build configurations for iOS and Android; for both OS you can create debug and release builds.
To understand how to create build configurations refer to this set of tutorials:
This tutorial uses an Android debug Build Configuration with the following properties:
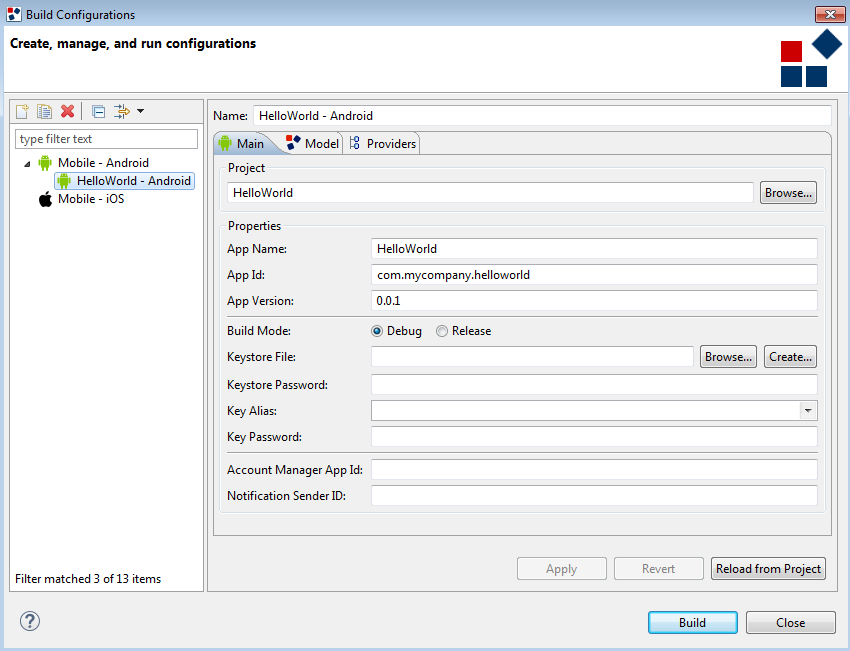
Keep note of the Build Configuration’s name as you will need it later.
Understand Build task structure and parameters
WebRatio Mobile Platform lets you build Mobile Projects from command line through Ant build. An Ant build requires the so-called xml buildfile that describes the build process.
It defines which is the project to be built, which is the target (compile, generate, build, etc) and the related task (the piece of code to be executed).
WebRatio contains two bundled default buildfiles; one for building, the other for generating.
We are going to use the buildfile to build projects, which is located inside the WebRatio\build\scripts folder in the WebRatio installation directory.
This is its content:
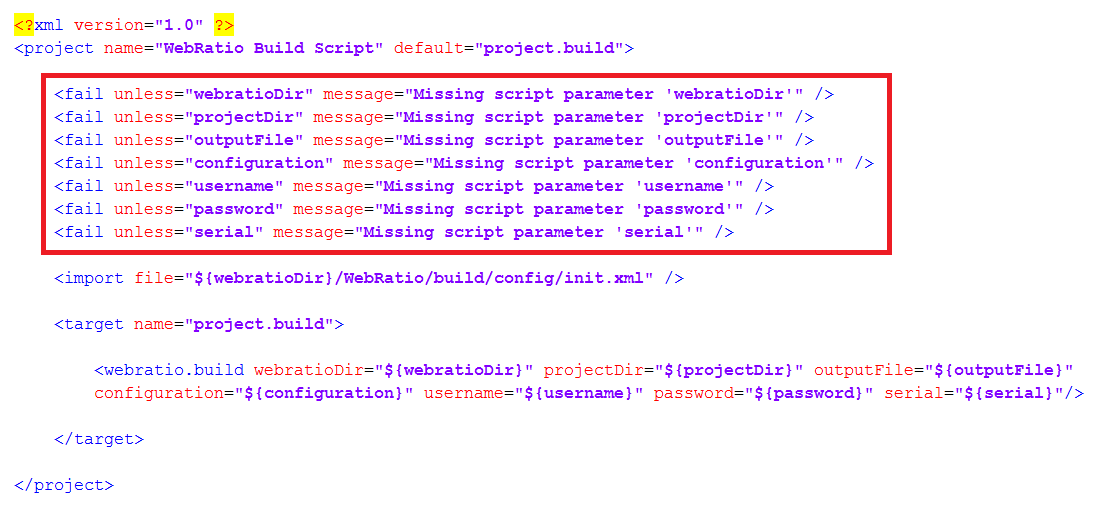
This buildfile defines the following parameters which are all mandatory:
- webratioDir : defines the absolute system path to reach the installation folder of WebRatio
- projectDir : defines the absolute system path to reach the folder in which the Mobile Project to be generated is available
- outputDir : defines the absolute system path at which the generation result will be available
- configuration : defines the absolute system path to reach the folder in which the launch file is available, which describes the build configuration to be used. It accepts also only the name of the configuration to be used
- username : corresponds to the username associated with the WebRatio Mobile Platform activation
- password : corresponds to the password associated with the WebRatio Mobile Platform activation
- serial : corresponds to the serial associated with the WebRatio Mobile Platform activation
These parameters need to be defined in Jenkins.
Jenkins offers two ways to define parameters:
- Jenkins Environment Variables: global and shared by all projects
- Build Parameters: local and related to single build instance; you’ll review them and if needed provide them, every time a build is launched
Both types of parameters can be used in Jenkins with this syntax ${<PARAM_NAME>} with <PARAM_NAME> replaced by the desired parameter.
The webratioDir, outputDir, username and serial parameters can be considered as global since they are not supposed to change across projects. You will create in the next steps the related Jenkins Environment Variables.
The projectDir, configuration and password can be instead considered as local with respect to the build process instance. Even though the password won’t change, it can be prompted as confirmation each time a build process is run. You will create in the next steps the related Build Parameters.
Configure Jenkins Environment Variables
In order to build a Mobile Project from Jenkins the first step is to open the Jenkins dashboard. Start the Tomcat where you put the Jenkins application, and wait for the “Server startup” message.
Once you receive that message, open your default browser and navigate to the Jenkins web application; the URL is based on the type of installation done with the jenkins.war file (in this example http://localhost:8080/jenkins
You should see the Jenkins dashboard.
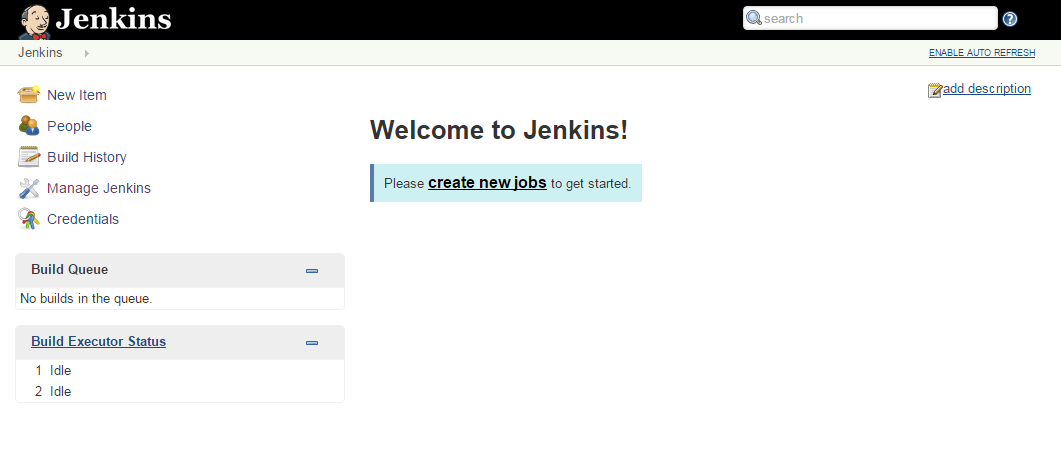
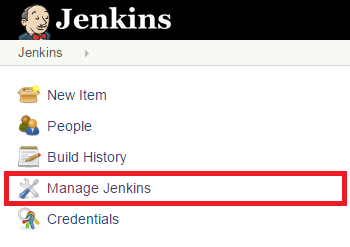
From the dashboard, press the Manage Jenkins link to open the Jenkins configuration page.
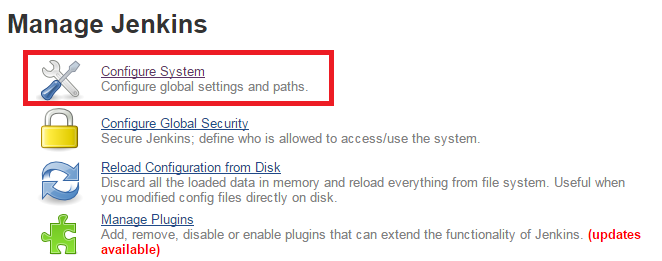
Then press the Configure System link.
Scroll down till you find the Global Properties section. Check the Environment Variables to start defining new global variables for Jenkins. You should see immediately the “List of key-value pairs” label and the Add button as shown below.

In order to connect Jenkins to the WebRatio installation on your machine, you can configure four variables:
- OUTPUT_DIR: used by the buildfile to identify the output directory that will store the results of the build process
- WEBRATIO_DIR: the absolute path to the WebRatio installation folder
- USERNAME: the username used to activate the WebRatio installation
- SERIAL: the serial used to activate the WebRatio installation
Press the Add button to start adding variables: provide name and value for all of them.
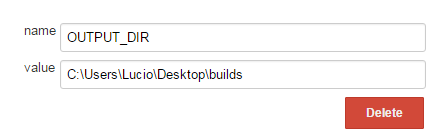
Repeat the procedure for all four variables.
Then press the Apply and Save buttons to confirm.
You should go back to the Jenkins dashboard.
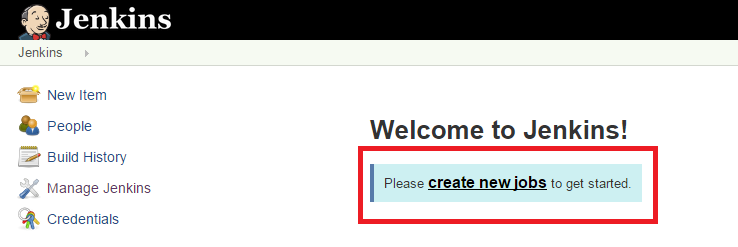
Create a new Jenkins Project
From the Jenkins dashboard, press the create new jobs link.
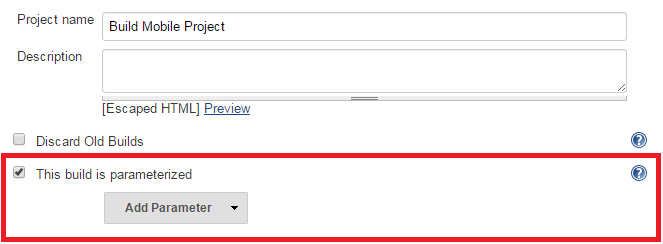
A new page is loaded showing the available project types. Provide a name (ex. Build Mobile Project) and choose Freestyle Project as project type, then press the OK button to proceed.

You should now see the Project Configuration screen.
Configure Build Parameters
It’s now time to configure the Build Parameters as decided previously (Understand Build task structure and parameters paragraph).
You will need the PROJECT_DIR, CONFIGURATION and PASSWORD parameters.
Regarding the PROJECT_DIR parameter this can be built as a concatenation of two parameters, one is the WORKSPACE_DIR, the other one is the PROJECT_NAME.
From the Project Configuration screen, check the This build is parametrized property.
The Add Parameter button should now be visible.
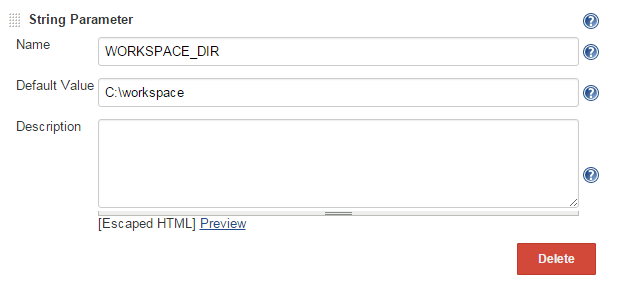
Let’s start adding the WORKSPACE_DIR parameter.
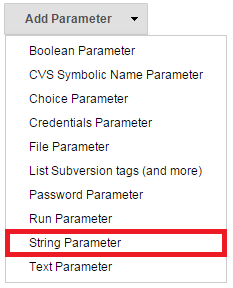
Press the Add Parameter button and choose String Parameter.
Set the name to WORKSPACE_DIR and the default value to the absolute path of the workspace on your local machine.
The parameter should look like the one below.
Repeat the same procedure also for the PROJECT_NAME and CONFIGURATION without providing a default value (as they will change every time you start a build process).
Finally add the PASSWORD parameter.
To do it, press the Add Parameter button and choose Password Parameter.
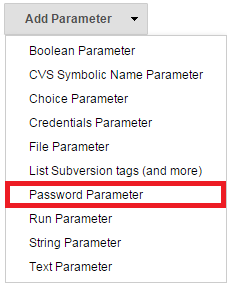
Provide as name PASSWORD and as default value the password associated to your WebRatio account.
The build parameters are now configured; press the Apply button to save changes.
Configure the Ant build
Let’s now invoke the Ant buildfile described in the Understand Build task structure and parameters paragraph.
Scroll down to the Build paragraph and then press the Add build step > Invoke Ant button.
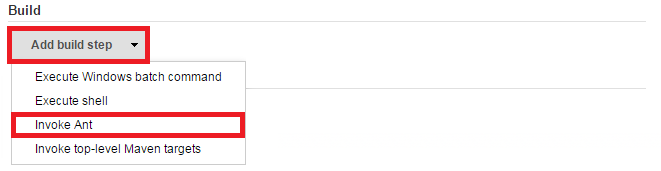
Open the advanced settings by pressing the Advanced… button
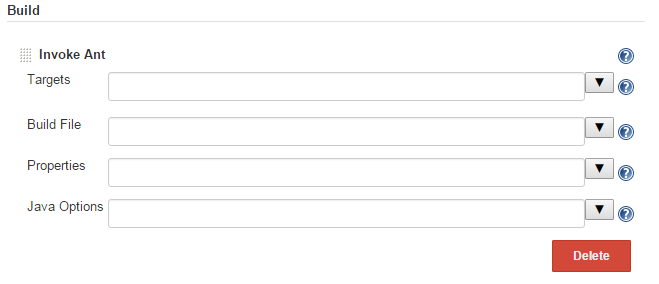
The first parameter required is the Target of the buildfile. This must be set equal to project.build
The target value can be found at line 14 of the build.xml file.
The second parameter is the build file which has a static location. It is always inside the WebRatio\build\scripts folders in the WebRatio installation directory.
Using our set of environment variables, this can be expressed as: ${WEBRATIO_DIR}/build/scripts/build.xml. Use it as the value for the Build File property.
The third parameter is a collection of Properties. It’s the set of parameters required by the buildfile, expressed by means of environment variables and build parameters.
For the purposes of this tutorial it is evaluated like this.
webratioDir=${WEBRATIO_DIR}
projectDir=${WORKSPACE_DIR}/${PROJECT_NAME}
outputFile=${OUTPUT_DIR}/${PROJECT_NAME}.apk
configuration=${CONFIGURATION}
username=${USERNAME}
serial=${SERIAL}
password=${PASSWORD}
This should be the final configuration of the Jenkins Project.
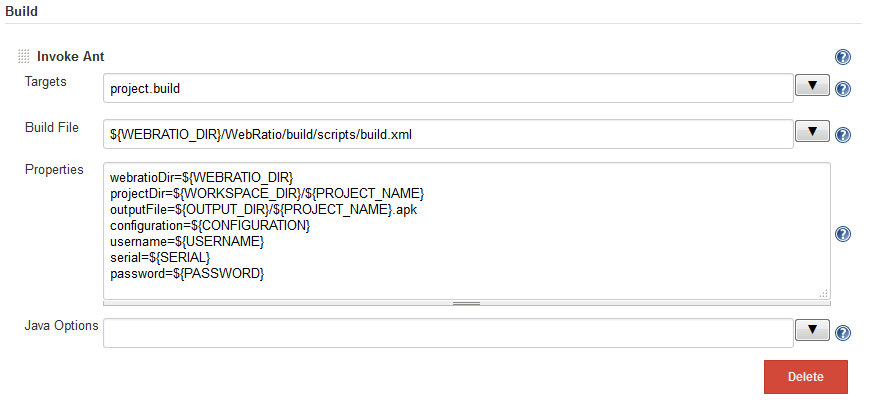
Press the Apply button and then the Save button to save the configuration.
Build the Mobile Project
Once that the configuration is done, it’s time to build the Mobile Project.
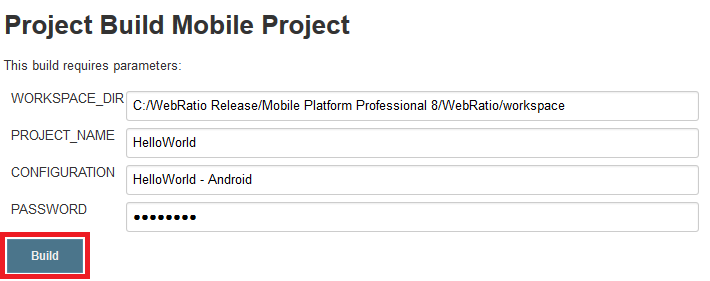
From the main Jenkins dashboard, press the Build with Parameters button.

A new page shows the list of project parameters that we configured in the previous steps.
Provide all of them and then press the Build button to start the build process.
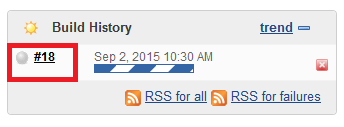
As soon as you press the Build button, you should see, on the left side menu of Jenkins, the status of the current build.
Press the build #id to open its details.
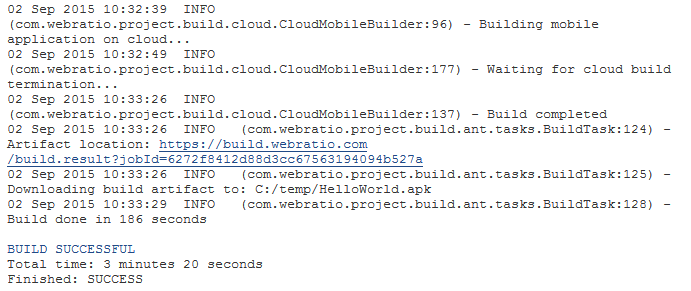
From the details screen press the Console Output button to have the real time update on the build process.
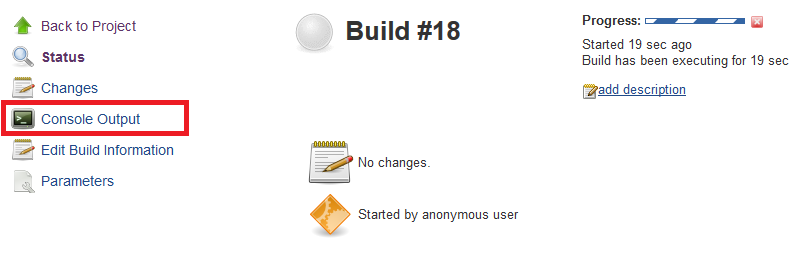
The build process is executed on WebRatio cloud servers, and once it is completed you should see the BUILD SUCCESSFUL message.