This article shows how to use an external XML file for load content in the Web application. It's possible to use remote XML files or files stored in the Web application folder. Consider an XML file containing the list of italian regions, provinces and cities. You can download a sample file here. Suppose that you want to create a form in which the user can select these information. You want to load the options in this form using the XML file. Let's see how to do this easily.
-
Download the "XML Example File" attachment in your Web Project folder under the directory WebContent/xml.
-
Add a Page.
-
Add an Entry Unit to the page and name it "Form".
-
Add two Selection Fields to the Entry Unit, name them "Region" and "Province".
-
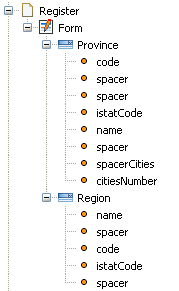
The "Region" Selection Field must show the region name and its code between brackets. As output suppose to have just the istat code of the region. Add the necessary Slots to the field. You can see a sample list in the image on the right.
-
The "Province" Selection Field must show the province name, its code between brackets and the cities number. As outpout suppose to have the istat code. Add the necessary Slots to the field. You can see a sample list in the image below.
 |
-
Add a Get XML Unit outside the page and name it "Get Regions". In the Properties View choose "Static Url" for the Source Type property and write "xml/dbcomuni.xml" for the Static URL property.
-
Add a Script Unit outside the page and name it "Parse Regions XML". In the Properties View click on the Browse button next to the Script File property. In the opening dialog select the "descr" folder, write a name for the Groovy Script (parseRegionXML.groovy) and click on the OK button.
-
Open the file and write the Groovy Script. This script has to produce the options lists for the two Selection Fields. In order to write the correct Groovy Script you have to know the XML file structure. A portion of the XML file is reported below.
<?xml version="1.0" encoding="UTF-8"?>
<dataroot xmlns:xsi="http://www.w3.org/2001/XMLSchema-instance">
<regioni>
<regione>Piemonte</regione>
<capoluogo>Torino</capoluogo>
<zona>Italia Nord Occidentale</zona>
<codice_istat>01</codice_istat>
<sigla_regione>PIE</sigla_regione>
<sito>http://www.regione.piemonte.it/</sito>
<email>urp@regione.piemonte.it</email>
</regioni>
<regioni>
<regione>Valle d'Aosta</regione>
<capoluogo>Aosta</capoluogo>
<zona>Italia Nord Occidentale</zona>
<codice_istat>02</codice_istat>
<sigla_regione>VDA</sigla_regione>
<sito>http://www.regione.vda.it/</sito>
<email>urp@regione.vda.it</email>
</regioni>
......
<province>
<provincia>Torino</provincia>
<regione>01</regione>
<numero_comuni>315</numero_comuni>
<codice_istat>001</codice_istat>
<sigla>TO</sigla>
<sito_provincia>http://www.provincia.torino.it/</sito_provincia>
</province>
<province>
<provincia>Vercelli</provincia>
<regione>01</regione>
<numero_comuni>86</numero_comuni>
<codice_istat>002</codice_istat>
<sigla>VC</sigla>
<sito_provincia>http://www.provincia.vercelli.it/</sito_provincia>
</province>
.......
</dataroot>
The Groovy script has just one input which is the XML file and it has different outputs, one for each slot of the selection fields (spacer excluded). The script must search for all the "regioni" nodes and "province" nodes. Each resulting list is alphabetically reordered. Then the interesting information are extracted. Here is the complete Groovy script
#input Document xmlFile

#output String[] regions, String[] codes, String[] istatCodes, String[] provinces

#output String[] codesP, String[] istatCodesP, String[] citiesNumber


//extracts all "regioni" and "province" elements

def regions = xmlFile.selectNodes("//regioni")

def provinces = xmlFile.selectNodes("//province")


//alphabetical sort using the name of the region/province

regions = regions.sort({it.selectSingleNode("regione").text})

provinces = provinces.sort({it.selectSingleNode("provincia").text})


//extract the list of region names,codes, etc.. (the .text operator returns the node value)

def regionNames= regions.collect{it.selectSingleNode("regione").text}

def codes = regions.collect{it.selectSingleNode("sigla_regione").text}

def istatCodes= regions.collect{it.selectSingleNode("codice_istat").text}


def provincesName= provinces.collect{it.selectSingleNode("provincia").text}

def codesP= provinces.collect{it.selectSingleNode("sigla").text}

def istatCodesP= provinces.collect{it.selectSingleNode("codice_istat").text}

def citiesNumber = provinces.collect{it.selectSingleNode("numero_comuni").text}


//returns the output arrays

return ["regions": regionNames, "codes": codes,

        "istatCodes": istatCodes, "provinces": provincesName,

        "codesP": codesP, "istatCodesP": istatCodesP,

        "citiesNumber": citiesNumber]
-
Connect the Get XML Unit with the Script Unit with an OK link.
-
Open the Coupling Dialog and couple the "Retrieved XML Document" output parameter with the "xmlFile" input parameter.
-
Connect the Script Unit with the Entry Unit with an OK link.
-
Open the Coupling Dialog and couple each output of the Script Unit with a slot of the Entry Unit.
Look at the following images for the complete model and the coupling example.
-
Generate the Web Project using the command "Generate Full Web Project".
This example consider the two selection fields as completely independent. Infact, as you can see in the image, event if the user chooses the "Lombardia" region, the list of provinces remains always the same. It's possible to improve this form adding a relationship between regions and province and then creating a custom field template that filters the provinces using javascript depending on the region selected. Let's see how to do it.
-
Add a new Slot to the Province Selection Field named "relatedRegion" and mark it as Output.
-
Select the Province Selection Field and in the Properties View reorder the slot placing the relatedRegion slot at first.
-
Modify the Groovy Script adding a new output named "relatedRegion" and add the following lines
def relatedRegion = provinces.collect{it.selectSingleNode("regione").text}


//add the relatedRegion to the output

return ["regions": regionNames, "codes": codes,

        "istatCodes": istatCodes, "provinces": provincesName,

        "codesP": codesP, "istatCodesP": istatCodesP,

        "citiesNumber": citiesNumber, "relatedRegion": relatedRegion]
-
Open the Coupling Dialog on the OK link connecting the Script Unit and the Entry Unit and couple the new output "relatedRegion" with the new Slot of the Entry Unit.
-
Create a new Style Project.
-
Create a new folder named "javascript".
-
Download from here the javascript to filter the options and place it in the "javascript" folder.
-
Select the page and in the Properties View click on the Browse button next to the Linked Resources property. In the opening dialog select the "filterlist.js" and click on the OK button.
-
Right click on the "Region" selection field and choose the "Add Property" command. In the Properties View write "fieldToFilter" for the property name and write the id of the "Province" field in the Value property.
-
Create a new Field Template and name it "FilterWithJavascript".
-
Write the following code in the template.
#?delimiters [%, %], [%=, %]

[%

setHTMLOutput()

def type = field["type"]

def fieldId = field["field"]

def plain = getById(fieldId)?.name == "Field"

def fieldProp = field["field"] + ((isLocalizedType(type) && plain) ? "_locale" : "")

def subType = getById(field["subType"])

def typeId = (field["subType"] != "") ? field["subType"] : type


def labelProperty = field["field"] + "LabelList" + (isLocalizedType(type) ? "_locale" : "")

def listProperty = field["field"] + "List"

def selectionFieldEmpty = params["selection-field-empty-message"]


def filteredField = field.selectSingleNode("Property[@name='fieldToFilter']")?.attributeValue("value")


def submitLinks = getSubmitLinks(field)

def modifiable = (field["modifiable"] == "true")

def selection = getById(field["field"])?.name == "SelectionField"

def multiSelection = getById(field["field"])?.name == "MultiSelectionField"


def readOnly = "false"

def readCond = getDisableCondition(field)

if(!selection && !multiSelection && !modifiable){

  readOnly = "true"

}else if(readCond != null){

  readOnly = "${" + readCond + "}"

}


def onkeyPressed = {

   if(submitLinks != null && submitLinks.size() > 0){

      %]onkeypress="if(event.keyCode==13){clickButton('[%= submitLinks.collect{it["link"]}.join("|")%]'); return false;}"[%

   }

}


if (mode == "error") { %]

<span class="<wr:StyleClass context="field"/> error"><html:errors property="[%=fieldProp%]"/></span>

[% } else if (mode == "label") { %]

<span class="<wr:StyleClass context="field"/> header"><wr:Label context="field"/></span>

[% } else { %]

	<html:select onchange="javascript:myfilter.set('^' + this.value)" [%onkeyPressed()%] styleId="[%= fieldProp %]"

	styleClass="[%=styleClass%]" property="[%= fieldProp %]" disabled="[%= readOnly%]">

		[% if (selectionFieldEmpty == "true") { %]

	  		<html:option value=""><bean:message key="[%=params["no-selection-message"]%]"/></html:option>

	  	[% } %]

	  <html:options property="[%=listProperty%]" labelProperty="[%=labelProperty%]"/>

	</html:select>

	<SCRIPT TYPE="text/javascript">

	    var myfilter;

		document.observe("dom:loaded", function() {

		  myfilter = new filterlist($('[%= filteredField %]'));

		});

	</SCRIPT>

[% } %]
-
Select the Grid of the page. In the Outline View select the "Region" selection field. In the Properties View, assign the "FilterWithJavascript" template in the Unit Layout property.
-
Generate the Project. The result is that the Province field will be filtered showing only the list of Province belonging to the selected Region.
Advanced Example
Suppose that you want to parse the XML file to create another version of that file, which is usable by the XML In Unit. In this way you can save the information stored in the XML file in volatile entities, and use those entities to model cascading dropdown lists. The first step is to create the Data Model representing the XML file content. When modeling those entities there are a few of guidelines to follow:
-
The attributes must be named as the XML Node written in the XML file. For example the "regione" node must be the "regione" attribute.
-
Do not use the Uppercase for the first character of the name.
-
If the name is composed by different words, concatenate the words without any separator. For example, the "codice_istat" node becomes the "codiceistat" attribute.
-
Remember to do not use reserved names, such as the "class" name.
Let's see now how to change the Web Model.
-
Write a new Groovy Script which transforms the original XML into a new XML file for the XML In Unit. This is the sample script.
#input Document inputDocument

#output Document document


import org.dom4j.*

import org.apache.commons.lang.StringUtils


//rename the root element in "Root"

Element root = inputDocument.getRootElement()

root.setName("Root")


//add the EntityName element

Element regionEntity = root.addElement("Regione")


//iterate over all regions and rename the node to "Instance"

root.selectNodes("regioni").each{regione ->

	root.remove(regione)

	regione.setName("Instance")


        //normalize the attributes names replacing the "_" character with none

	regione.elements().each{it.setName(StringUtils.replace(it.getName(),"_",""))}

	regionEntity.add(regione)

}


Element provinceEntity = root.addElement("Provincia")

Element relationship = root.addElement("Relationship")

relationship.addAttribute("id", "role1")


//iterate over all provinces and rename the node to "Instance"

root.selectNodes("province").each{provincia ->


	root.remove(provincia)

	provincia.setName("Instance")


        //normalize the attributes names replacing the "_" character with none

	provincia.elements().each{it.setName(StringUtils.replace(it.getName(),"_",""))}

	provinceEntity.add(provincia)


        //create the relationship node in order to connect the province to a region

	Element instance = relationship.addElement("Instance")

	Element source = instance.addElement("Source")

	source.setText(provincia.valueOf("codiceistat"))

	Element target = instance.addElement("Target")

	target.setText(provincia.valueOf("regione"))


}


//removes the comuni nodes which are useless

root.selectNodes("comuni").each{root.remove(it)}


return ["document":inputDocument]
-
Add a XML In Unit outside the page and name it "Insert Data".
-
Right click on the "Insert Data" unit and choose the Add XML In Entity command. In the Properties View, write "Region" for the name, choose "Regione" for the Entity property, choose "codiceistat" for the Key attributes property and check the Use Names property.
-
Right click on the "Insert Data" unit and choose the Add XML In Entity command. In the Properties View, write "Province" for the name, choose "Provincia" for the Entity property, choose "codiceistat" for the Key attributes property and check the Use Names property.
-
Right click on the "Insert Data" unit and choose the Add XML In Relationship command. In the Properties View, write "Relationship" for the name, choose "ProvinciaToRegione" for the Relationship property.
-
Connect the Script Unit to the XML In unit with an OK Link and couple the document output parameter of the Script Unit to the Input XML Document input parameter of the XML In Unit.
Now you have to model the cascading dropdown lists using AJAX. You can see how to do it in the related WebRatio Tutorial in the WebRatio installed product.