Introduction
The Periodical Page Refresh is a feature that allows you to add a trigger to a navigation flow with the selective refresh enabled. In this way, it’s possible to automate clicking on a link to update some information in real time. This feature is very useful when you need to execute a business logic that takes some time to complete and when you want to notify the user in real time about the result. This article explains how to get this result using a sample model in which a stock quote Web service is called each five seconds to get a real quote about Google.
The WebRatio Model
First, you need to have a starting model on which to apply the periodical refresh. Let’s suppose you want to accomplish the example about the Web service described in the previous section. The starting model is shown in the following figure. The prerequisite is to have a Navigation Flow on which the “Selective Refresh” is enabled.
You can find more information about how to obtain the following model by watching the “Invoking SOAP Web Services” and “Invoking SOAP Web Services - Output Transformation” online lessons.
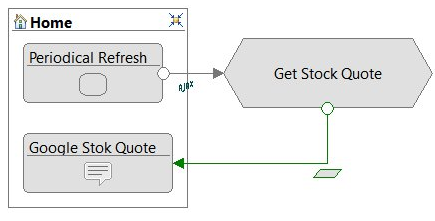
The proposed model displays to the user a page on which a message is shown with the Google Stock Quote. Every five seconds, the Navigation Flow outgoing from the “Periodical Refresh” View Component triggers the “Get Stock Quote” action. The action refers to an action definition in which a SOAP Request Response operation calls the Web service and gets the quote.

To add the periodicity to the Navigation Flow, you have to create a custom template for the “Periodical Refresh” View Component or for the Navigation Flow. In this article you learn how to create the Component Template. This template contains a piece of JavaScript code that clicks the link every five seconds.
The Component Template
The prerequisite to create a custom template is to have a Style Project that contains it. Once you have created the template for your View Component (in this example, the template is for the “Periodical Refresh” View Component ), you should write the following code:
#?delimiters [%, %], [%=, %]
<wr:layoutparameter default="500" label="Interval" name="interval" type="integer">
The timeout expressed in milliseconds
</wr:layoutparameter>
[% setHTMLOutput() %]
[% def periodicalLink = unit.selectSingleNode("layout:Link") %]
<script>
if(window["<wr:Id context="unit"/>"]){
clearInterval(window["<wr:Id context="unit"/>"]);
}
window["<wr:Id context="unit"/>"] = setInterval(function(){[% printRaw(getAjaxRequestCall(periodicalLink, "index")) %]}, [%= params["interval"] %] );
</script>
- Lines 8-13. This is the interesting part of the template. Basically you are creating an interval setting which is the link to be triggered and when. Using the “setInterval” method you ensure that every X milliseconds the link is triggered. This is the core of the script that enables the periodical page refresh. All the rest of the code ensures that everything works properly, whether the view component is included in the selective refresh or not. In fact, if the view component is included in the selective refresh, the “setInterval” function is executed again, creating more intervals and so the link is triggered too many times. Saving the result of the “setInterval” function in a variable attached to the window prevents this undesired behavior from occurring.
- Lines 9-11. You check whether the window variable exists or not and clear its content before setting the interval.
- Lines 2-4. You can add a Layout Parameter to the template to let the modeler decide the interval in milliseconds to apply to the navigation flow.
The last thing to do is to apply the template on the View Component and generate the project to see the final result.