Introduction
This article explains step-by-step how to model the Vacation Request business process available on the WebRatio add-on. The Vacation Request Process focuses on controlling the vacations requests within the organization, from the initial request up to its approval or rejection.
The process starts when an employee of the organization submits a vacation request. Once the request is registered, an automatic check on the availability of the requested days is performed. If the dates are available, the request is received by the immediate supervisor of the employee requesting the vacation. The supervisor can approve or reject the request; in the latter case, he can add a motivation.
If the request is rejected, the process returns back to the employee who can then review the reasons for rejection. If the request is approved, a notification is sent to the Human Resources Representative, who must complete the respective management procedures.
Let’s see how to model this business process in WebRatio BPM Platform.
Step 1: Create the BPMN Project
Let's start by creating a new BPMN Project that will contain all the process models you desire:
- Click on File > New > BPMN Project from the main menu
- Enter a name for the new project, such as "Vacation Request"
- Press Finish to complete.
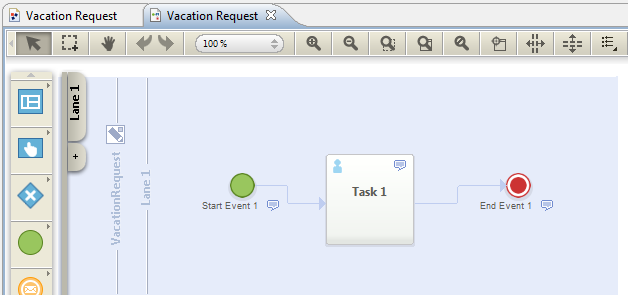
As you can notice, WebRatio BPM Platform automatically creates a skeleton for the process.
Step 2: Define Process Actors
Now, let’s define the actors involved in the process. The vacation request involves an Employee who submits the request, a Supervisor who approves or rejects the request, and a Human Resources Assistant who completes the management procedures. Therefore, for each actor, you need to create a Lane and a Role.
Define Lanes
First, we need to change the name of the first lane and add all the other lanes of the process. To change the lane name:
- Double-click on the lane tab "Lane 1" on the left side of the work area
- Enter an actor’s name, such as "Employee"
To add the other lanes:
- Press the plus button under the last tab in the process
- Enter a name for the new lane
- Repeat the first two steps for all actors
Define Roles
Each actor can belong to one or more user category that we call Roles. You need to define the Roles involved in the Vacation Request Process. Remember that a Role might correspond to several lanes in the same process or in different processes (e.g.: a user belonging to the Supervisor Role might act as Supervisor in a Vacation Request Process instance, and he might start a Vacation Request Process himself, or he might act as Employee in an Expense Report Process Instance).
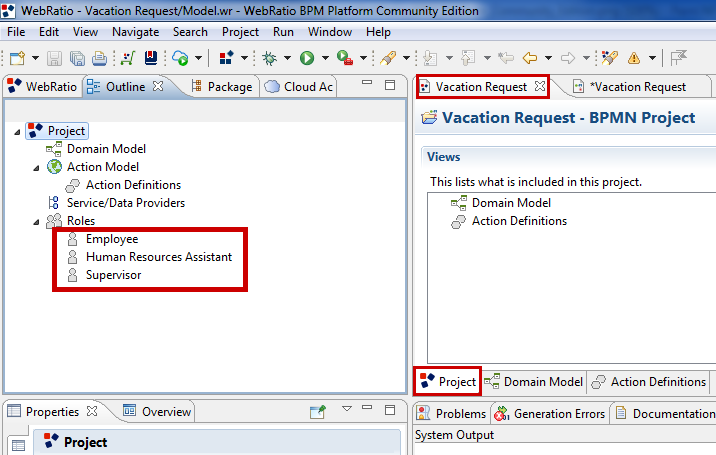
The Roles are defined within a BPMN Project. In this project you are going to create three roles: Employee, Supervisor, and Human Resource Assistant.
Let’s start adding the Roles for the Employee lane in our BPM process:
- Open the Model.wr of the Vacation Request project.
- Move to the Vacation Request BPMN Project view.
- Right click on the "Roles" node in the Outline View and select the Add > Role option.
- Write "Employee" as the role name.
- Repeat Steps 3 and 4 in order to add the "Supervisor" and "Human Resources Assistant" roles.
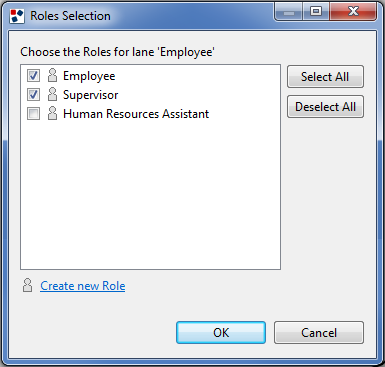
Now, let’s associate each role to the corresponding lane:
- Open the Vacation Request Process.
- Select the "Employee" lane and move to the Properties View.
- Press the "Select Roles" button next to the "Roles" property.
- In the opening dialog, select the role to associate with the lane and press the OK button to confirm.
- Repeat the same procedure to associate the "Supervisor" role with the "Supervisor" lane and the "Human Resources Assistant" role to the "Human Resources Assistant" lane.
Step 3: Define Process Parameters
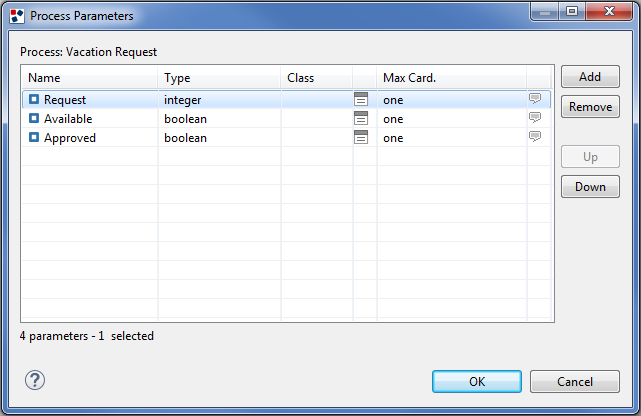
Now, let’s consider which information is managed by the Vacation Request Process. First of all, there’s the Vacation Request object. The request is composed of different fields that may not be directly handled by the process; the only required information is the request identifier, so that it’s possible to retrieve it. Then a parameter is required to evaluate if the days requested are available or not and another parameter that states whether the request is approved or not. This is the process parameter summary:
- Request: the vacation request identifier
- Available: the boolean value indicating the availability of the requested days
- Approved: the boolean value containing the Supervisor decision
Let’s add these parameters to the process:
- Press the "Edit Process Parameter" button next to the process name.
- In the opening dialog, press the "Add" button to add a parameter.
- Type the parameter name (e.g. "Request").
- Choose a type for the parameter
- Set a maximum cardinality for the parameter (one or many).
- Repeat Steps 2-5 to add all the process parameters.
At the end of this procedure, the Process Parameter dialog will appear as shown in the image below.
- Press the OK button to confirm.
Step 4: Define the BPM Process
Once the process actors and parameters have been defined, it is time to design the flow of the process along with all the necessary activities performed by the actors. This section explains how to create the process diagram step by step starting from the first activity until the last one.
Define the "New Vacation Request" start event
Each process requires at least one start event that specifies how the process can be started. In this case the process starts when an Employee wants to request a vacation. This is a manual action performed by the Employee. The best way to represent this intention in the business process model is to use a Generic Start Event.
The skeleton created by the wizard already contains a generic start event, so you just need to rename it (e.g. "New Vacation Request" ). Be sure that the event is placed in the "Employee" lane.
Define the “Register Vacation Request” user task
The first activity of the employee is to register the vacation request. This activity is a User Task, because it is accomplished by an actor of the business process. You can use the user task "Task 1" already present in the model and change it to become this task.
- Double-click on "Task 1"
- Enter a new name for the task, such as "Register Vacation Request"
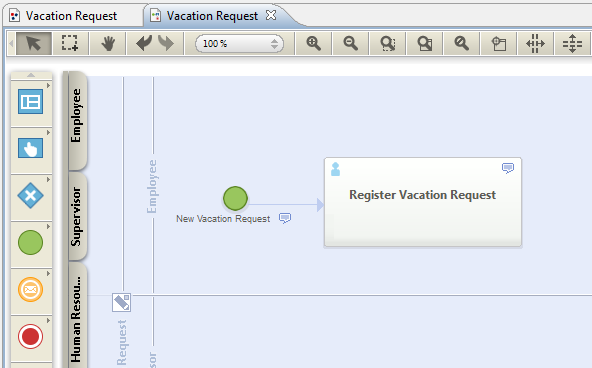
The Employee must fill in a new vacation request in this task. The business process is interested in the the parameter, which identifies the vacation request, so you have to model that the "Register Vacation Request" user task to use the "Request" parameter.
- Select the "Register Vacation Request" task.
- Move to the Properties View.
- Press the "Browse" button next to the Parameters property.
- Select the "Request" process parameter.
- Press OK to confirm.

NOTE: Notice the “Editable” and “Required” option next to each parameter. You can specify that a parameter can be modified by the business process actor checking the “Editable” property. You can also state that a parameter is mandatory to complete a task properly by checking the “Required” property.
Once your activity parameters are properly defined, a new icon appears in the right-bottom of the task. You can easily display all the parameters you chose for the task by simply clicking on it (see the following image).

Define the "Check Day Availability" service task
The next step is to check whether the days indicated in the vacation request are available or not. You need to define an activity that receives the Vacation Request information as input and states if the vacation days involved are available or not for that employee. This operation is executed without the user interaction. The BPMN concept for an activity executed by the system is the Service Task. Let’s add a Service Task to the "Supervisor" lane.
- Select the "Service Task" item from the toolbar section related to Activities.
- Place it in the "Supervisor" lane
- Type a name for the task, such as "Check Day Availability"
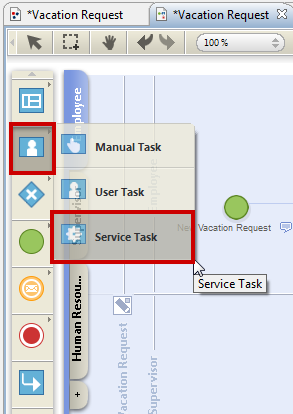
- Then, let’s connect the “Register Vacation Request“ user task with the “Check Day Availability” service task.
- Select the "Register Vacation Request" task.
- Select the Sequence Flow option from the pie menu.
- Release the flow target on the "Check Day Availability" task.
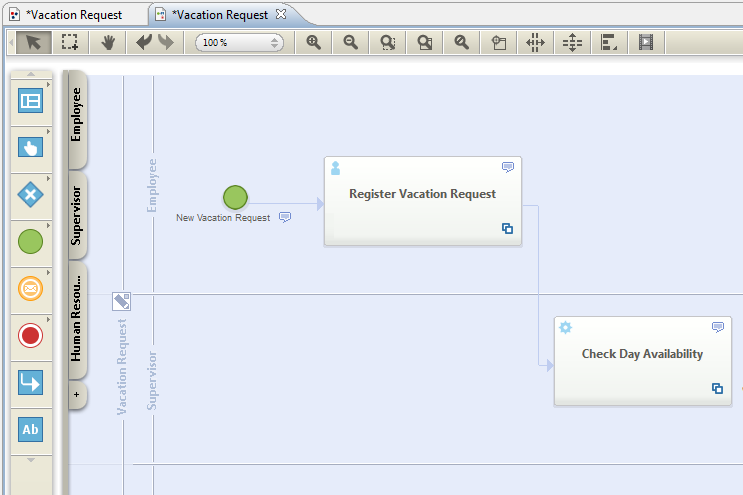
Now, let’s associate the process parameters for this task:
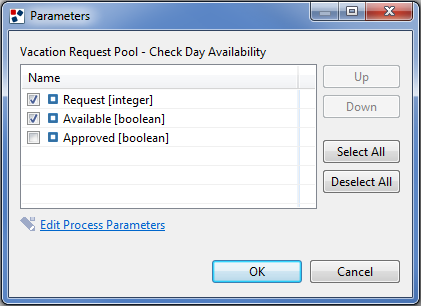
NOTE: The "Editable" and "Required" property are not available for the selected parameters because you are setting parameters for a service task that is not accomplished by a business process actor.
It’s now possible to define the Microflow executed by the service task. Microflows are modeled in Action Definitions. In this case, the Action Definition receives as input the information about the vacation request and returns the result of the availability check. Let’s define the Action Definition:
- Press the "Action Definition" button next to the Action Definition property.
- In the opening dialog press the "Create new Action Definition" option.
- In the Action Definitions view, type a name for the new Action Definition, such as "Verify Available Vacation Days".
- Double click on the Action Definition in order to define its model. As you can see, WebRatio BPM Platform automatically creates the Port Definition Parameters in order to match them with the process parameters used by the task.
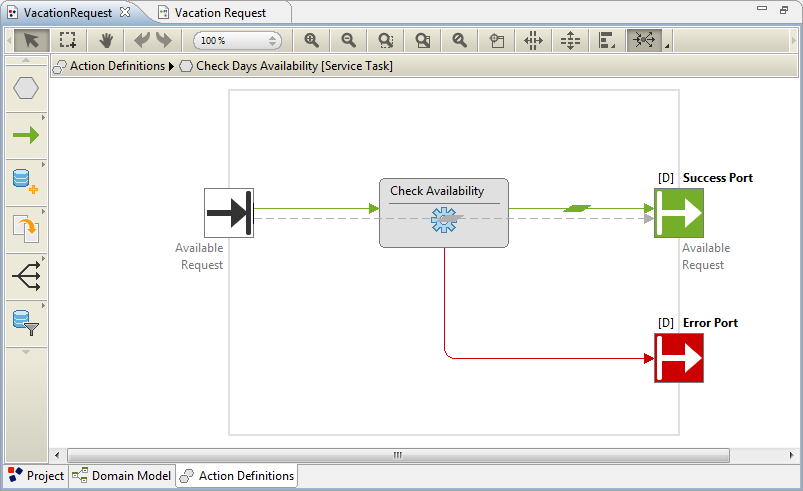
This Action Definition will contain the logic needed to check the availability for the vacation request passed as input. You can model any business logic. Once the Action Definition is properly defined, let’s go back to the task properties in the process definition. As you can see the "Input Binding" and "Output Binding" properties are automatically set.
Define the "Check Days Availability" exclusive gateway
The business process takes a different path depending on the result of the service task. Let’s use an Exclusive Gateway:
- Click on the "Check Day Availability" task.
- In the pie menu on the task, select the Exclusive Gateway option.
- Release the gateway in the “Supervisor” lane.
- Type a name for the gateway, such as "Check Days Availability".
Once the gateway has been placed, you need to draw the sequence flows representing the available paths. You need to add two sequence flows: one in case the vacation days are available and the other in case the vacation days are unavailable. The first one will activate a new task for the vacation approval; the latter will reactivate the "Register Vacation Request" task. Let's start adding the first sequence flow:
- Click on the "Check Days Availability" gateway element.
- Starting from the pie menu on the gateway, add the “Approve Vacation Days” user task in the "Supervisor" lane.
- Double-click on the new Sequence Flow just created and type a name for it, such as "Days Available".
- Move to the Properties view and enable the Default property (stating that this is the flow followed by default).
Then, let’s add the Sequence Flow representing the case in which the vacation days are not available. This sequence flow "Days Not Available" will connect the gateway with the "Register Vacation Request" task.
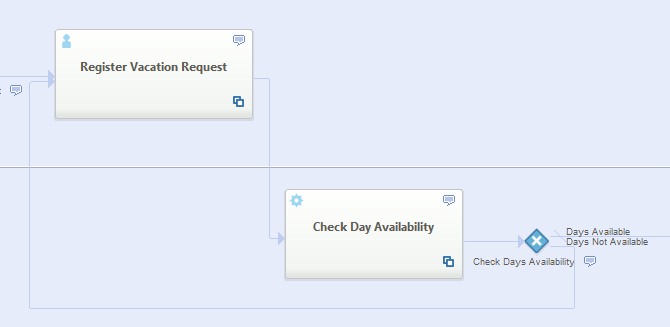
The "Check Days Availability" gateway evaluates the "Available" parameter. If the availability of days requested is confirmed, it will activate the "Approve Vacation Request" Task; otherwise, the next task will be the "Register Vacation Request" Task. Let’s configure the gateway and its outgoing sequence flows in order to define which path should be followed based on the parameter's value.
- Select the "Days Available" Sequence Flow connecting the "Check Days Availability" gateway with the "Approve Vacation Request" Task.
- Move to the Properties view and press the Edit button next to the Expression property
- In the opening dialog, press the Add button, and then define the expression to be fulfilled when the current sequence flow is followed.
- Finally, press the OK button to confirm.
- Repeat the same procedure for the "Days Not Available" Sequence Flow outgoing from the "Check Days Availability" gateway.


Define the “Approve Vacation Request” user task
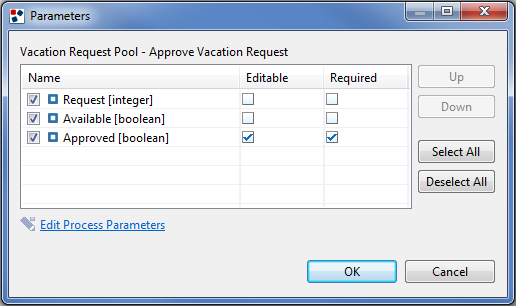
Once the business process checked that the requested days are available, the supervisor can decide whether to approve the vacation request or not. The supervisor has at his disposal the vacation request information to make his decision and fill in the "Approved" parameter. Let’s define the process parameters used by the task as shown in the following image.
Define the "Check Request Approval" exclusive gateway
Now, let’s add another exclusive gateway to evaluate the "Approved" parameter. Once the gateway has been placed, you need to define the available paths. If the vacation days are not approved the employee should be notified ("Inform Reject Reason" Task), otherwise the Human Resources Assistant must handle the vacation request ("Make Administrative Task"). The resulting model is shown in the following image.
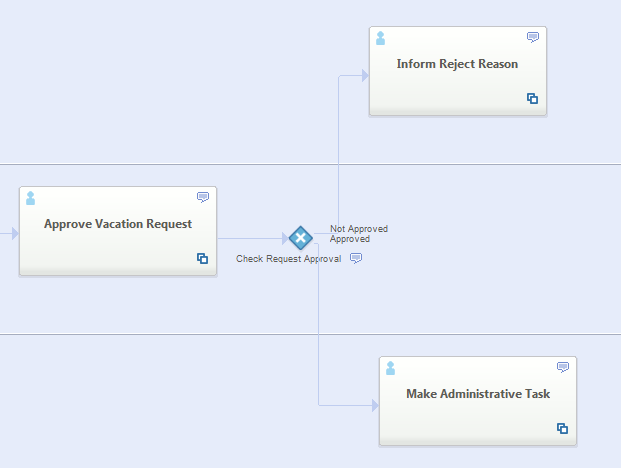
Let’s define the expression for each sequence flow starting from the "Check Request Approval" gateway.


Define the "Inform Reject Reason" user task
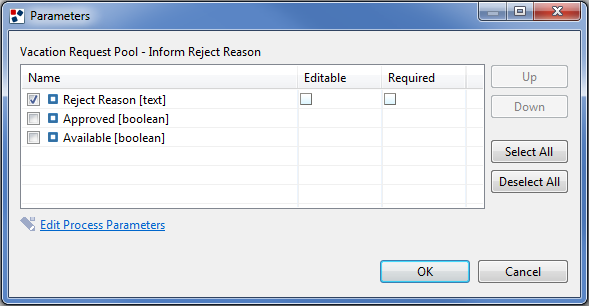
Let’s associate the "Inform Reject Reason" task with the corresponding process parameters. Refer to the image below for an example.
Define the "Make Administrative Task" user task
Let’s associate the "Make Administrative Task" task with the corresponding process parameters. Refer to the image below for an example.

Define the "Vacation Request End" end event
After the execution of the "Make Administrative Task" task, the process ends. For this reason, let’s add an End Event that states the end of the process:
- Click on the "Make Administrative Task" task.
- In the pie menu, select the End Event option.
- Release the new End Event in the "Human Resources Assistant" lane.
- Type a name for the event, such as "Vacation Request End".

The process ends also after the execution of the "Inform Reject Reason" task. Even in this case, you need to add a sequence flow connecting the task with the end event.
Add comments to the model
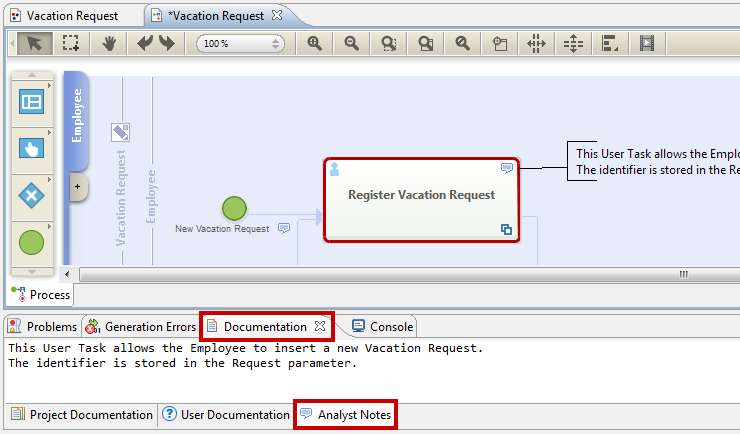
You can add comments on any model element to document the business process and make it easier to understand. The Vacation Request business process you can find on the WebRatio Add-on contains comments, as you can notice from the dedicated icon  placed on each element. You can add your own comments and notes during your project development phase simply by selecting the model element you chose and entering your notes in the Analyst Notes tab placed in the Documentation view.
Step 5: Generate the BPM Engine API
Once the business process is completely modeled, it’s time to generate it. The generation process lets you get the BPM engine implementing the business process. Move to the Project View and press the “Generate and Run on Cloud” button. The BPM engine publishes a Rest API that can be used by Web and Mobile applications to run the business processes. The API also includes a set of administrative methods that can be used only by the business process administrator to manage the processes. At the end of the generation process, you ill gain access a Web representation of the engine’s API, generated by Swagger. Using this Web interface, you can try the business process execution directly from your Web browser. To learn more, watch the Your First Business Process lesson.