Introduction
WebRatio Platform lets you define graphic containers for content shown to the user. These containers can be reused for many projects and applied to different type of content. This is possible thanks to the ability to create a dedicated resource containing the graphic container code. This resource is the Frame Layout Template. This article explains the basic structure of the template and the steps to create your own Frame Layout Template, and then it shows a working example.
The main usage of he Frame Layout Template is to wrap single View Component or a set of View Components placed inside a cell. There are many ways to render a frame, as shown by the images below.
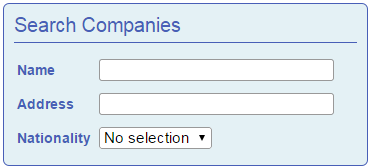
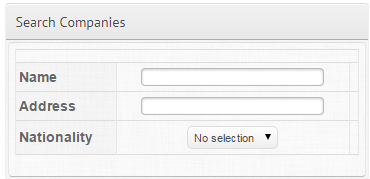
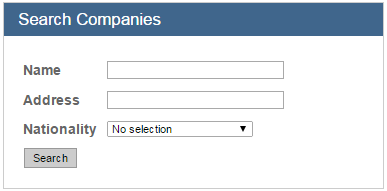
Let’s suppose you want to define a new Frame Layout Template to be applied by default to all elements of your Web Project. You can start from the "Basic" Frame Layout Template of the "WRDefault" style shown in the following image and then, make few adjustments:
- Change the background color of the section containing the label.
- Add the ability to show and hide the content of the frame by clicking on the label.
How to create a Frame Template
The prerequisite for creating a Frame Layout Template is having a Style Project in your workspace. If you do not have a Style Project, select the File > New > Style Project option from the main menu, give a meaningful name to the project and press the Finish button to complete the procedure.
Now, you need to create a new Frame Layout Template file.
- Select File > New> Layout Template option, from the main menu.
- Choose the Frame option in the dialog that opens and press the Next button.

- Choose a name for the new template (e.g., "FrameWithNameCompany") and select the target Style Project.
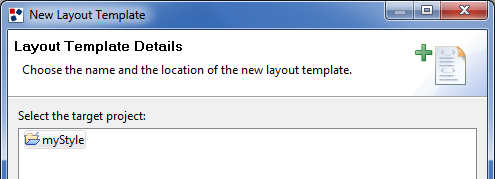
- Complete the wizard without changing any other property.
At the end of the procedure, the tool opens the Frame Layout Template source code in the work area. The template contains some predefined content.
- You can now write your own HTML code. The following code is what you need to create the proposed example.
#?delimiters [%, %], [%=, %]

[%setHTMLOutput()%]

<div class="frame">
  <div style="cursor: pointer; height: 55px; padding: 0; margin: 0; background-color: #40668C;" onclick="$(this).next().toggle();">
    <div class="frame-title" style="position: absolute; top: 15px; left: 15px; background-color:#1B7DDF;">
        <span><wr:Label context="element"/></span>
    </div>
  </div>
  <div class="frame-content">
      <wr:FrameContent/>
  </div>
</div>
- Save the file.
NOTE. Do not use the style attribute to define the graphics; however, you should create a CSS file containing it. Doing so will make the code more readable and easier to work with. In our example, for the sake of simplicity, you can leave the style attribute.
In the code there are some pieces of code that are not HTML. They are special tags used to retrieve specific information from the Web Project model element to which the template is applied and that are used at generation time to obtain the final JSP page. Those tags are explained in the next sections.
Now, let’s have a look at the code to understand its main structure.
-
Line 1. This line refers to the definition of the special tokens used to delimit the lines of Groovy code. The [% and %] delimiters are used to encapsulate Groovy scriptlets, and to realize conditionals, loops, and so on. The [%= and %] encapsulate Groovy expressions used to directly get the result of an operation or the value of a variable. They are mandatory.
-
Line 2. This line refers to the Groovy function used to declare that you want HTML code for the final output. This line is mandatory.
-
Line 4. In this line, the background color to apply to the section containing the label is specified using the style attribute as is the ability to show and hide the content of the frame by clicking on the label using the onclick attribute.
-
Lines 5-7. The <wr:Label> WebRatio Generation Tag is used to print the label of the element on which the Frame Layout Template is applied. The context attribute of the tag is set to "element", which is an implicit variable that refers to the element to which the template is applied.
-
Lines 9-11. The <wr:FrameContent/> WebRatio Generation Tag retrieves the content of a View Component or a Cell and prints it. It can only be used within a Frame Layout Template, where the dynamic content of the View Component (or Cell) can be placed. The exact size of the View Component content may be unknown at first, because it depends on the actual data displayed by the View Component. As a consequence, it is a good practice to design the frame to accommodate content of variable horizontal and vertical dimensions.
Let's apply the Frame Layout Template to an element of your Web Project to see how it looks. In the following image, you can see the template applied to a Form Component. Refer to the "Choose and Apply Style" online lesson to learn more about how to apply a template.
The first time, the form is displayed with the content open:
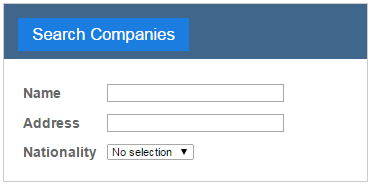
If you click on the title, the content is hidden:

Other examples
You can now see some more sophisticated examples of Frame Layout Template.
Example 1: Show an attribute value as the frame title
Let’s suppose you want to define a new Frame Layout Template showing the "company name" attribute of the Details Component as the frame title. The IFML model is the following:

Let’s create a new Frame Layout Template file (e.g., "FrameWithNameCompany") using the procedure explained in the "How to create a Frame Template" section.
The code could be something like the following:
#?delimiters [%, %], [%=, %]

[%setHTMLOutput()
  def companyName = element.selectSingleNode("layout:Attribute[@name='Name']")
%]

<div class="frame">
  <div class="frame-title">"<wr:Value context="companyName"/>"</div>
  <div class="frame-content">
    <table>
      <wr:Iterate var="attr" context="element" select="layout:Attribute">
        [% if (attr != companyName) { %]
          <tr>
            <th class="header"><wr:Label/></th>
            <td class="value"><wr:Value/></td>
          </tr>
        [% } %]
      </wr:Iterate>
    </table>
  </div>
</div>
- Line 4. This line refers to the variable that retrieves the "Name" attribute of the element in this case, the Details Component.
- Line 8. This line refers to the definition of the frame title.
- Lines 10-19. This piece of code lets you to print the name and value of each attribute and, avoid printing the company name again, which was already used in the frame title. The check is done at line 12.
If you apply the Frame Layout Template to the "Company Details" component and generate the Web Project, the result will look like as in the following image:

As you can see the attributes are wrongly shown twice. This happens because the default Component Layout Template of the Details Component contains the <wr:Frame> tag, that retrieves the code present in the Frame Layout Template and the standard code to print the attributes. The previously written Frame Layout Template contains already the code to show the attributes.
You can avoid this behavior, by creating a Component Layout Template that only prints the Frame Layout Tamplate.
- Select File > New > Layout Template option, from the main menu.
- Choose the Component option in the opening dialog and in the box below select the Details Component.
- Then press the Next button.
- Choose a name for the new template (e.g., "onlyFrameDetails") and select the target Style Project.
- Press the Finish button to complete the procedure.
The code could be something like the following:
#?delimiters [%, %], [%=, %]

[%setHTMLOutput()%]

<c:if test="${not(empty <wr:Id context="unit"/>) and (<wr:Id context="unit"/>.dataSize gt 0)}">
  <wr:Frame>
  </wr:Frame>
</c:if>
- Line 5. THis line refers to the code that test if the state object of the component is not empty.
- Lines 6-7. This piece of code refers to the WebRatio Generation tag that allows to retrieve and print the code present in the Frame Layout Template applied on the component.
Let's apply it to the "Company Details" component in the Component Layout property and generate the Web Project. Now the details information are correctly shown once:

Example 2: Show a button in the frame header
Another example consists of showing the edit button in the frame of the Details Component.

Let's create a new Frame Layout Template file (e.g., "FrameWithEditButton") using the procedure explained in the "How to create a Frame Template" section.
The code could be something like the following:
#?delimiters [%, %], [%=, %]

[%setHTMLOutput()
  def edit = element.selectSingleNode("layout:Link")
%]

<div class="frame">
  <div class="frame-title">
    <wr:Label context="element"/>
    <a title="Edit" id="<wr:Id context="edit"/>" href="<wr:URL context="edit"/>" style="margin-left:80px;">
      <img title="Edit" alt="Edit" src="myStyle/img/edit.png" border="0">
    </a>
  </div>
  <div class="frame-content">
    <wr:FrameContent/>
  </div>
</div>
- Line 4. This line refers to the variable that retrieves the first (and unique) flow of the element in this case, the Form Component.
- Lines 10-12. The "Edit" button is printed using the <a> HTML tag with the reference to the modeled Navigation Flow in the href attribute. The URL is generated thanks to the <wr:URL> WebRatio Generation Tag with the information from the Navigation Flow shown in the context attribute through a variable.
Let's apply it to the "Company Details" component and generate the Web Project to see how the Frame Layout Template looks. The result will look like what is shown in the following image:

Example 3: Show the company details and the related employees in a structured table
When the Frame Layout Template is applied to a Cell, this template is automatically applied to all elements inside it.
Suppose to have modeled a page like that seen in the following image:

The layout structure, shown in the following image, is organized by enclosing the "Company Info" details component and the "Related Employee" list component in a cell, that has been assigned a name (e.g., "Details") that specifies the section.

The goal of the custom Frame Layout Template is to show the company's details, information and employees, with a homogeneous structure:

Let's create a new Frame Layout Template file (e.g., "FrameCompanyDetailsSection") using the procedure explained in the "How to create a Frame Template" section.
The code can be something like the following:
#?delimiters [%, %], [%=, %]

[% setHTMLOutput() %]

<table style="margin-top:5px;border: 1px solid #cccccc" width="100%" border="0" class="details">
  <tr>
    <td valign="top" height="20" width="100%" class="detailsUnitTitle">
      <wr:Label context="element"/>
    </td>
  </tr>
  <tr height="100%">
    <td valign="top" width="100%"><wr:FrameContent/></td>
  </tr>
</table>
This code creates a table for each element (cell, details, and list) applying a specific CSS.
Let's apply the Frame Layout Template to the Cell to see how it looks:
- Select the Cell in the Layout View and move to the Layout Properties View.
- Set a title for the Label property (e.g., "Details").
- Assign the Print Frame option to the Cell Layout property.

Next, generate the Web Project.