Introduction

The Excel Style is a predefined style available in WebRatio Platform. This style allows to export the content of a modeled page in an Excel spreadsheet file. The generation process creates a JSP page containing XML code that is processed by a custom tag that invokes the Apache POI engine to render the Excel file. The resulting spreadsheet is a temporary file that is served to the user when he accesses the page.
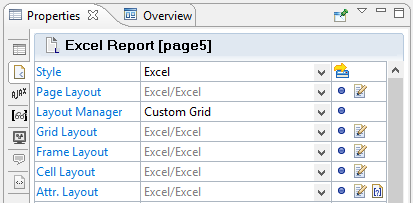
The Excel Style has been developed in order to facilitate the user its usage. For this reason, all the templates that are "standard" are set as default for the entire style. This allows the user to simply change the layout of the page in order to get an Excel spreadsheet, in the Layout tab of the Properties View in this way:
- Set the "Excel" style to the Style property.
- Set to the "Custom Grid" option to the Layout Manager property.
You can see the result of this operation looking at the following image.
How to use the Excel Style
Suppose you want to create an Excel spreadsheet starting from the "Acme" sample project. In particular you want to export the list of all the products, grouped by categories. First of all you have to model the page just as it was a normal Web page. Let's use a Hierarchy Component with one level to get the information in the desired way. The resulting modeled page is shown below.

Transform this page into an Excel file, selecting the Layout tab in the Properties View, set the "Excel" option to the Style property and set the "Custom Grid" option to the Layout Manager property. Then generate the project. You can see the result downloading the "Report Example" attachment.
Other examples
You can also use many components to fill the Excel file with content. The Excel Style supports Details Component, Multiple Details Component and Hierarchy Component.
Example 1: Use the Multiple Details Component
Suppose you want to add the store list. Just place a Multiple Details Compoent in the page based on the "Store" entity and generate the project. You can see the result in the "Report Example With Many Components" attachment.
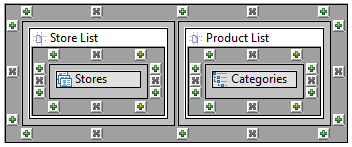
NOTE. The tool takes into account the position in which you place the components in the Grid. This means that, considering the following image, the store list will be placed on the right respect to the product list.


It is also possible to customize a bit the Excel spreadsheet layout. Let's see which are the options you have at your disposal:
- Page Template
- Format. It defines the result file format. The possible values are XLS (default) and XLSX.
- Block Padding. It permits to define a gap of cells between the components placed into the sheet. The default value is 1. The gap is both vertical and horizontal.
- Frame Template. By default, the Excel frame is associated to each components placed into the page. This allows you to set the following parameters:
- Show Title. It defines the rendition of the Block title (component or cell). The default value is "true".
- Title Font Weight. It defines the Block title (component or cell) font weight. The possible values are normal and bold (default).
- Title Background. It defines the Block title (component or cell) background color.
- Title Color. It defines the Block title (component or cell) text color.
- Title Borders. It defines the Block title (component or cell) borders to render The value is a space separated combination of the following keywords: top, left, right, bottom.
- Title Borders Style. It defines the Block title (component or cell) borders style. The possible values are THIN, MEDIUM, DOUBLE, DASHED.
- Title Border Color. It defines the Block title (component or cell) borders color.
- Component Template. All the default component templates have the same Layout Parameters that are the following:
- Show Header. It defines the rendition of the component header. The default value is "true".
- Header Font Weight. It defines the header font weight. The possible values are normal and bold (default).
- Header Background. It defines the header background color.
- Header Color. It defines the header text color.
- Header Borders. It defines the header borders to render The value is a space separated combination of the following keywords: top, left, right, bottom.
- Header Borders Style. It defines the header borders style. The possible values are THIN, MEDIUM, DOUBLE, DASHED.
- Header Border Color. It defines the header borders color.
- Show Break Line. It defines if the break lines between rows must be shown or not.
- First Row. It defines the block first row.
- First Column. It defines the block first column code or number.
- Attribute Template. The default attribute template has the following Layout Parameters that allows to give a style to each cell of the Excel file:
- Cell Font Weight. It defines the cell font weight. The possible values are normal and bold (default).
- Cell Background. It defines the cell background color.
- Text Color. It defines the cell text color.
- Cell Borders. It defines the cell borders to render. The value is a space separated combination of the following keywords: top, left, right, bottom.
- Cell Borders Style. It defines the cell borders style. The possible values are THIN, MEDIUM, DOUBLE, DASHED.
- Cell Border Color. It defines the cell borders color.
- Data Format. It specifies the data format used to present data in the cell. If not set the format used is the one specified in the Localization panel for the Data Patterns.
- Wrap Text. It defines whether the text should be wrapped within the cell.
- Line Width. It defines the cell maximum line width in characters for string and text attributes.
- Image Scale. It defines the amount by which image dimensions are multiplied relative to the original size.
- Image Overlay. It indicates whether the image must overlay the cells.
Example 2: Create different sheets in the same file
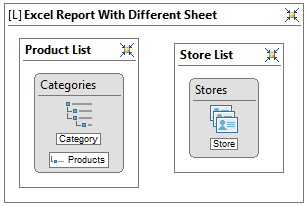
You can create different sheets in the same Excel file. This is done using subpages. Each subpage is a sheet and the subpage name represents the sheet name. As an example you can split the two list in different sheet modeling the page like the following.
NOTE. All the components must be placed in the subpages and not outside them, otherwise their content will be skipped.
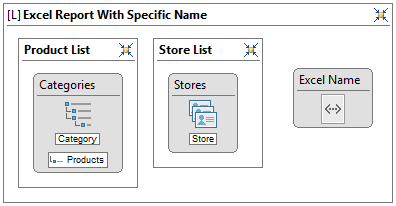
Example 3: set a specific name for the file
Finally you can set a specific name for the Excel file, which is different from the name of the modeled page. You have to use the "Excel File Name" custom location of the Excel page template to do this and place a Script Component in this location.
The Script Component should have a Groovy script like the following:
return "CUSTOM EXCEL NAME"

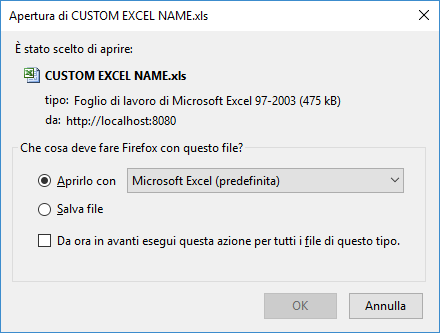
The result is that the dialog asking to save the Excel file will propose as name "CUSTOM EXCEL NAME".
How to create a custom template
The Excel Style has the goal to produce some XML code in the JSP page. This XML code is processed by Apache POI in order to get the resulting Excel file. If you want to create custom templates to improve this style you have to know the structure of this XML. This is a sample of the XML code.
 <Excel blockPadding="1">
   <FileName>foobar.xls</FileName>
   <Sheet name="Sheet 1">
     <Block position="0_0">
       <Title style="font-weight:bold">Product</Title>
       <Header>
          <Cell>name</Cell>
       </Header>
       <Row>
         <Cell id="att2" type="string" style="font-weight:bold">Wilderness</Cell>
       </Row>
     </Block>
   </Sheet>
 </Excel>
Suppose that you want to include in the Excel spreadsheet custom messages using the Message Component. This is not possible right now since the Excel Style does not manage this type of component. Let's see how to write a custom template to do this. First of all have a look to the previous XML code. The new template has to produce only a part of it. In particolar, this is the portion of the code to consider:
 <Block position="0_0">
   <Title style="font-weight:bold">Product</Title>
     <Header>
       <Cell>name</Cell>
     </Header>
     <Row>
       <Cell id="att2" type="string"  style="font-weight:bold">Wilderness</Cell>
     </Row>
 </Block>
The Message Component allows to print different messages, but each message does not have an "header". So you just ignore that part. The template has to produce a <Row> element and a <Cell> element for each element. You can start creating the Excel template for the Message Component copying the "Localized" layout template of the WRDefault style.
#?delimiters [%, %], [%=, %]

[% setXMLOutput() %]


<Block position="[%= blockPosition%]">
  <c:if test="${not(empty <wr:Id context="unit"/>) and (<wr:Id context="unit"/>.dataSize gt 0)}">
    <wr:Frame>
      <c:forEach var="current" varStatus="status" items="${<wr:Id context="unit"/>.data}">
        <c:set var="index" value="${status.index}"/>
        <Row>
          <Cell><bean:message key="${current}"/></Cell>
        </Row>
      </c:forEach>
    </wr:Frame>
  </c:if>
</Block>
Possible Enhancement
The previous code works perfectly but does not allow you to give a particular style to the message's cells. You can have this chance by adding a "style" attribute to the <Cell> element. The value of this attribute will be taken from different Layout Parameters. Just to make an example, let's add the possibility to set the font weight of the messages.
#?delimiters [%, %], [%=, %]

<wr:LayoutParameter label="Cell Font Weight" name="cellfont-weight" type="enum" values="normal|bold" default="normal">
  Defines the rendering of a cell.
  Allowed values are:
  - normal (default)
  - bold
</wr:LayoutParameter>

[%
  setXMLOutput()
  def fontWeight = params["cellfont-weight"]
%]

<Block position="[%= blockPosition%]">
  <c:if test="${not(empty <wr:Id context="unit"/>) and (<wr:Id context="unit"/>.dataSize gt 0)}">
    <wr:Frame>
      <c:forEach var="current" varStatus="status" items="$<wr:Id context="unit"/>.data}">
        <c:set var="index" value="${status.index}"/>
        <Row>
          <Cell style="font-weight:[%= fontWeight %]"><bean:message key="${current}"/></Cell>
        </Row>
      </c:forEach>
     </wr:Frame>
  </c:if>
</Block>
NOTE. There are limitations to the value that the "style" attribute supports. All the things that you can do are implemented in the standard template of the Excel Style. Refer to the previous section to get a list of the possible values. You can see the complete list and documentation of the available style attributes in the WebRatio Product Documentation (Help > WebRatio Product Documentation > Web Modeling User Guide > Reference > Default Style Reference > Excel).
Moreover it is possible to associate to a cell a particular "type" to have the Excel cell match that type. You have to add to the <Cell> element the "type" attribute. Let's see how to change the template.
#?delimiters [%, %], [%=, %]

<wr:LayoutParameter label="Cell Font Weight" name="cellfont-weight" type="enum" values="normal|bold" default="normal">
  Defines the rendering of a cell.
  Allowed values are:
  - normal (default)
  - bold
</wr:LayoutParameter>

[%
  setXMLOutput()
  def fontWeight = params["cellfont-weight"]
%]

<Block position="[%= blockPosition%]">
  <c:if test="${not(empty <wr:Id context="unit"/>) and (<wr:Id context="unit"/>.dataSize gt 0)}">
    <wr:Frame>
      <c:forEach var="current" varStatus="status" items="${<wr:Id context="unit"/>.data}">
        <c:set var="index" value="${status.index}"/>
        <Row>
          <Cell type="string" style="font-weight:[%= fontWeight %]"><bean:message key="${current}"/></Cell>
        </Row>
      </c:forEach>
     </wr:Frame>
  </c:if>
</Block>
Using Formulas
It's possible to create a cell of type formula in a custom template. You just have to create a code fragment like the following:
<Cell type="formula">=(A1 + B2)/B3</Cell>
where (A1 + B2)/B3 is the Excel formula.
As you can see you have to know the cell codes necessary to retrieve the cells involved in the formula.
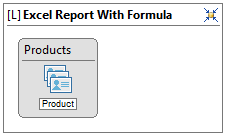
Suppose you want to create an Excel file showing the Acme product list with a column specifing the price of the product with the 20% of discount. You can model a page like the following image, in which the Multiple Details Component shows all the Product information.
Then you have to write a custom Excel template for the Multiple Details Component, to add another column with the discounted price. This is the resulting template:
[%
  import org.apache.commons.lang.StringUtils
  setXMLOutput()
  def writeStyle(params, prefix){
    def style = params.entrySet().findAll{it.key.startsWith(prefix) && !StringUtils.isBlank(it.value)}.collect{StringUtils.uncapitalize(it.key - prefix) + ":" + it.value}.join(";")
    if(!StringUtils.isBlank(style)){%] style="[%= style%]"[%}
  }
  def writeLocation(params){
    if(!StringUtils.isBlank(params["firstRow"])){%] firstRow="[%= params["firstRow"]%]"[%}
    if(!StringUtils.isBlank(params["firstColumn"])){%] firstColumn="[%= params["firstColumn"]%]"[%}
  }
%]

<Block position="[%= blockPosition%]"[%writeLocation(params)%]>
  <c:if test="${not(empty <wr:Id context="unit"/>) and (<wr:Id context="unit"/>.dataSize gt 0)}">
    <wr:Frame>
      [% if("true" == params["showHeader"]){%]
        <Header[%writeStyle(params, "header")%]>
          <wr:Iterate var="attr" context="unit" select="layout:Attribute">
            <wr:Visible>
              <Cell><wr:Label/></Cell>
            </wr:Visible>
          </wr:Iterate>

          <Cell>Discount</Cell>
          <Cell>Price with 20% discount</Cell>
        </Header>
      [%}%]
      <c:forEach var="current" varStatus="status" items="${<wr:Id context="unit"/>.data}">
        <c:set var="index" value="${status.index}"/>
        <Row>
          <wr:Iterate var="attr" context="unit" select="layout:Attribute">
            <wr:Visible position="'index'">
              <wr:Value/>
            </wr:Visible>
          </wr:Iterate>

          <c:set var="index_cell" value="${index + 3}"/>
          <Cell type="formula">=(B${index_cell} * 20)/100</Cell>
          <Cell type="formula">=(B${index_cell} - C${index_cell})</Cell>

        </Row>
      </c:forEach>
    </wr:Frame>
  </c:if>
</Block>
- Lines 25-26. Two columns are created: one to show the discount of its product and one that shows the discounted price.
- Line 38. This is a variable that calculates the cell index depending on the row that you are writing to create the discount calculation formula (suppose it must start from cell B3).
- Line 39. This is a cell that calculates the discount (e.g. formula: =(B3*20)/100 ).
- Line 40.This is a cell that calculates the final discounted price (e.g. formula: =(B3-C3) ).
Commons Problems
Empty Excel File
One of the most common problems when you are working with the Excel Style is to get an empty Excel file at runtime.
This problem can be related to different reasons:
- The Content Components in the Excel page do not have content. You can verify this, just change the style of the page from the "Excel" to the "WRDefault" and check if the problem persists. If so, then you have to debug the Web application in order to understand why the components are not working as expected.
- The generated JSP page contains HTML code. You can check this point, right-click on the modeled page and choose the Open Generated Code > Layout Page command. The JSP page has to contain only XML code.
You can solve this problem:
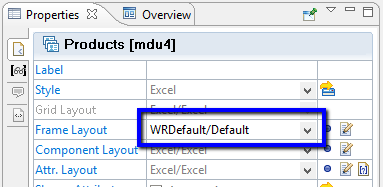
- Check if there is an element in the Grid that has a Frame Layout associated which is different from the default "Excel/Excel" one. If this Frame Layout prints HTML code, change it to a valid one.
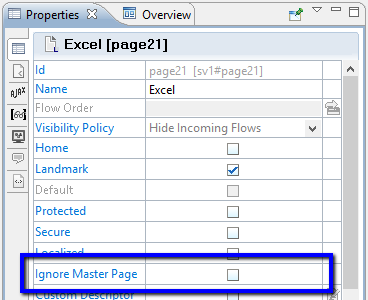
- Check if the page has a Master Page associated. If so, the HTML code belongs to the Master Page. Solve the problem, flagging the Ignore Master Page property in the Properties View of the page.
